Intermatic Mechanical Timer Replace - Troubleshooting / Sprinklers & Irrigation - Rachio Community
Home | Support | Status Page
Intermatic Mechanical Timer Replace
Troubleshooting Sprinklers & Irrigation
You have selected 0 posts.
6.5k views 33 likes 27 links
58](https://community.rachio.com/u/iamdago "iamdago")
42](https://community.rachio.com/u/Gene "Gene")
read 15 min
Top replies
1 / 103
Jun 2020
post by iamdago on Jun 12, 2020
1
I know there are similar posts about this exact question. I looked over them and my Mechanical Timer looks different. I asked some guy “Gene” here for help but he just ignored me so I thought i’d make a post.
I have 2 Zones. Let me know if you need pictures of anything or have any questions. I’m not sure if its allowed but I am open to options of another smart system.
I want to upgrade this to Raicho 3. Im assuming based on the cover of the box that my system is a 220-240V. My water is well water. I want to get down to what I need to buy and get done, so I have everything before I do it.
\ IMG_20484032×2268 2.51 MB](https://community.rachio.com/uploads/db1097/original/2X/b/bcdc5a6d314f5c96a53e26822ddf5136518e0922.jpeg "IMG_2048")
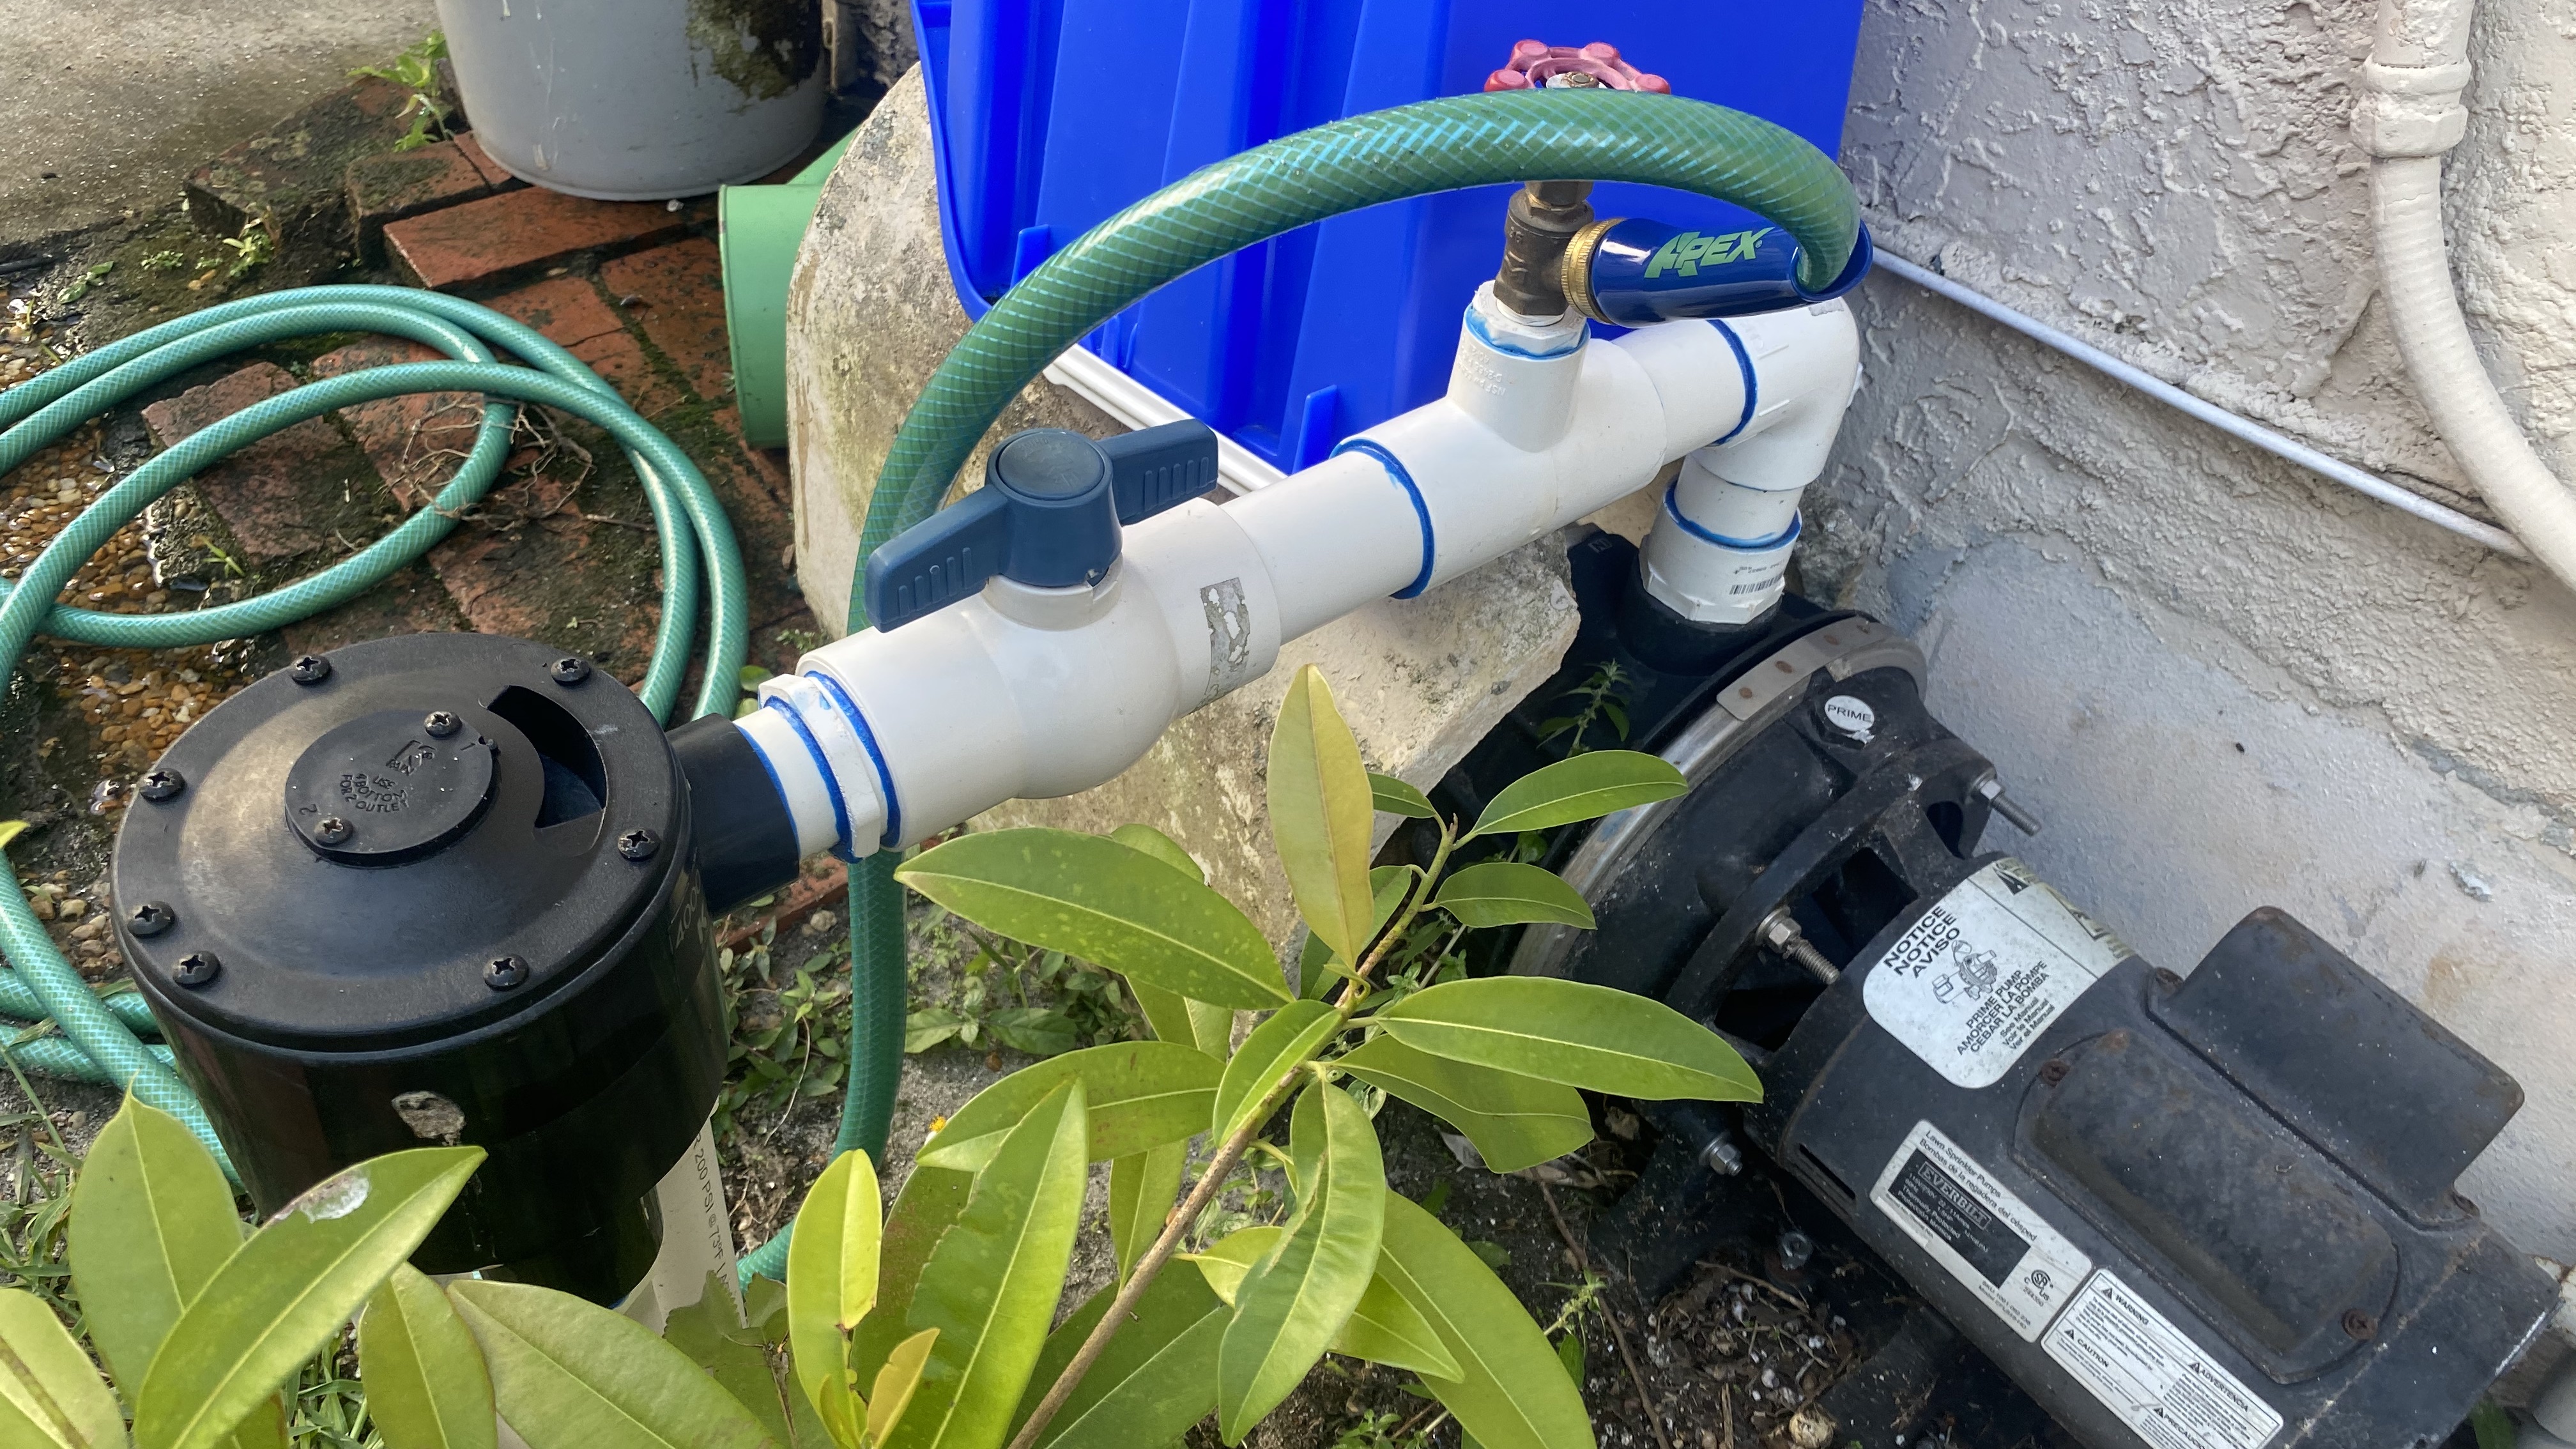
\ IMG_20474032×2268 2.27 MB](https://community.rachio.com/uploads/db1097/original/2X/d/df58b5cf580a00d41dc0a351b46ef70cd594d6a5.jpeg "IMG_2047")
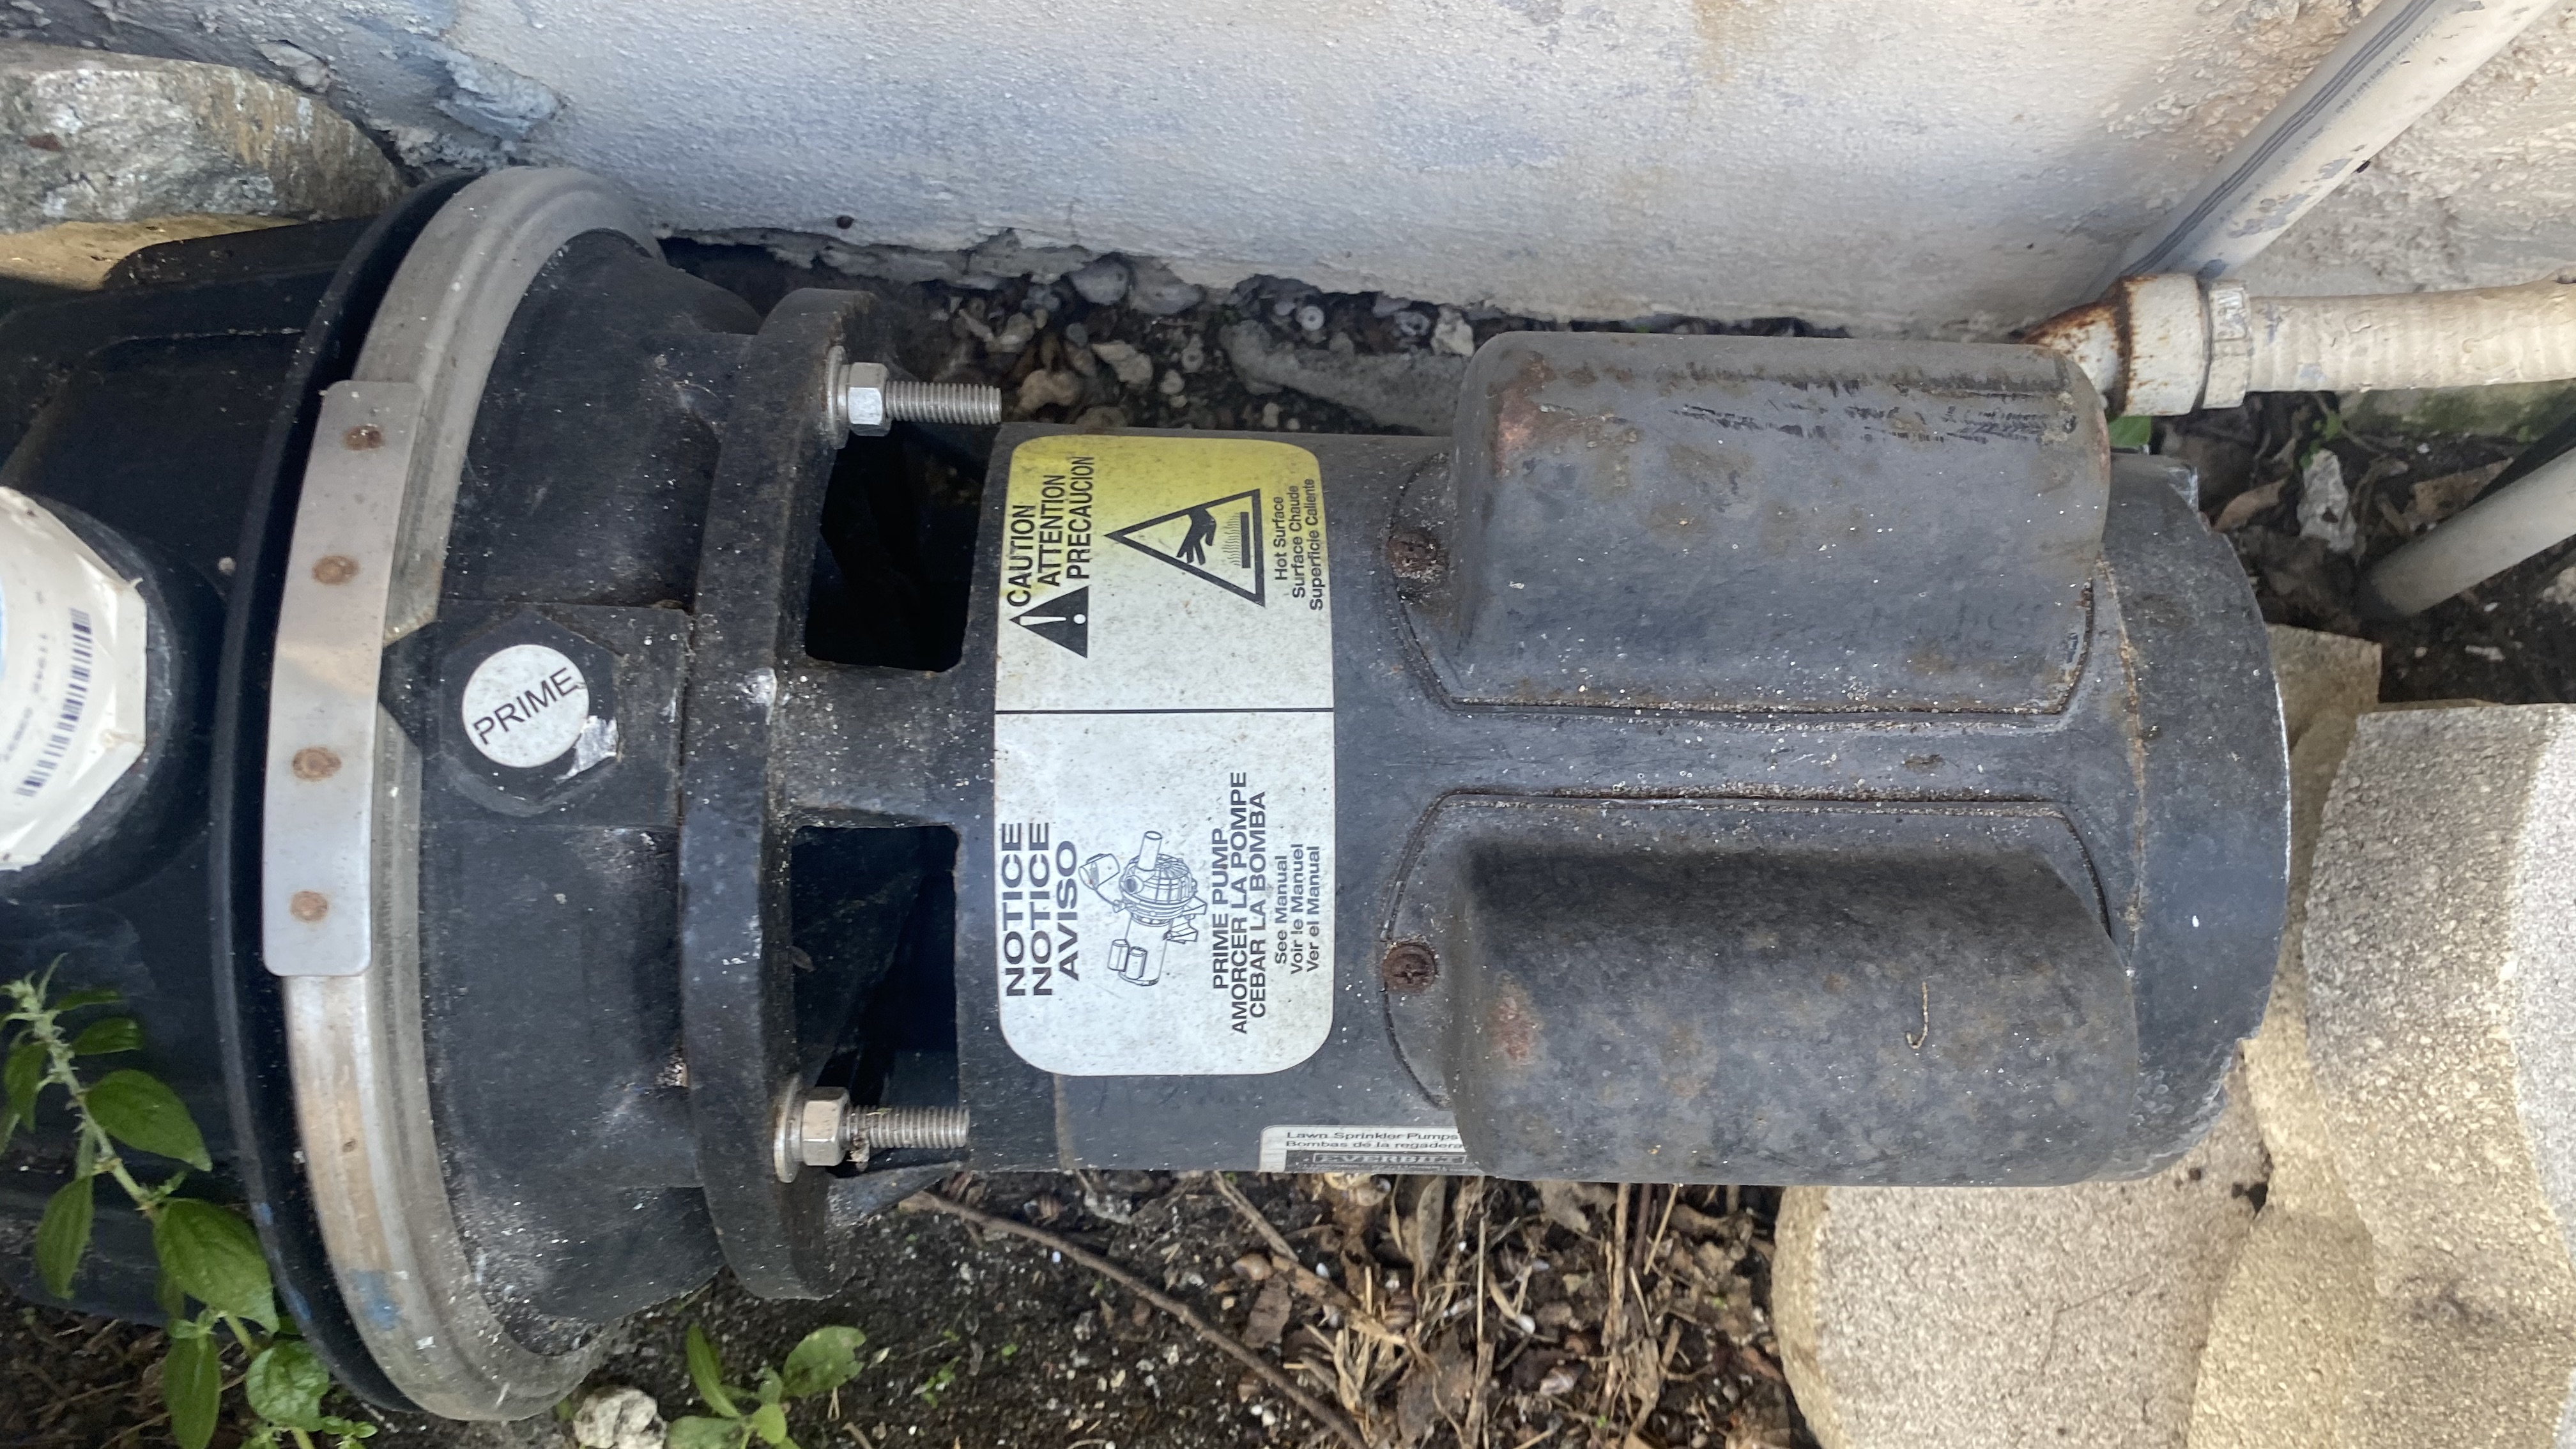
\ IMG_20464032×2268 2.66 MB](https://community.rachio.com/uploads/db1097/original/2X/0/09e9f1a193922c5641ce76af957b74e73038c801.jpeg "IMG_2046")
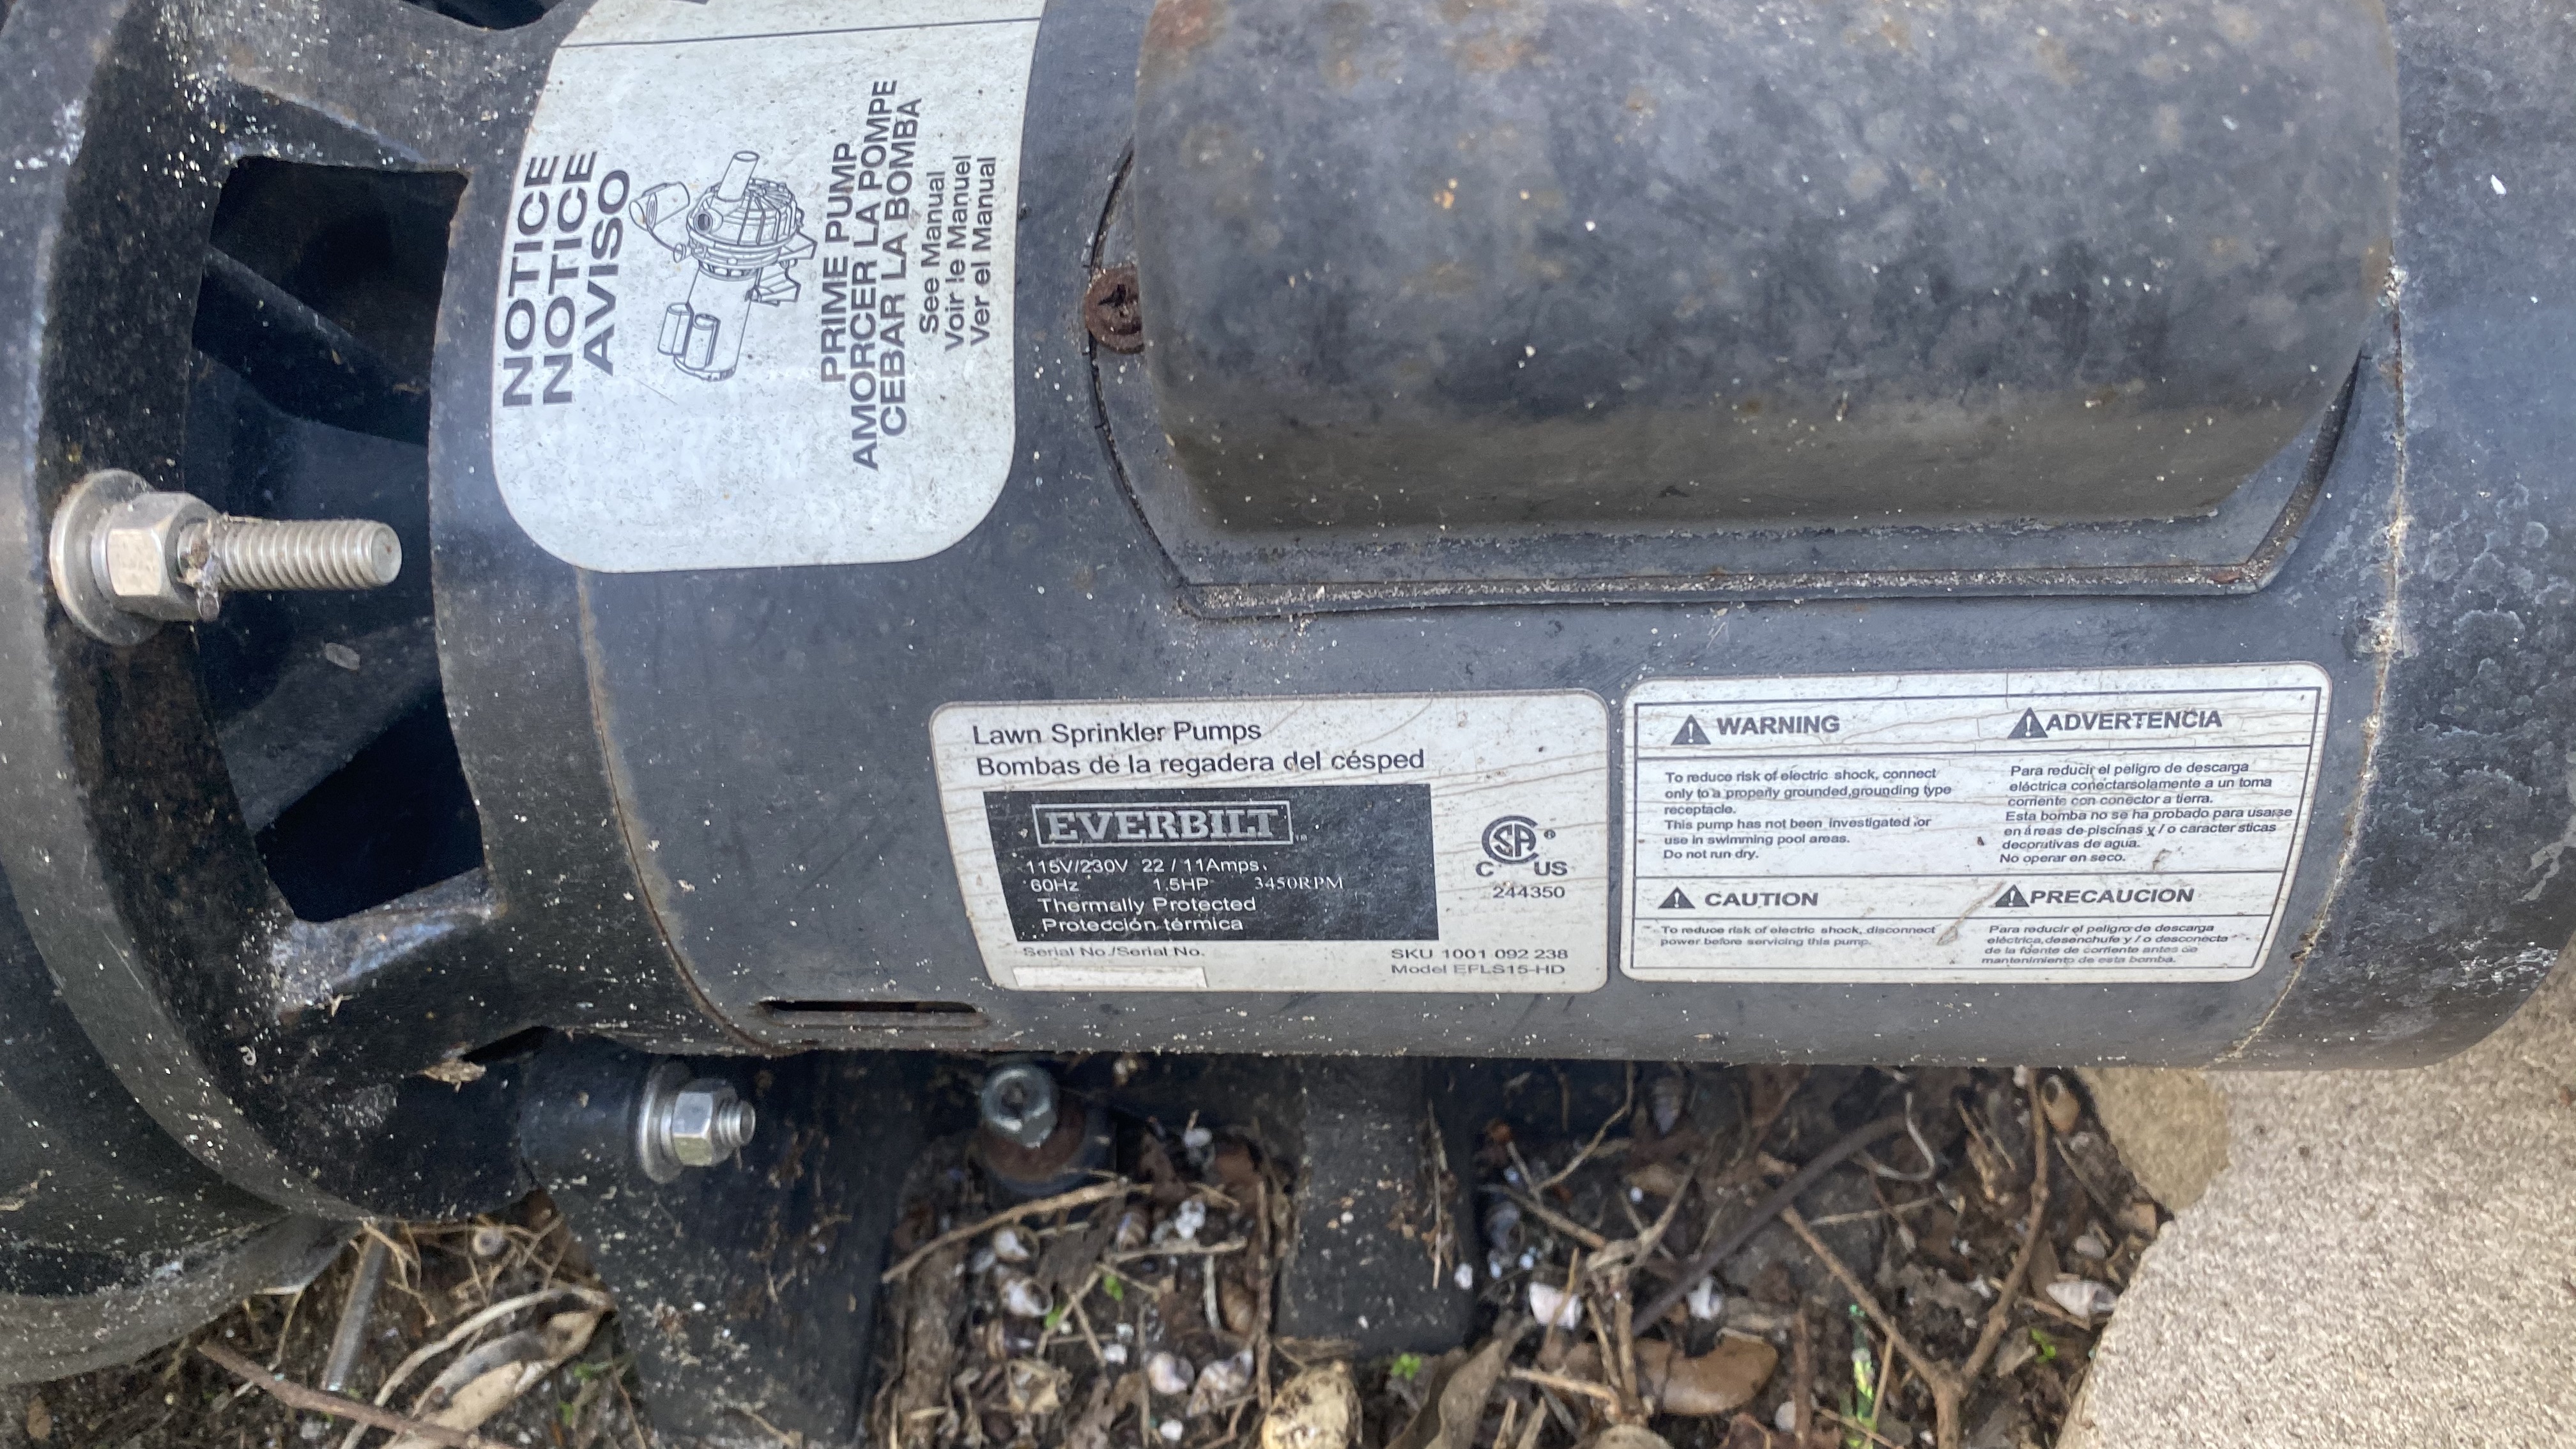
\ IMG_20452268×4032 2.07 MB](https://community.rachio.com/uploads/db1097/original/2X/d/dcad5edfd507e119cdd8d1886555b9b6e3b1fe42.jpeg "IMG_2045")
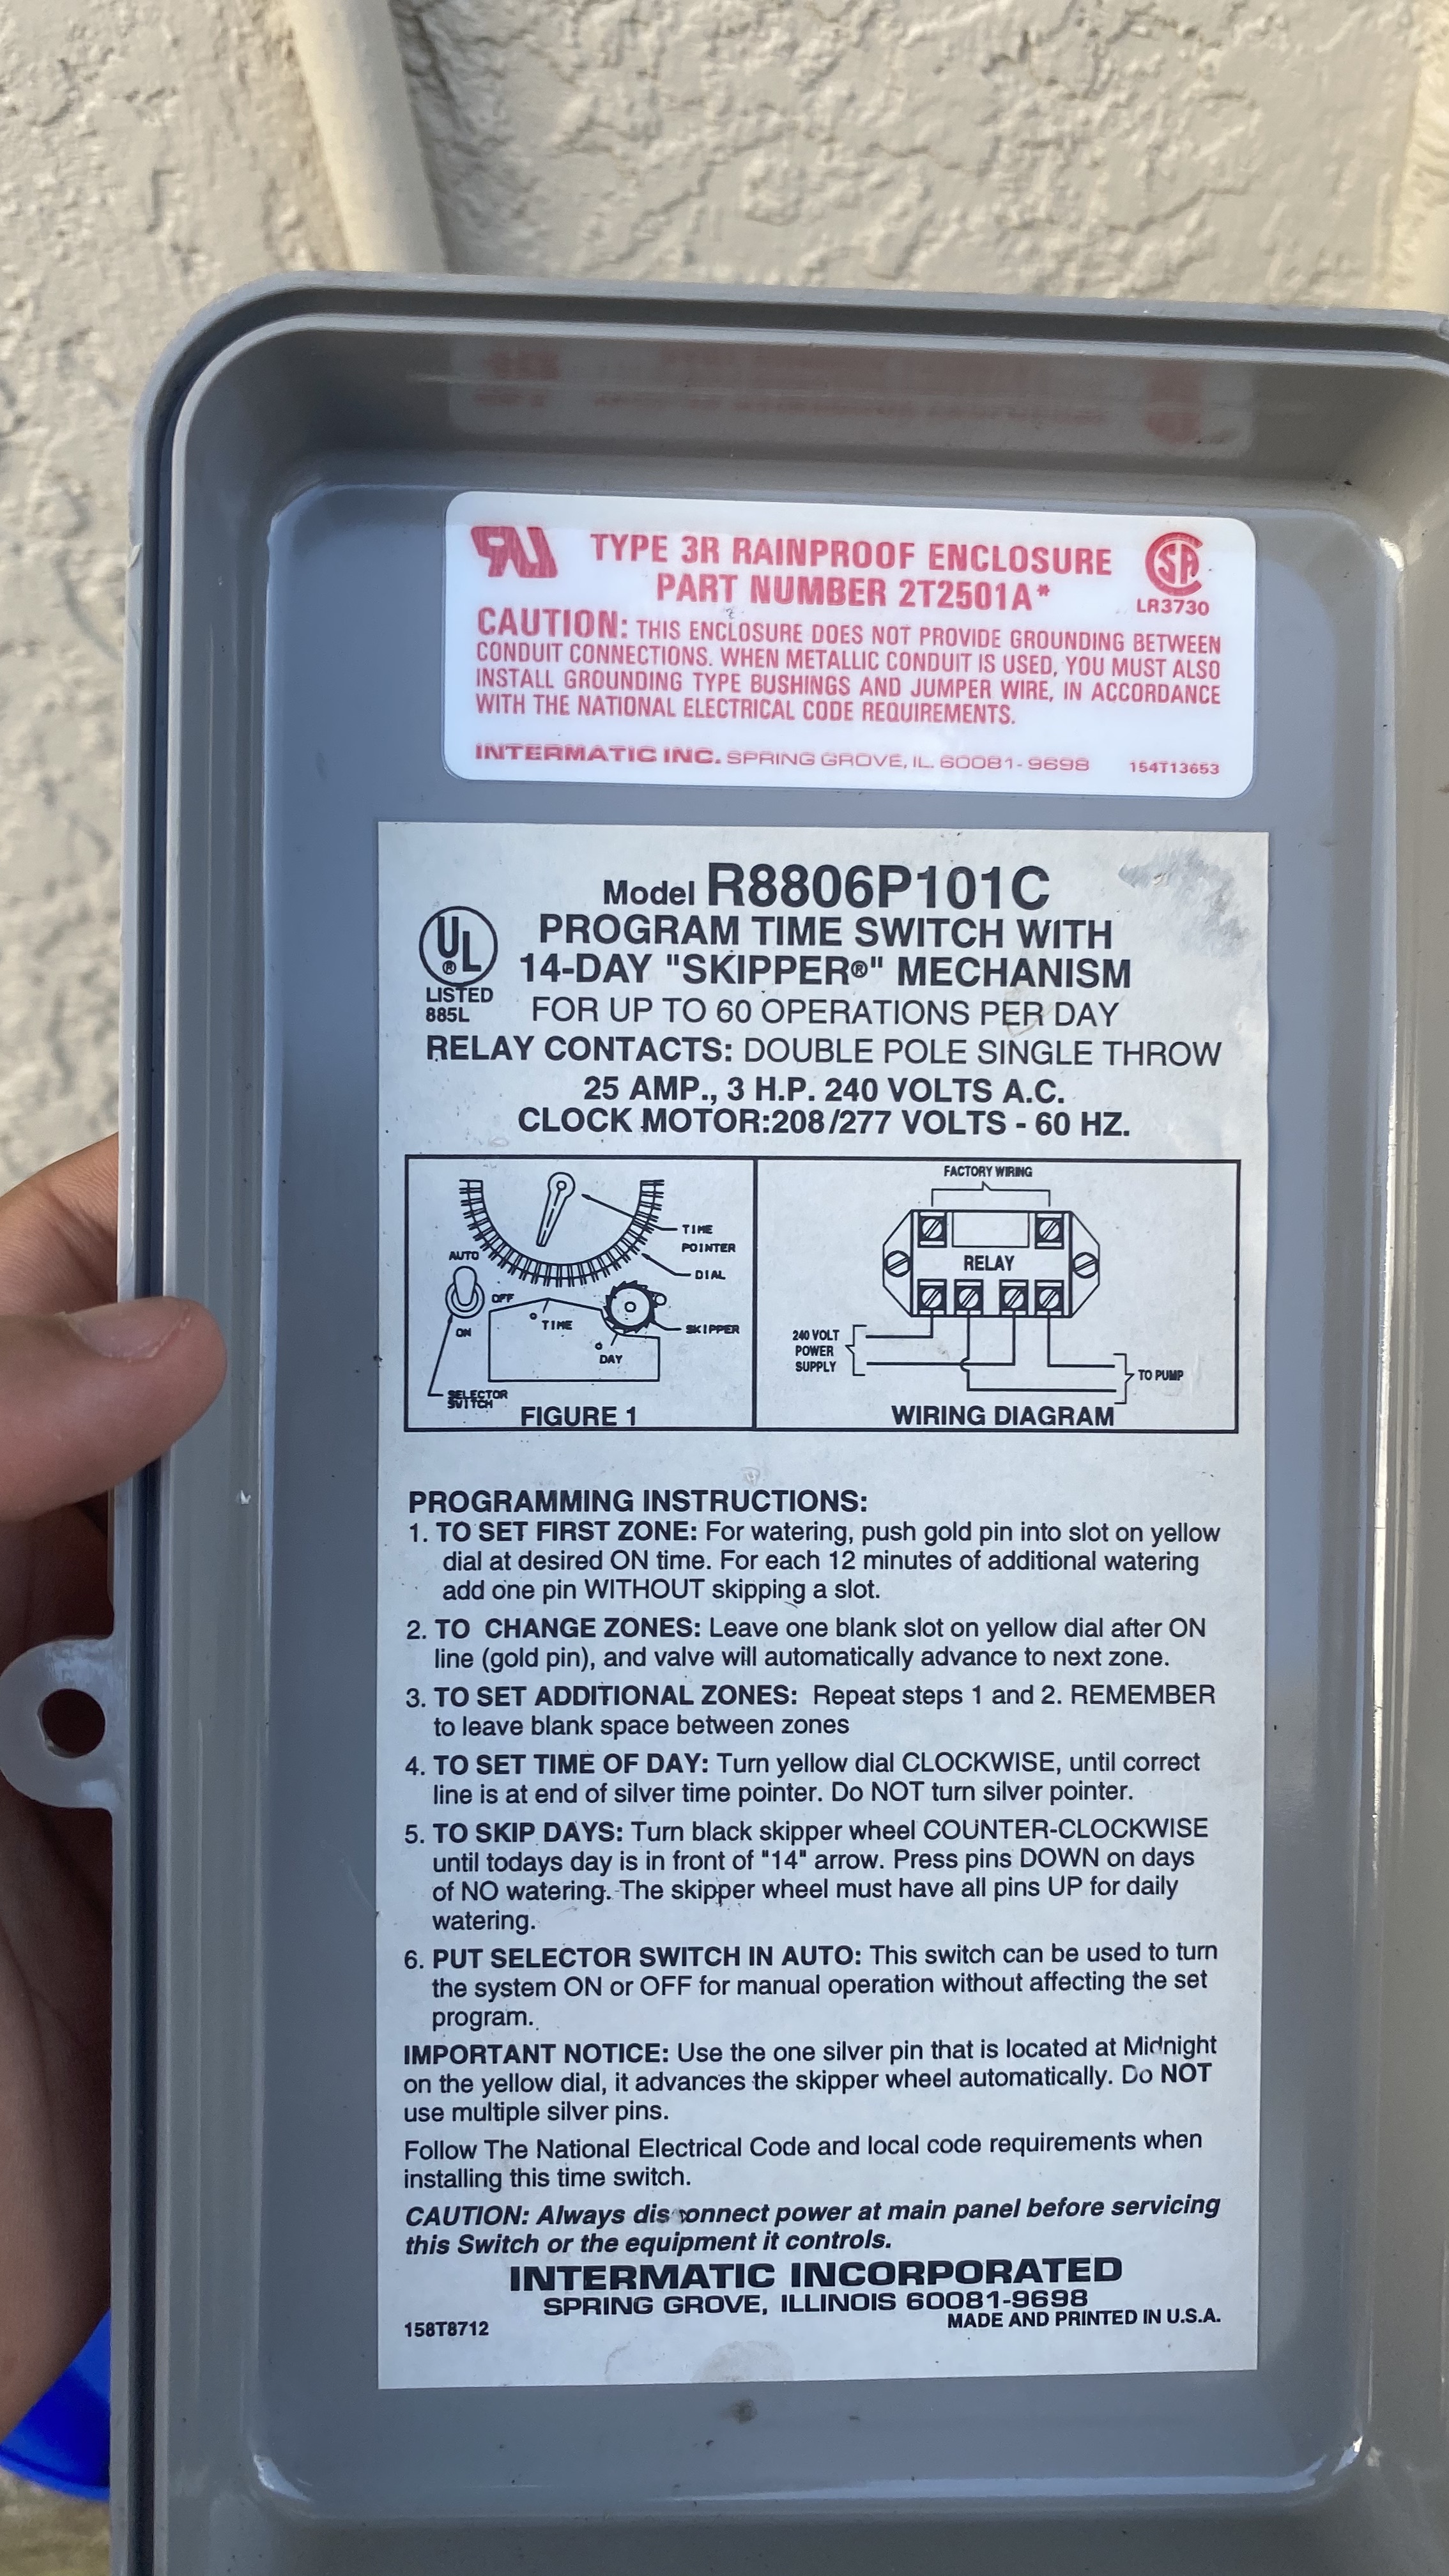
\ IMG_20442268×4032 2.17 MB](https://community.rachio.com/uploads/db1097/original/2X/5/55616220075f456dcd7c72343ed53a11ad7a6de8.jpeg "IMG_2044")

\ IMG_20432268×4032 2.1 MB](https://community.rachio.com/uploads/db1097/original/2X/1/10172a4858e75bef1d92627876aca86f984c2b91.jpeg "IMG_2043")
6.5k views 33 likes 27 links
58](https://community.rachio.com/u/iamdago "iamdago")
42](https://community.rachio.com/u/Gene "Gene")
read 15 min
Top replies
post by beardedpacket on Jun 13, 2020
If you don’t know what you’re doing, hire a pro.
PRO FINDER:
https://pro-tools.rachio.com/?_ga=2.132673934.1295053688.1592019817-93199847.1588108811
post by iamdago on Jun 13, 2020
Thanks for the reply. I was under the conclusion that I would get help, since there has been two similar post to mine and they received help.
post by iamdago on Jun 18, 2020
Bump… I would like some help please.
post by DLane on Jun 18, 2020
@iamdago - sorry I missed your original post, it is a volunteer community. I know Gene has been busy with good situation personally.
Here is what I think you’ll need:
- Rachio external enclosure
- Rachio (3e or 3 will work)
- Pump start relay for the size pump you have. Make sure it is a low power (on the relay activation) so it won’t pull too much current when switching on. Orbit has one. Should be available at Home Depot or Lowe’s. I think this is the one, didn’t have time to double check the switching draw -> https://www.homedepot.com/p/1-2-HP-Pump-Start-Relay-57009/100181554
- A two maniofold valve system to replace the indexing valve setup. Orbit available at Home Depot or Lowe’s. https://www.homedepot.com/p/Orbit-2-Valve-Inline-Manifold-Assembly-57250/202206756
- Waterproof wire nuts/connectors https://www.homedepot.com/p/DryConn-Aqua-Orange-Waterproof-Wire-Connectors-4-Pack-62104/202889869
- Enough field wire to run from the Rachio to the above manifold with at least three wires (common and two zones). https://www.homedepot.com/p/Southwire-By-the-Foot-18-4-Black-Solid-UL-Sprinkler-System-Wire-49276999/204724986
- Some 120 VAC rated wire and conduit to wire in the Rachio external enclosure.
- PVC pipe to connect to manifold and manifold connections.
- PVC glue
- In ground rectangular valve box for manifold.
I would have access to a volt/ohm meter for testing, too.
Standard caveats apply and YMMV.
12 days later
post by iamdago on Jul 1, 2020
2
Thank you for the reply. Not sure why I didn’t get a notification someone replied. Was talking to someone who does this for living. He was recommending not to use manifold and use slip on, like Hunter 24V Inline and have them separate (thoughts?).
As for the valve box? What size, there seem to be many or how can I tell what size. I would be using a 2 Line Manifold.
https://www.amazon.com/gp/product/B000I19I5E/ref=ox_sc_act_title_3?smid=A1V6UCH5WP7W10&psc=1
That relay good?
post by Gene on Jul 2, 2020
3
Hi @iamdago, how did you try to get in touch with me? Did not mean to ignore you, but as @DLane has mentioned, I do not have time to read every new post lately. Be sure to include “@” in front of whoever you wish to see your post, @Gene for example, otherwise it will not be very visible for them.
I recommend Rachio 2 or 3, as “e” version is missing flex daily schedule which is personally my favorite.
You are free to explore other controllers, but few will be able to comment about any particular system outside of what we are familiar with.
Start relay you’ve linked to will work, looks to be the same version as sold via homedepot / lowes, but with unrelated photos in the listing. Be sure to check other sellers, if you prefer to use prime shipping.
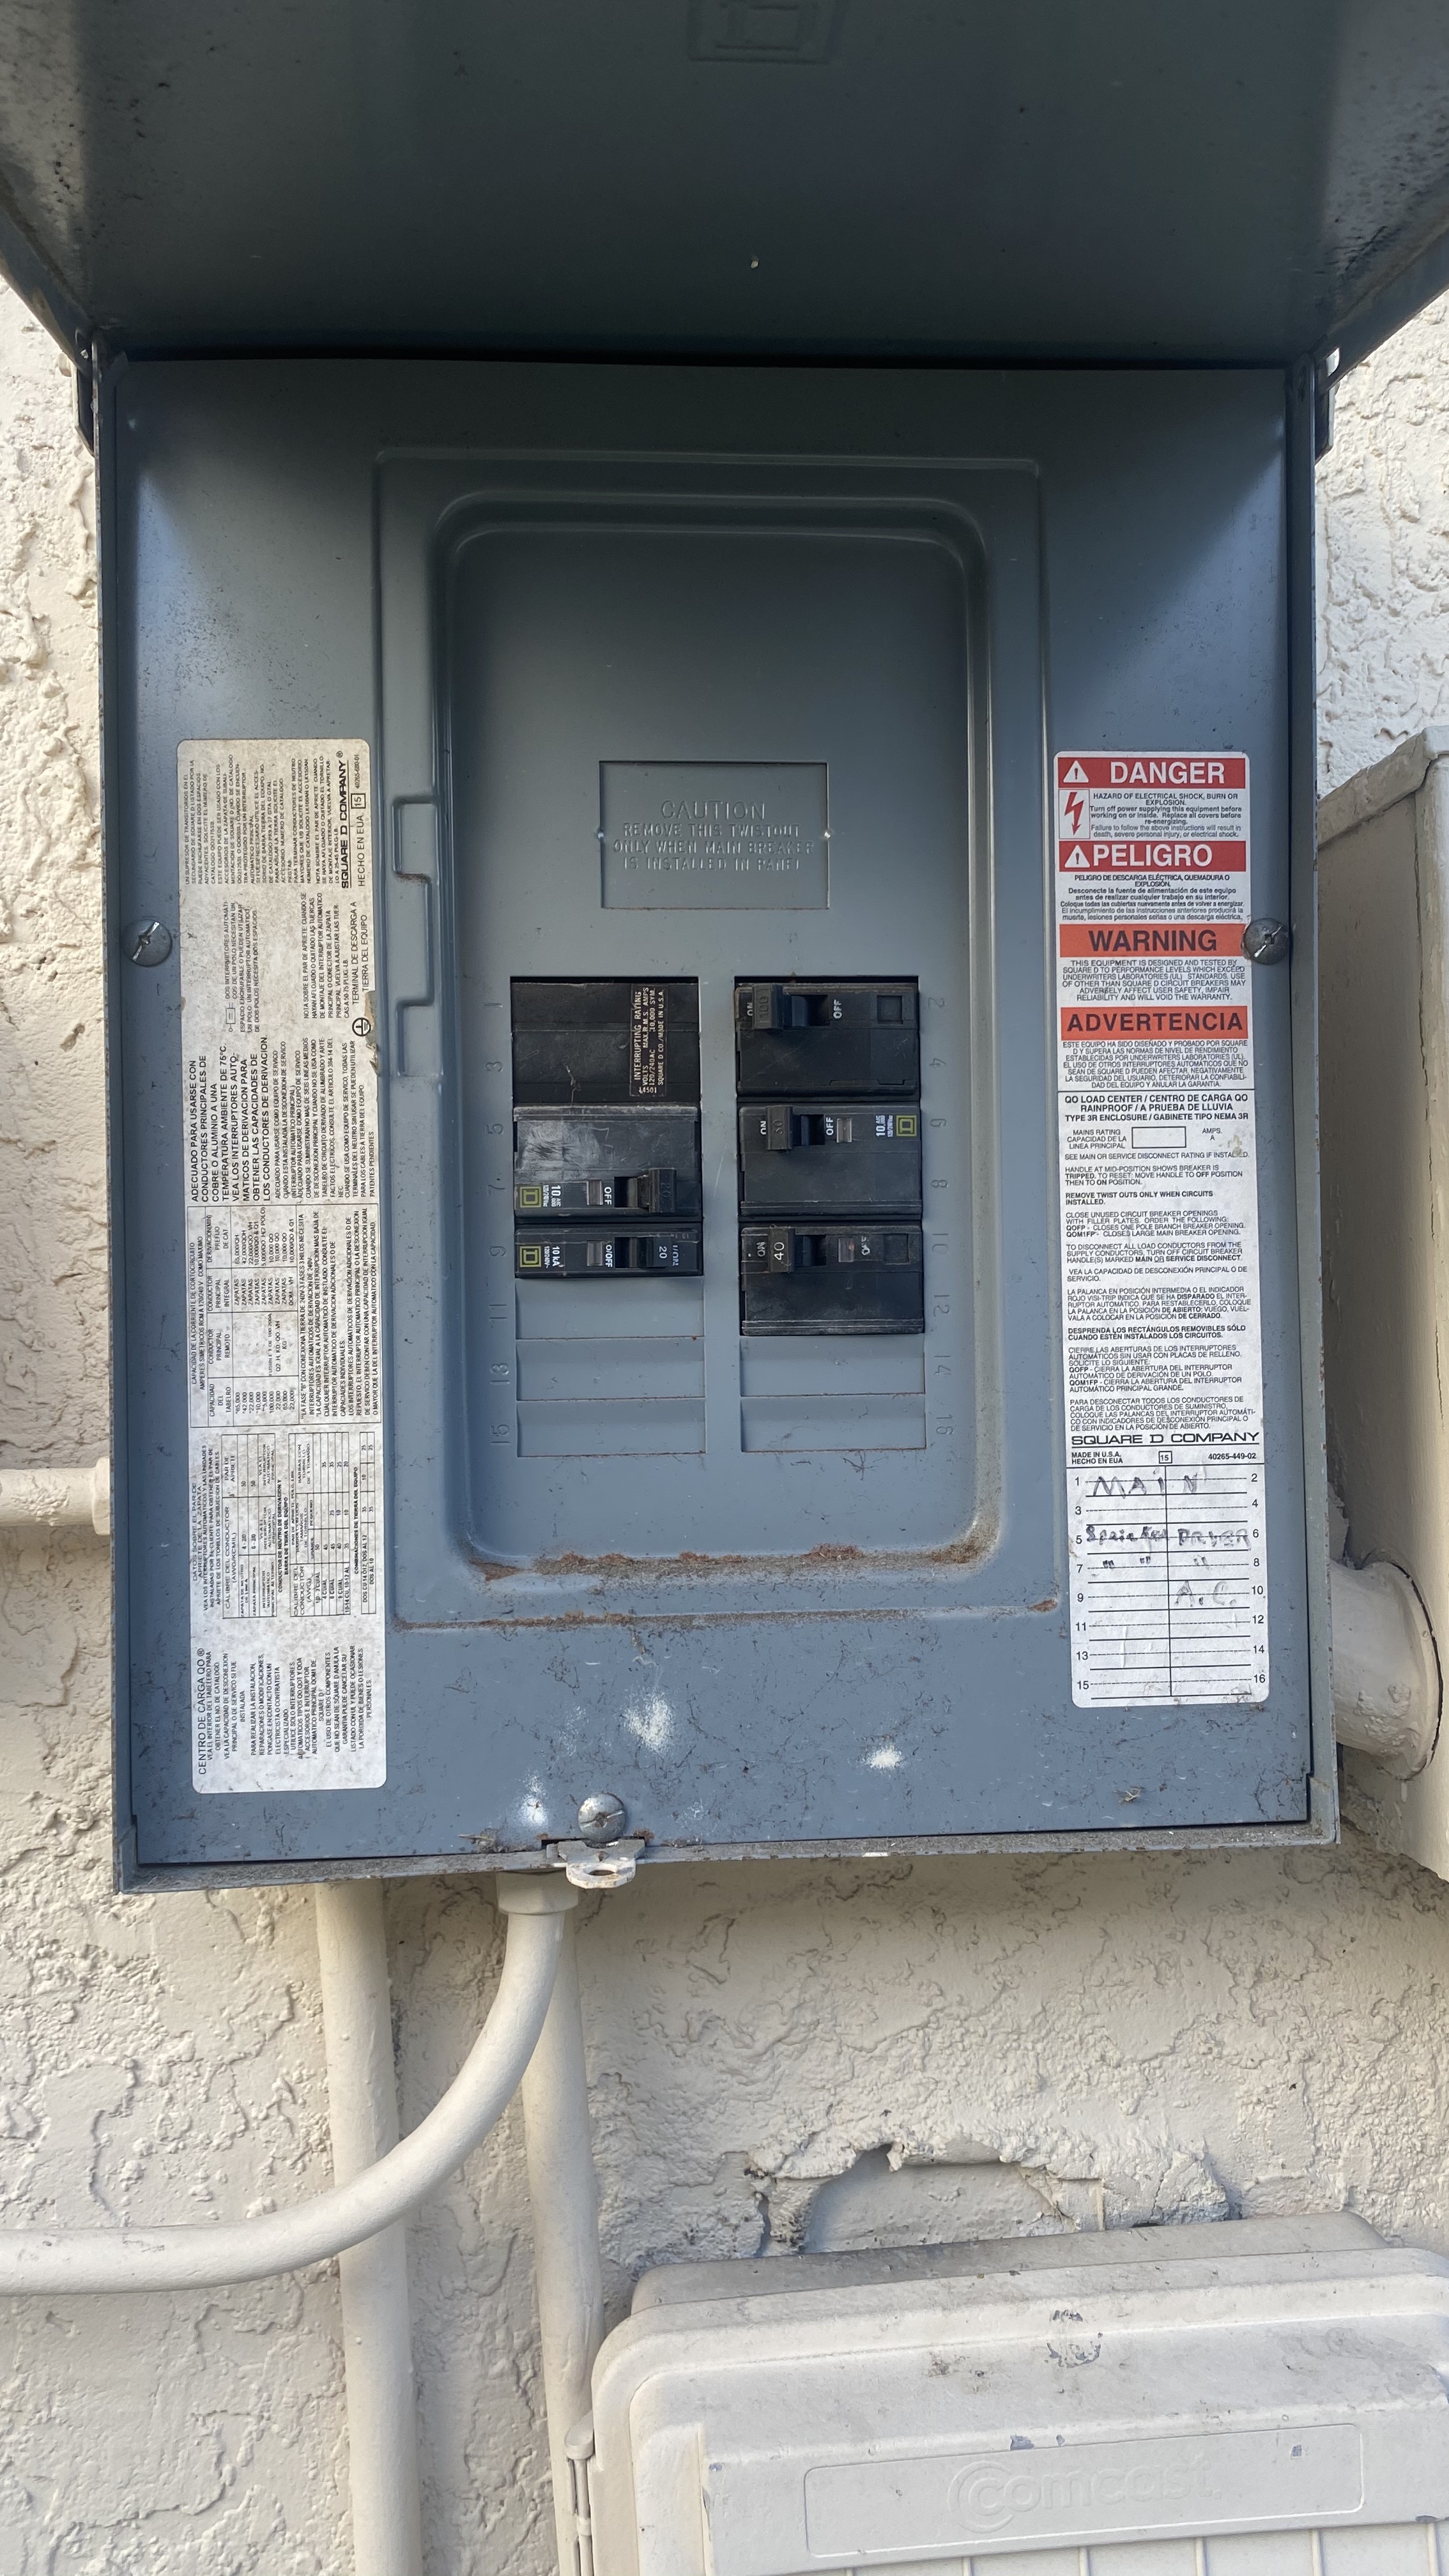
You look to have 220V (two pink wires) and Netral / GND (white wire) running to your old Intermatic.
Ideally you’d run separate 110V to the Rachio enclosure, as @DLane has mentioned, but you can also use either of the pink wires with the white wire to get 110V. Your pump & start relay should still use both pink wires for the full 220V.
Be sure to buy a multi-meter, from the DIY savings, in order to verify all of the voltages and turn off the power at the breaker before working with any of the wires.
The valve manifold that @Dlane has linked to in #4 of his responce is great if you wish to bury your valves, but with just two zones, it may be easier for you to keep the valves above ground and install a pair of above ground valves, such as these from Orbit (link), again be sure to check “other sellers” for prime delivery. On that note, please verify if you have 1 inch plumbing or 3/4 and buy an appropriate valve.
Above ground valves come with the anti-siphon valve (back-flow preventer), which you strictly do not need but there will not be any negative side effects from having them.
For anything else I’ll refer you back to @Dlane’s comment, he did a great job outlining the needed parts.
Most of the important questions will come as you get stared. Do not hesitate to ask and you should have a straightforward conversion.
Cheers,
Some guy Gene (better late than never)
P.S. Are you sure you have two zones? There are six pins on the timer, indicating that you likely have three zones. (three pins to turn ON the zones, and three to turn them back off).
post by iamdago on Jul 2, 2020
I read your post awhile back about the pins and made sure to asked but there’s only two zones. When I turn on, one zone turns on and when i turn it off and do a full circle to pass pins and turn on again the other zone turns on.
We spoke through email you replied to my initial email and when I asked if it was possible for you to help since you were local with questions. You never replied. But like you said better late then never.
I purchased the orbit start pump relay, picking up rachio today with outdoor enclosed. I know what wires to get based on a quote from a person trying to rip me off. For those I’ll go in person to home depot to pick up.
As for the manifold is there a downside to these versus inline single ones? The guy would warranty that or orbit if he installed.
I have a multimeter. As for the manifold is there a specific box to get there is a lot of sizes and not sure which one to go for. Right now I see no box so it might be in the ground with one of those 6” covers.
The person who gave a quote said it was 1”. Should I start by digging to see what’s what? I was gonna start by installing the outdoor box for rachio and relay. How close should it be to were pump relay is or can you draw on one of my pictures?
I saw rachio has a wall plug, is that for indoor? A since I’ll be using a relay am ai going to have to use that or?
Let me know if email or text or anything would work better for you. I’d be open to a quote too for the labor if you wanted to throw one by me.
post by Gene on Jul 2, 2020
1
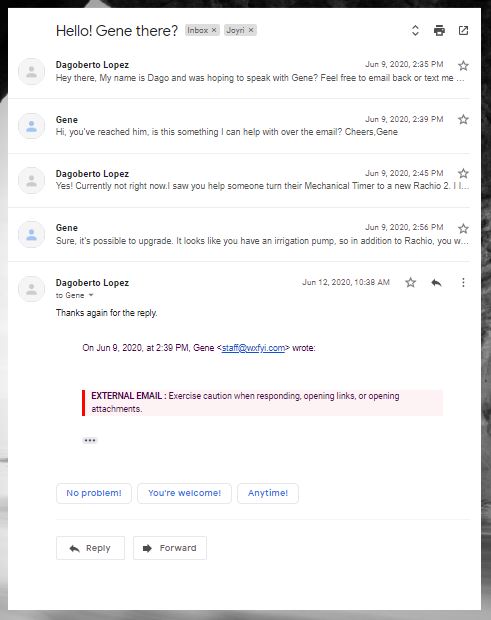
Ah, I see our conversation over email now, I definitely did not ignore you with several emails back and forth, the last one having no further questions:
\ email491×620 32.8 KB](https://community.rachio.com/uploads/db1097/original/2X/0/05978e5c1badb7dcea7b2ff85c0c73da6d830e47.jpeg "email")
There is no downside to using a manifold over single valves. Advantage of the manifold is that it comes with the connectors which make it possible to replace an individual valve, in case it breaks, without cutting and gluing PVC. You’d just untwist the two connectors next to the valve you are replacing and put a new one in it’s place, if case of individual valves they are usually glued into place making a repair more difficult.
I still think you have three zones, take an unobstructed view of your index valve (first picture you’ve posted on this thread), how many pipes (and what size) do you have going into the ground?
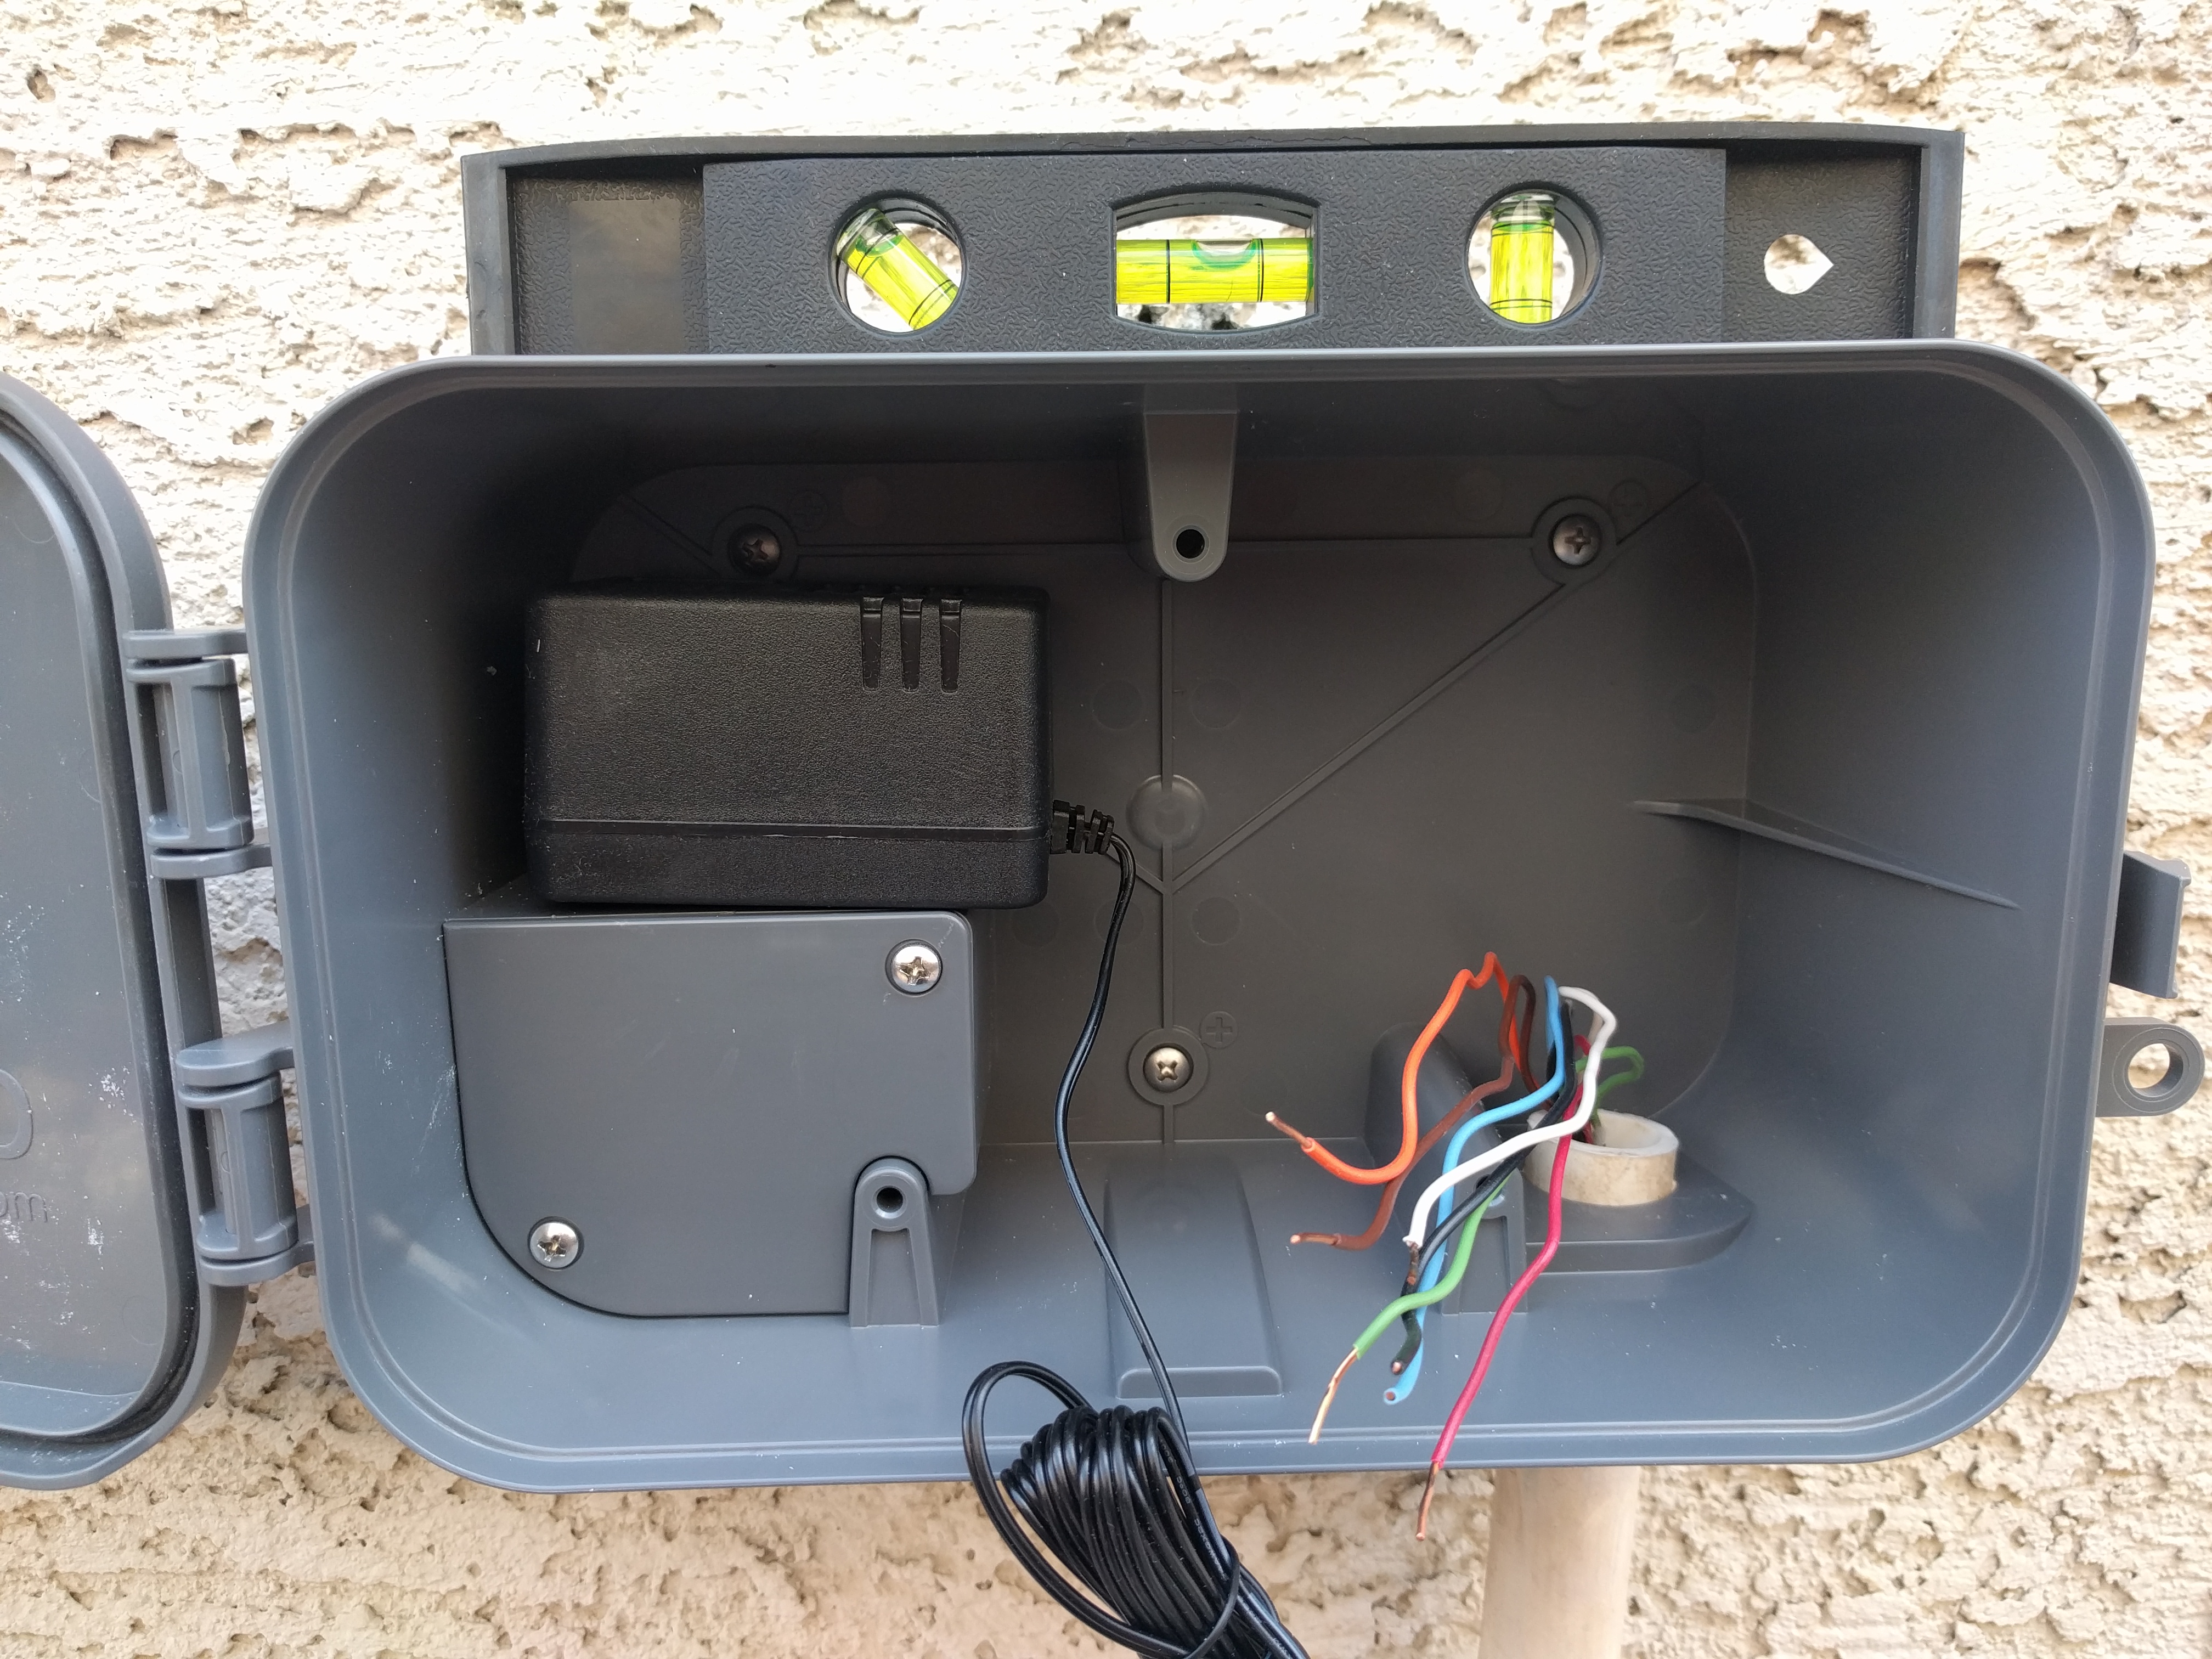
Rachio power brick will fit inside the outdoor enclosure:
\ 4032×3024 2.78 MB](https://community.rachio.com/uploads/db1097/original/2X/b/b3a960b3a556c73ee9f359f16f0724866a20e02b.jpg "")
Sorry, I am not in irrigation business, you’d be better served by someone local who specializes in this. I can answer your questions, to the best of my knowlage and experience doing a similar thing myself, DIY style.
post by iamdago on Jul 2, 2020
2
That screenshot you shared, I never got any response. The “Sure, it’s possible” I never got that. So my Thanks again was a sarcastic one since I believed I got ignored. Regardless thats in the past now.
But I’ll ask someone who’s home right now and edit this post. Alright about orbit, the person who quoted me was trash talking it but he was already trying to upcharge me on materials so I guess his word is also garbage.
Would I be able to reach you for a possible quote or quicker conversation?
Do you mean to plug it in the enclosed? like route a plug in there? Also how close to place that and relay
What pipe you buying to feed cables?
\ image3024×4032 3.39 MB](https://community.rachio.com/uploads/db1097/original/2X/9/9d3b74110ed96e093c9f52b5537296119df33bd7.jpeg "image")
post by Gene on Jul 2, 2020
It’s official, Rachio forums are better than email
It’s also official that you have two zones, definitely stay above ground and avoid the headache of digging.
Ones you’ve got all the parts (post here as you get them and we’ll advise what’s missing), the project should be a quick/ez one. If you have never worked with PVC, search youtube for “PVC join” and get yourself a few trial / learner peaces which will not end up part of your irrigation setup, practice makes perfect. If you discover that you still prefer not to deal with PVC / glue, ask your / neighborhood landscaper how much they would charge just to glue everything together, it will be cheaper if you provide all the parts.
Outdoor enclosure has an outlet where you’d plug the Rachio power block that came with your controller. You’d need to run power to the socket, but the process will be clearer once you have the part.
Rachio officially recommends a few feet between controller and the relay, but with low power Orbit relay, distance should not be an issue, just don’t have both in the same box.
I still prefer you use forums for your questions, rather than handling it over text. It may not be me with the best / fast advice.
DIY route may take more than a day, your lawn will be fine, especially with frequent rains the Florida is getting. Do not fall into an anxiety trap that you’d need to complete it in one go.
post by iamdago on Jul 2, 2020
So I got the Rachio 3 and Encloser.
Orbit 57009 Sprinkler System 1 or 2 Horsepower Pump Start Relay https://www.amazon.com/dp/B000I19I5E/ref=cm_sw_r_cp_api_i_blH.EbV94RK75
Apas Waterproof Wire Connectors Kit Outdoor Electrical Wire Nuts 25 PCS(AWG # 22-8) (Green) https://www.amazon.com/dp/B07GJM22VM/ref=cm_sw_r_cp_api_i_zlH.EbXWKBBV5
so do you have an example of what above ground looks like with what I have now? Like set up wise? or video.
The wire I will probably get last. So blue glue, the above ground inline x2, what else and links work so i have a reference please
post by Gene on Jul 2, 2020
Here is an example video of above ground valves being used:
Installing New Rain Bird Valves on an Existing Sprinkler System Using Glueless Lasco Fittings
Basically you’d leave the pipes going into the ground and cut them as high / close to index valve as possible. You’d install the above ground valves connected straight to the existing pipes. The pump side will need a T slitter installed and routed to both valves.
post by iamdago on Jul 2, 2020
Alright cool, will be planning to do this tomorrow after watching more videos. The guy kind of just transitioned it done. I rather see someone do it. Will reach out back with before and after pictures.
post by Gene on Jul 2, 2020
Be sure to check out videos about “dry fitting”, it’s a technique to make sure all of your peaces are cut right and will fit before you start gluing everything together.
The conduit I’ve used to run the wires is a standard electrical conduit, from home depot / lowes:
That said, because you are not berrying the valves, you can avoid it all together and simply run the wires exposed / shallowly berried. Conduit is best if you need to run / replace the wire going to underground box, otherwise it’s not necessary.
post by iamdago on Jul 2, 2020
Thoughts on the placement of relay and rachio. I figured removing mechanical timer and then using the tubing use for the wires already there. Then any new wires I would run along the pipe with a cover on the wires ofc on the side. Before is the one with one box.
post by Gene on Jul 2, 2020
You could also remove the guts from the old timer and insert the heart / relay from orbit. Only downside to it would be slightly harder addition for conduit / AC wire from old timer box to Rachio enclosure. If you buy an outdoor rated AC cable, you can simply drill a hole for it and run it exposed.
post by iamdago on Jul 2, 2020
Like this?
\ image2268×4032 2.27 MB](https://community.rachio.com/uploads/db1097/original/2X/2/2bbb7717e4988435af72d1260b1f1f2d1c34569e.jpeg "image")
post by Gene on Jul 2, 2020
There is no need for master valve, your pump is already performing this function.
Your water line setup will be
… … … … … … … … … … … > valve > existing pipe into the ground
Pump > Faucet adapter > T split
… … … … … … … … … … … > valve > existing pipe into the ground
Note that, besides the index valve, you can remove the manual valve as well (your field valves will allow you to use the water hose without turn off the water down the line).
post by iamdago on Jul 2, 2020
1
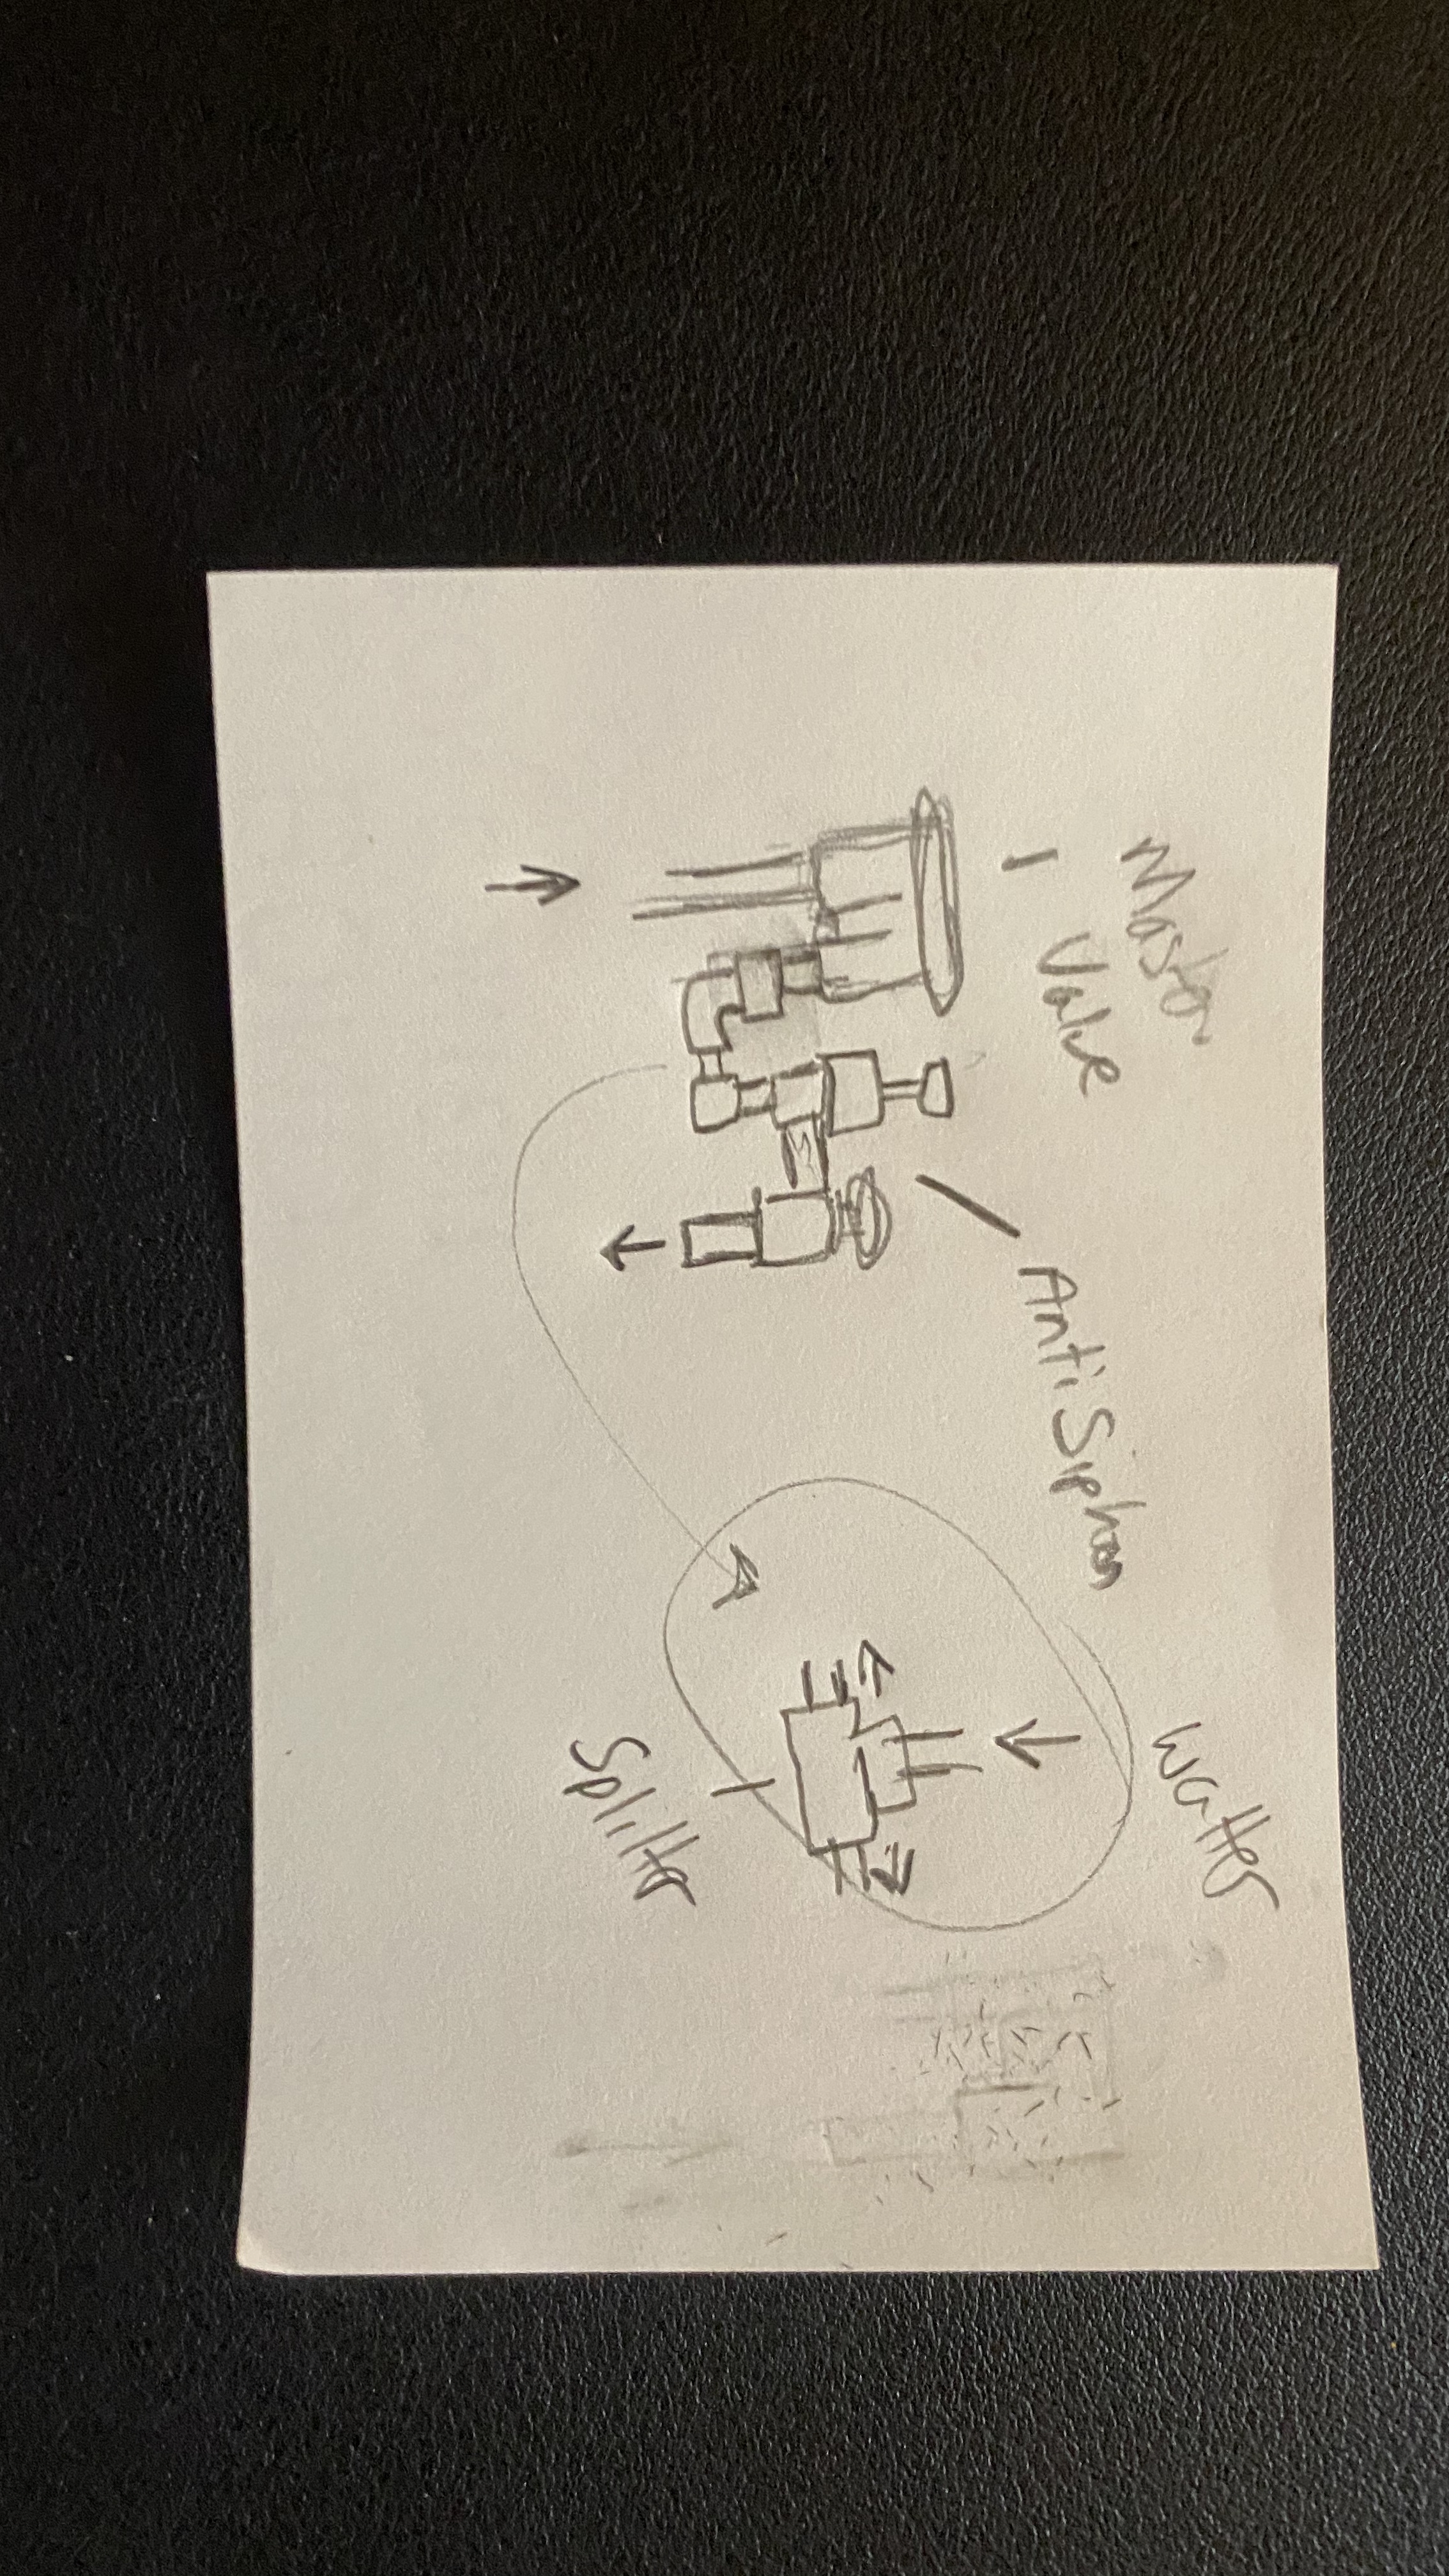
Let me see if I can draw cause I need visuals.
Also my outdoor box has two holes on the bottom. Just like the picture you put and once leading to where the cable plugs.
post by iamdago on Jul 2, 2020
Gene](https://community.rachio.com/t/intermatic-mechanical-timer-replace/25406 "Load parent post")
Like this? So i’m removing the black thing and attaching pipes to the two above ground siphons to each pvc pipe, to a t that connects to where the knob is.
\ image3024×4032 3.38 MB](https://community.rachio.com/uploads/db1097/original/2X/a/a0acf1e2472ddcf86cbea269f6aad50c3db9bcca.jpeg "image")

post by Gene on Jul 2, 2020
Yes, if needed the turn thing can be omitted / removed.
post by iamdago on Jul 2, 2020
What’s the purpose for that now? Also if I turn the hose on while rachio waters one zone will it work ? They attach a hose to one of those sprinklers on the ground.
I’m going to buy the PVC pipe and dry fit it and send a pic to verify.
post by Gene on Jul 2, 2020
Your old index valve does not have an off setting, whenever the water is provided, it will go somewhere. The valve in question allowed the index valve to be turned off and the hose to get the full pressure from the pump.
Your new valves, on the other hand, are off by default. If you turn on the hose while one of the zones is running, than pressure / flow will be shared between the two zones, each getting reduced flow.
You can create a third zone within Rachio, one that is not connected to any valve, running that zone while hose is open will provide full pressure to the hose, same as if the old manual valve was closed.
post by iamdago on Jul 2, 2020
Oh I see. I think after this upgrade, we’ll upgrade our actual sprinkler spouts. We use it cause they don’t reach the desired area cause one is damaged or something.
But i’ll keep that in mind. Will update tomorrow with dry fit.
post by iamdago on Jul 4, 2020
Gene](https://community.rachio.com/t/intermatic-mechanical-timer-replace/25406 "Load parent post")
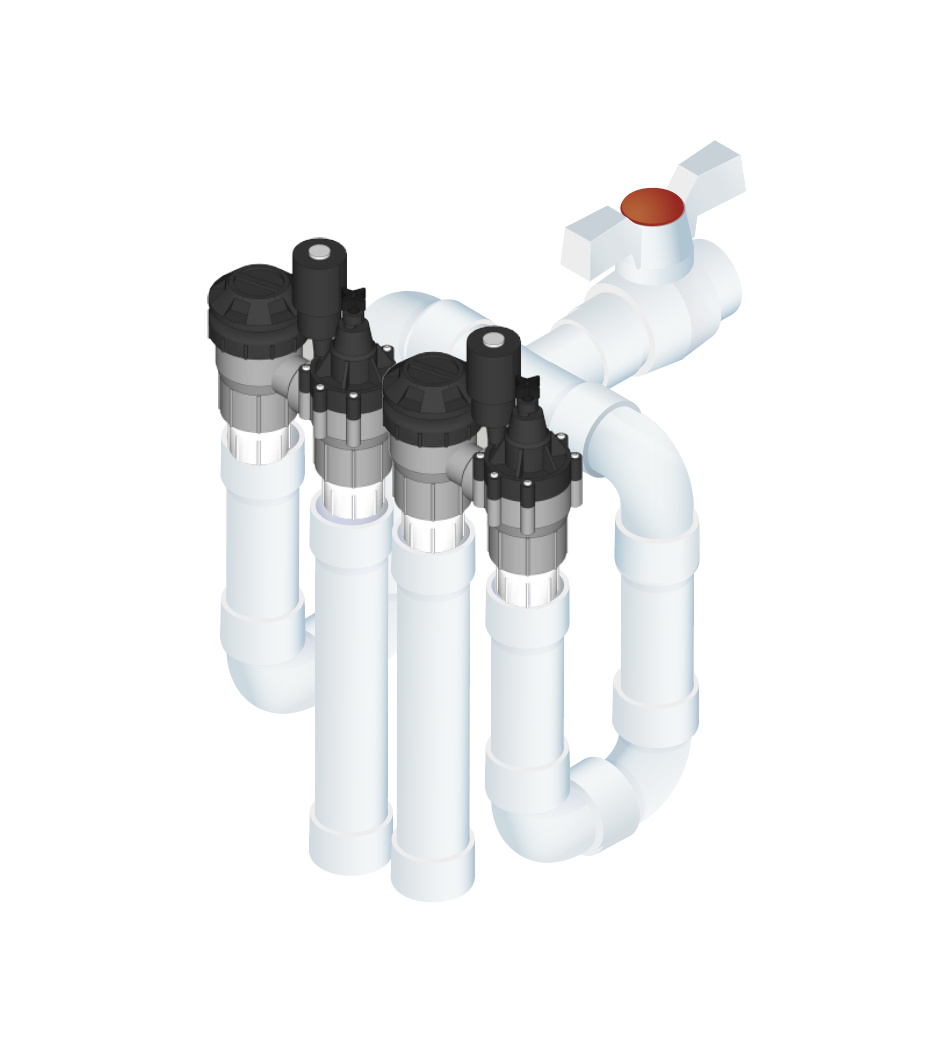
Thoughts on this.
\ Screen Shot 2020-07-04 at 1.15.00 PM952×1038 75.7 KB](https://community.rachio.com/uploads/db1097/original/2X/6/63854eb7ed03c9efd09454f8ae7d05aea19388b8.jpeg "Screen Shot 2020-07-04 at 1.15.00 PM")
post by Gene on Jul 4, 2020
What software have you used? The valve (with red dot) is not strictly necessary, but will not hurt if it fits.
Also the valve on the left is shown backwards, the valve part (that has solenoid attached) should always be on the pressure side (on the pipe connected to the pump) not the drain (pipe going into the ground).
post by iamdago on Jul 4, 2020
Yeah that’s a manipulated image, the backward one it’s just to get the idea of what to buy. The rest is on illustrator lol.
Yeah the ball will be moved or taken out if it doesn’t fit. At home depot now buying to dry fit
post by iamdago on Jul 4, 2020
Gene](https://community.rachio.com/t/intermatic-mechanical-timer-replace/25406 "Load parent post")
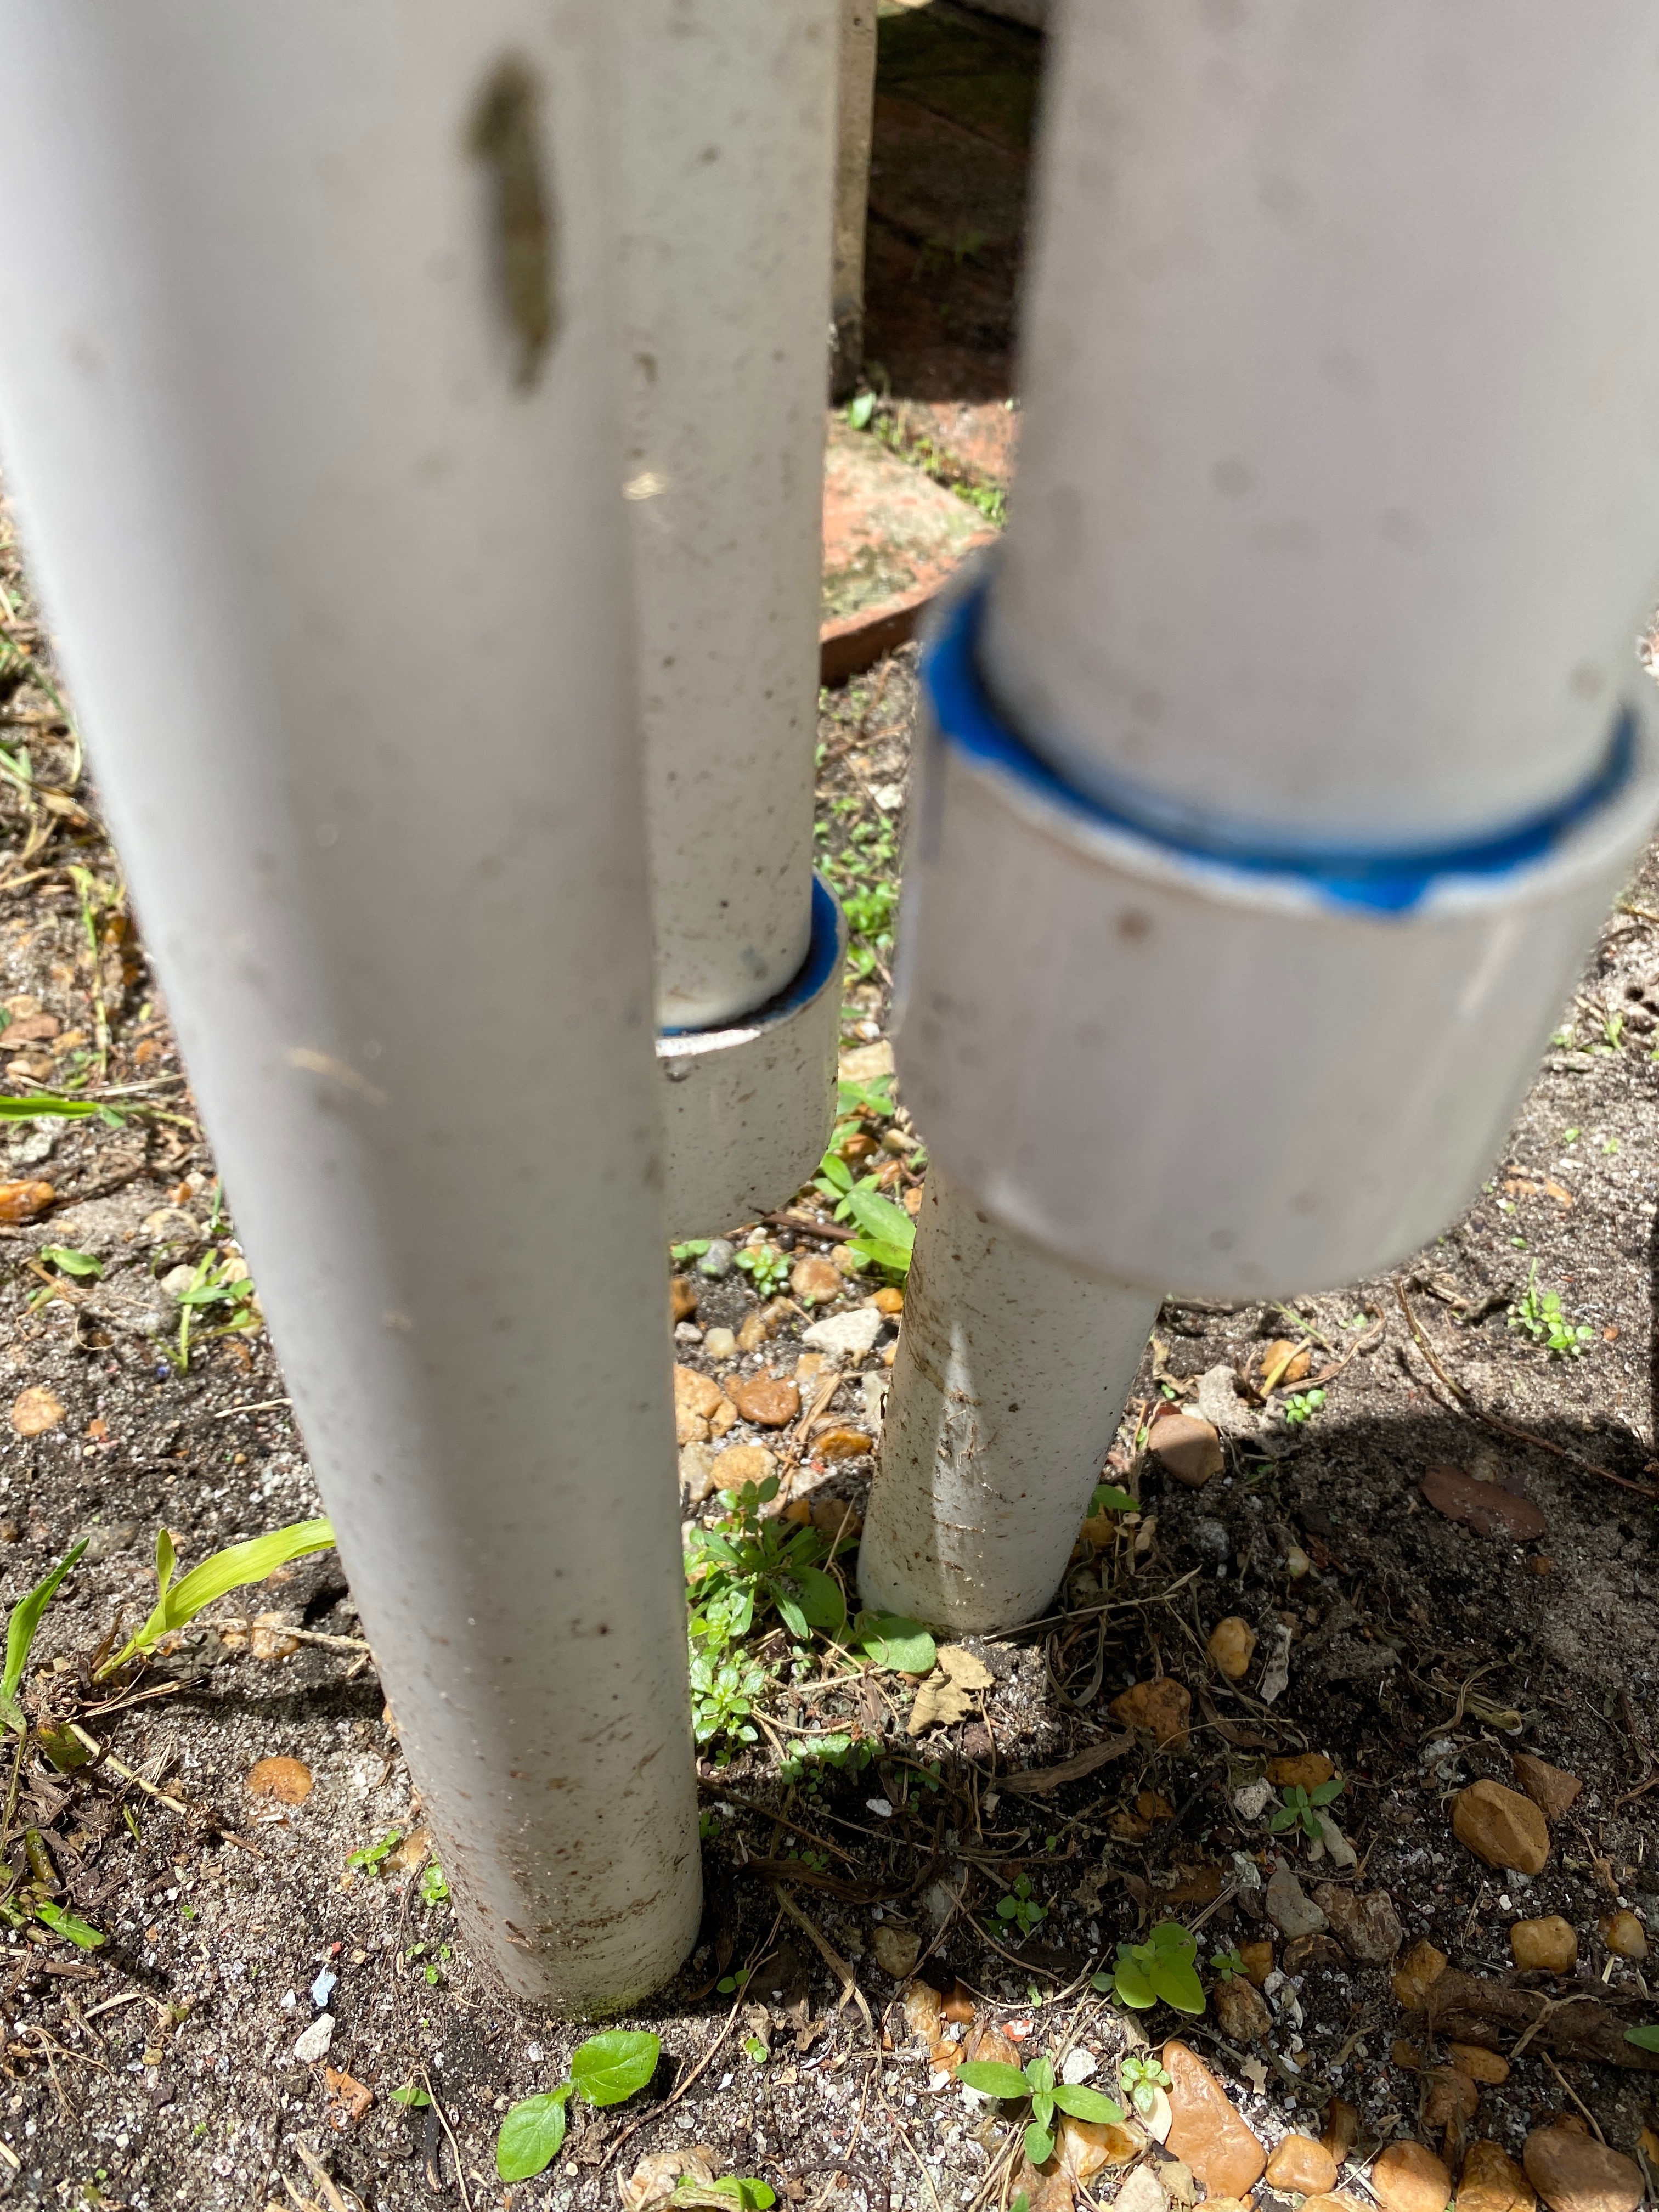
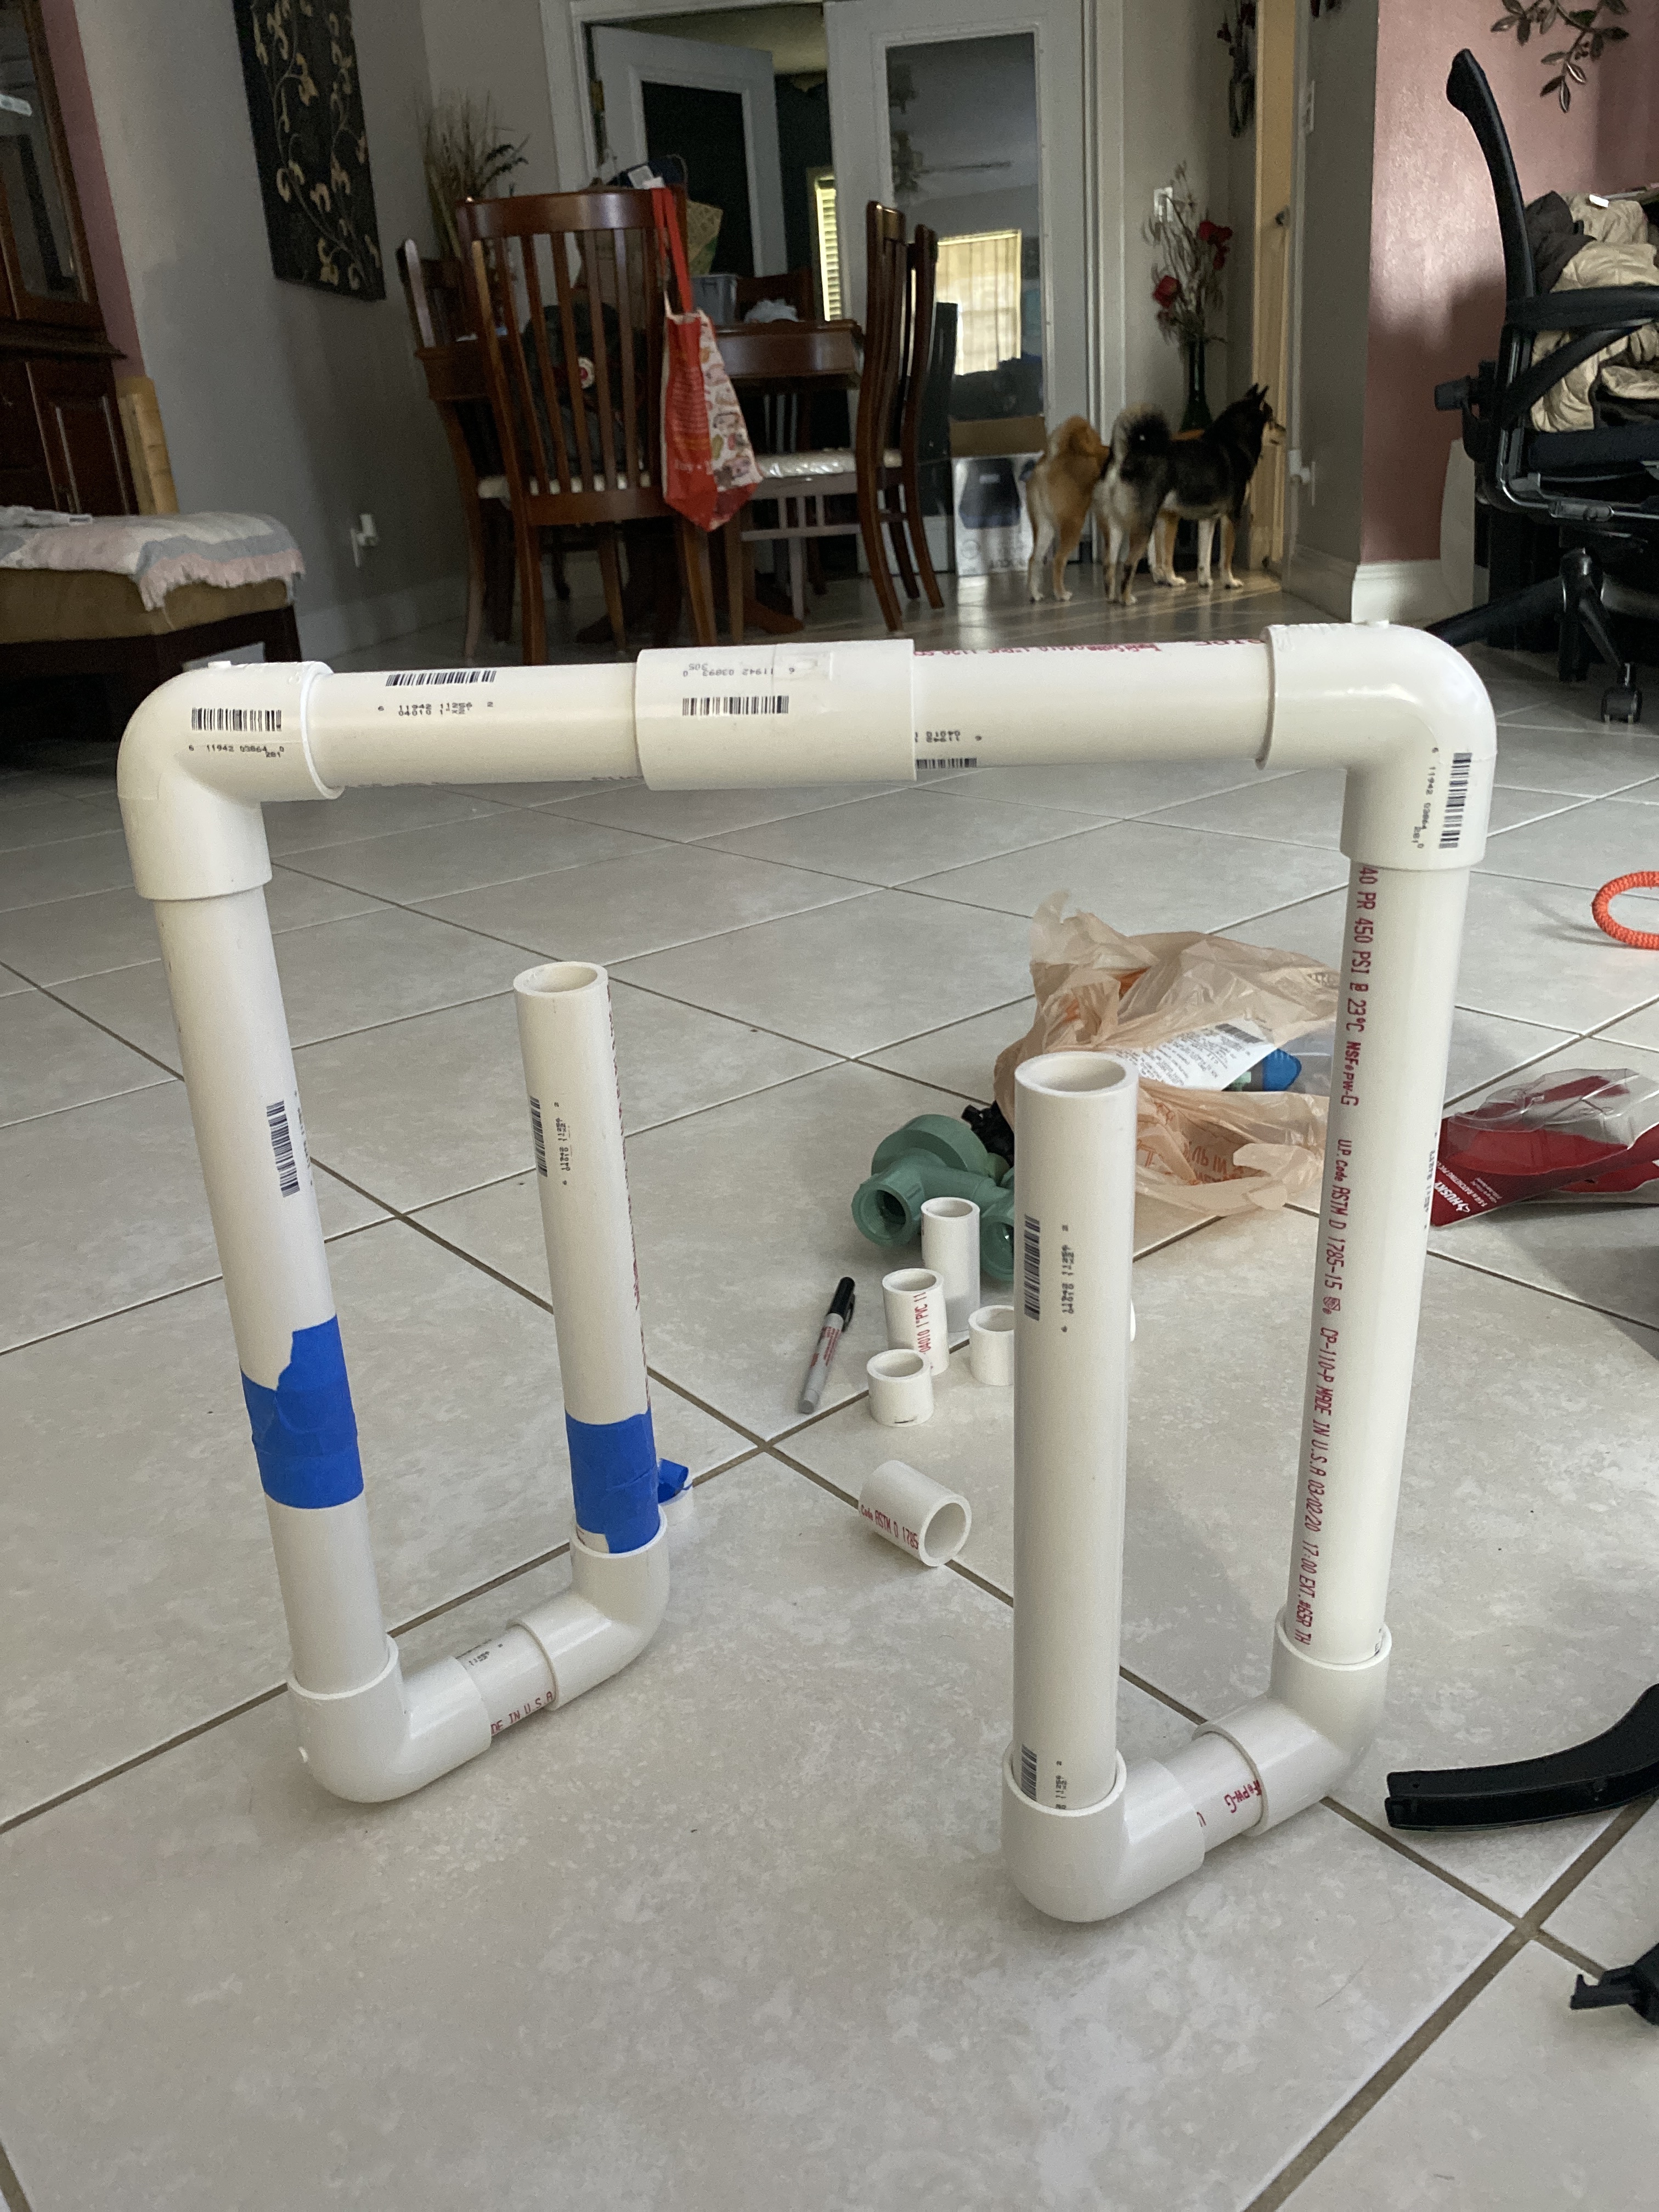
Don’t mind tape, but this is looking like it’s gonna work fine. Now to get a 1” female adapter into the siphon.
Then figure out the electrical part, then to wing it.
\ image3024×4032 3.4 MB](https://community.rachio.com/uploads/db1097/original/2X/9/98d4405f8a07ee5a353726d7a38077027d76c993.jpeg "image")
post by iamdago on Jul 8, 2020
Gene](https://community.rachio.com/t/intermatic-mechanical-timer-replace/25406 "Load parent post")
Is it possible to install the siphons before the controller and pump relay? Like will it still work? relay arriving later this week. But I wanted to install the pipes and turn on timer after it dries and make sure what goes through fine.
post by Gene on Jul 8, 2020
Sure. You can either drive the valves from Rachio (powered by extension cord) without installing it permanently, while running the pump with the old timer, or …, simply turn the valve(s) on manually by turning the solenoids clockwise to turn on, CCW to turn them back off.
post by iamdago on Jul 8, 2020
1
How does this dry fitting look? Also the parts that screw, do they go all the way in? How hard should I torque?
\ image720×1280 491 KB](https://community.rachio.com/uploads/db1097/original/2X/1/15cf6513cc7a120a0b5c66c3a1920afc368c59ae.jpeg "image")

\ image1280×720 456 KB](https://community.rachio.com/uploads/db1097/original/2X/c/c739ee3a34bd4820ef23a704cafa16d24f1f589c.jpeg "image")
post by Gene on Jul 8, 2020
1
Looks good, though the valve on the second picture does not look to sit alighted with the pipe. This is probably due to this being a dry fit, but make sure there is not much of a gap between the valve inlet opening and the pipe. Glue can’t fix a large gap.
Do not over tighten the screw fittings. You can find a thread sealant in a home improvement sore. Something like this:
https://www.lowes.com/pd/Oatey-Great-White-Sealant/4750813
Make sure to look for one compatible with PVC
post by iamdago on Jul 8, 2020
1
I actually got the thread tape for the thread, and yeah it doesn’t even have the adapter to go on the pipe, just threw it in there to measure. That’s why.
Got the relay today, gonna need wires, do you know which I have to get? I assumed they sold one for the sprinkler controller?
Probably mount the controller near timer box since that’s were ima install the relay.
post by Gene on Jul 9, 2020
Careful not to go overboard with the thread tape, too much and you may crack the valve / pipe.
Irrigation wire is sold by the foot at home depot / lowes, something like this (link).
These are available in the electrical department, just ask an associate to cut some for you (tell them you need 3 or 4 conduit irrigation wire, ~15ft).
I recommend you run separate wire to the relay (you need 2 conductors or more) and the valves (you’d need 3 conductors or more). The wire I’ve linked to has 4 conductors,
post by iamdago on Jul 9, 2020
So i’m buying 2x 4 Conductor Wires , each 1
15 ft
post by Gene on Jul 9, 2020
No, one run will likely be enough, simply cut it into two peaces where it makes the most sense.
You may not require the 15 ft, simply figure out how much you need for the run to the relay and how much for the run to the valves. For example if it is 3 ft to the relay and 5 ft to the valves, you may get away with 10 ft of wire (3ft + 5ft + margin). 15ft was my over-approximation based on what I saw.
post by iamdago on Jul 9, 2020
Just to be clear, run them from controller is what you’re saying? Controller to relay and controller to valves.
post by Gene on Jul 9, 2020
yes
post by gaustin on Jul 9, 2020
@Gene, I’m laughing at this thread…would have been more efficient to fly over and just do it! You are the man btw…cool of you to help him through ever step.
post by iamdago on Jul 9, 2020
Yeah I appreciate his help, without him would of took a lot more confidence but him confirming for me makes it easier.
Yeah he’s 10-15 mins away from me lol
post by Gene on Jul 9, 2020
And take away from your pride of having done everything yourself? Great work by the way, I don’t mind all of the questions, now we can use this thread as a good tutorial for others.
post by iamdago on Jul 9, 2020
yeah will make wiring diagram later to post to see if i got it right and will get some conduit just because later when I get an adapter for pvc today after work
post by iamdago on Jul 9, 2020
Gene](https://community.rachio.com/t/intermatic-mechanical-timer-replace/25406 "Load parent post")
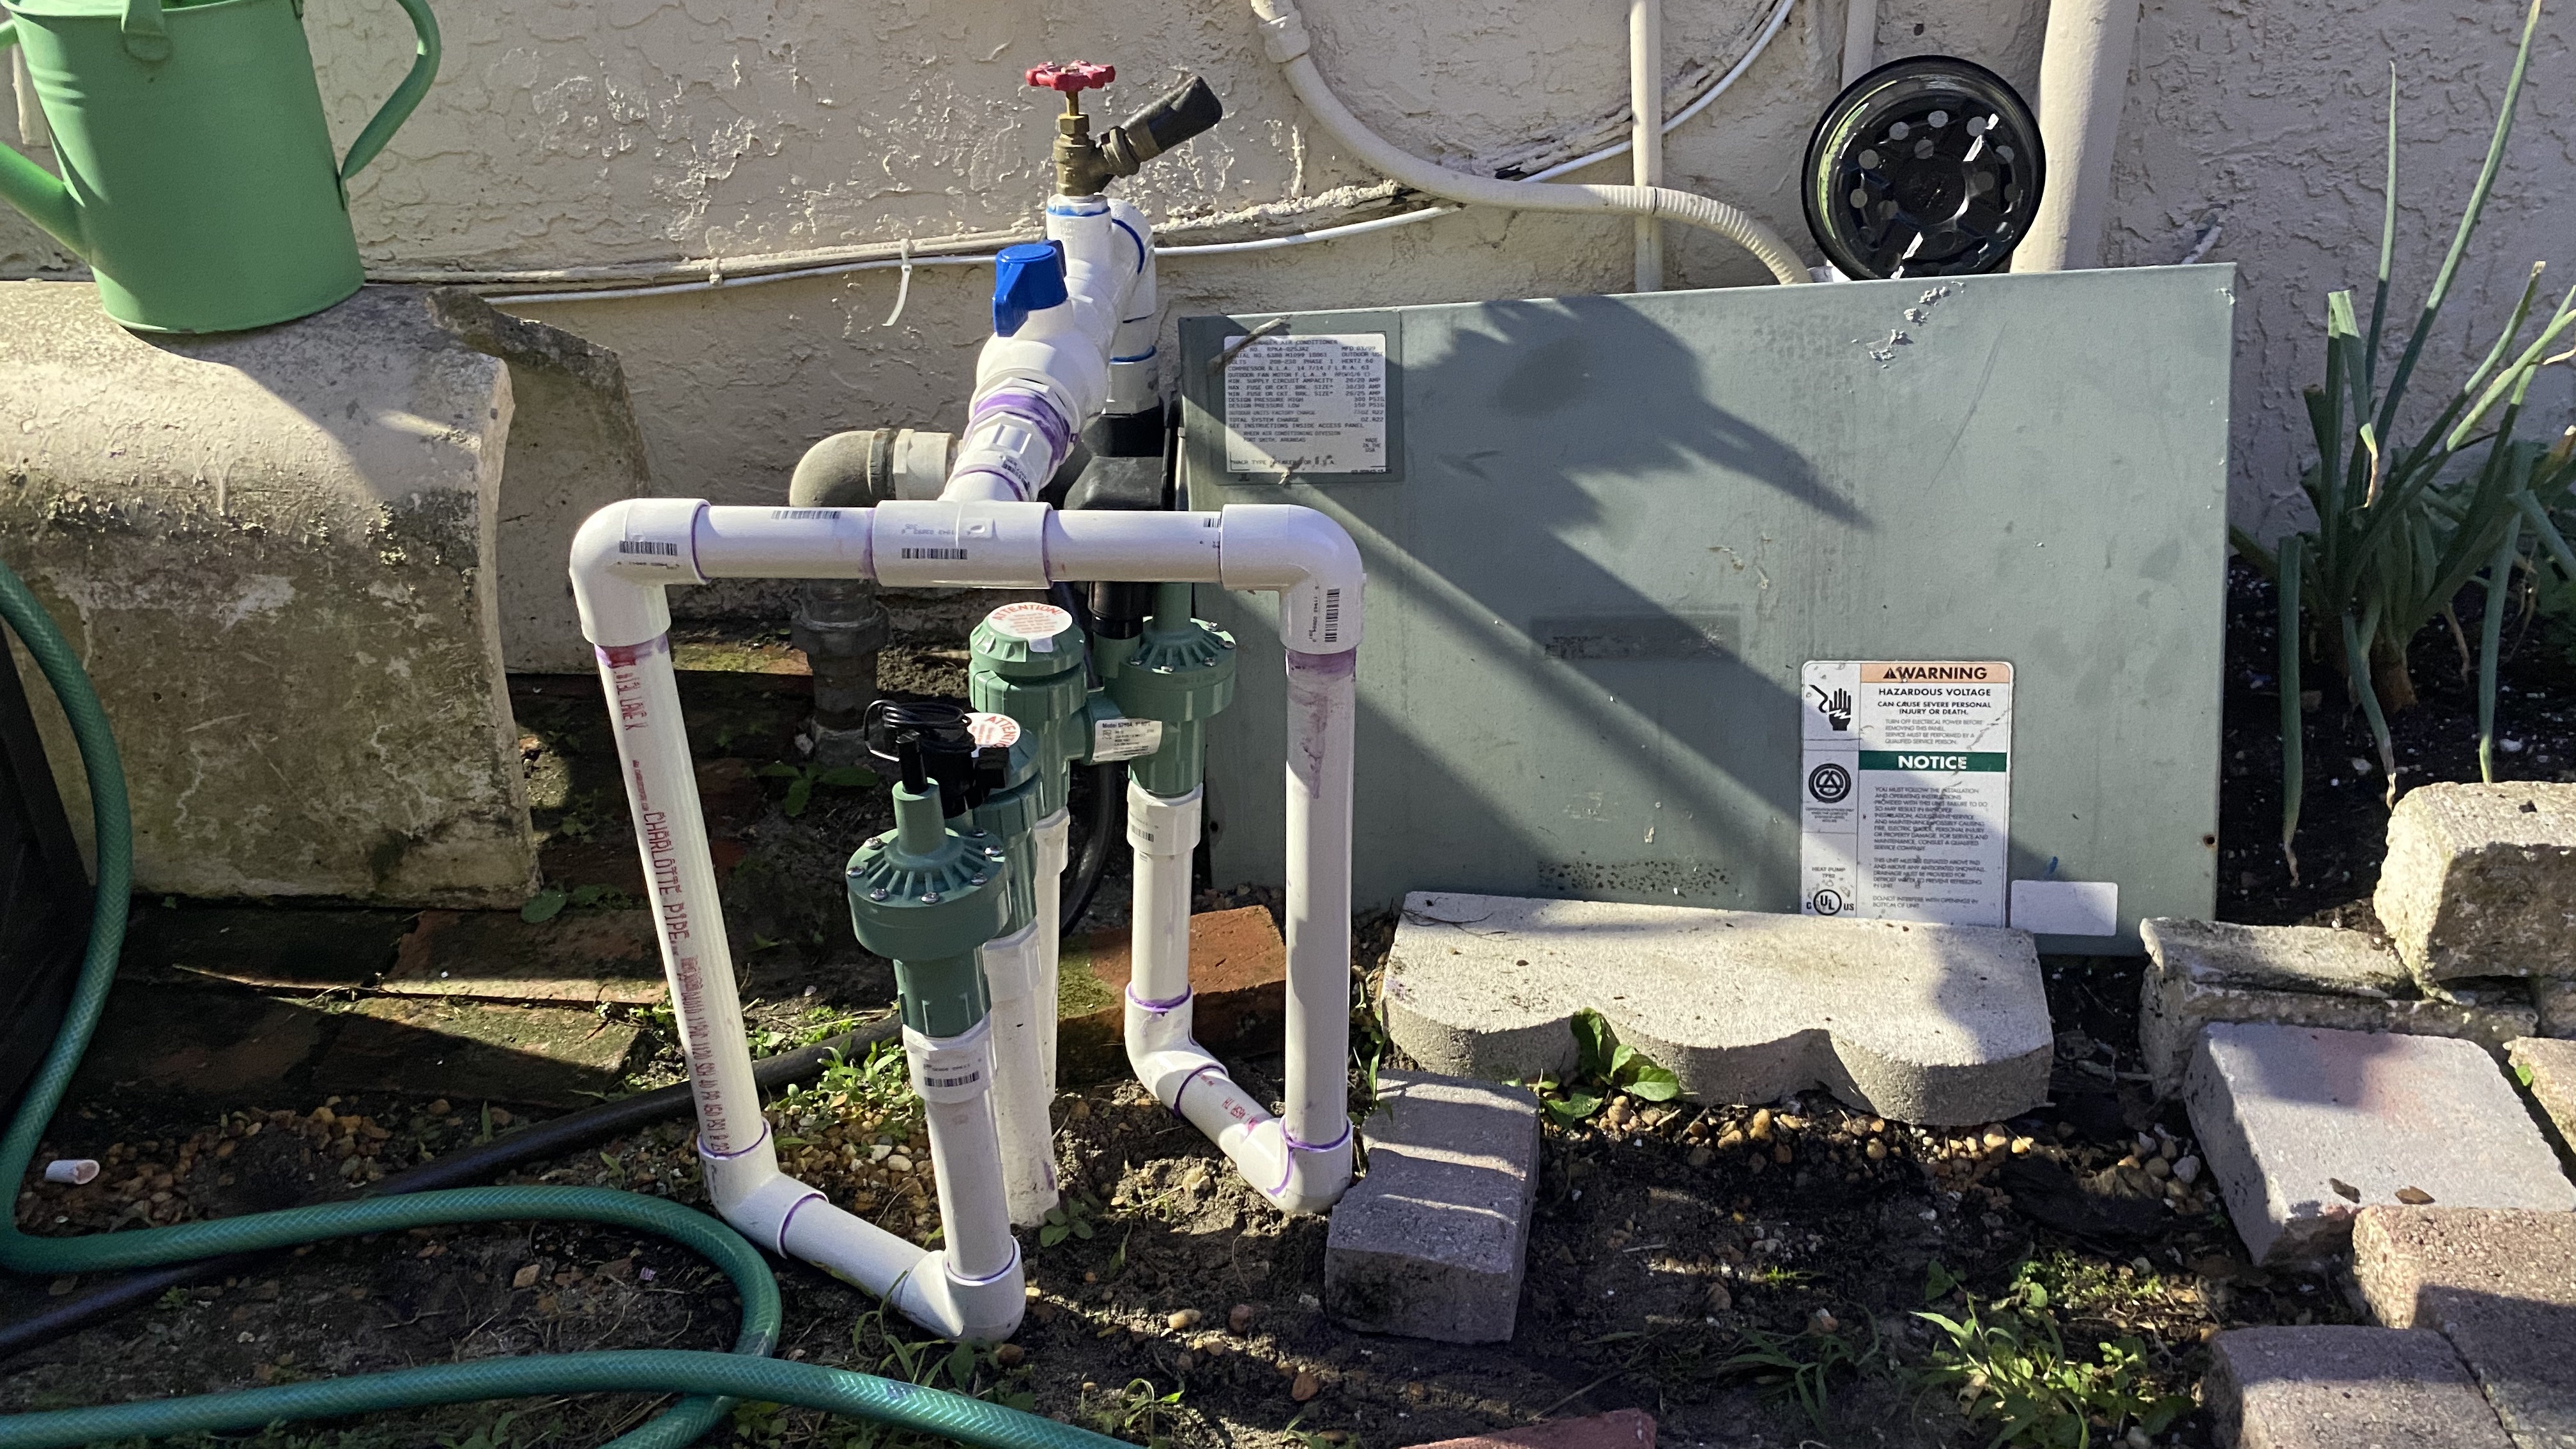
Now work on wiring diagram and to wait 24 hour to test for leaks and flow. Bought the wires and conduit.
Conduit from Relay in Mechanical timer box, to the rachio. Going to also run sprinklers cables through there. Make another hole in the mechanical timer box to run cables to sprinkler valves.
Thoughts?
Gonna see how people routed cables from valve to box neatly, not that I mind wires free but I like things clean.
Wiring diagram coming soon
\ image4032×2268 2.42 MB](https://community.rachio.com/uploads/db1097/original/2X/a/addb39251e4f89c1c4f6605400551aa3f0e1a3d1.jpeg "image")
post by iamdago on Jul 9, 2020
1
Gene](https://community.rachio.com/t/intermatic-mechanical-timer-replace/25406 "Load parent post")
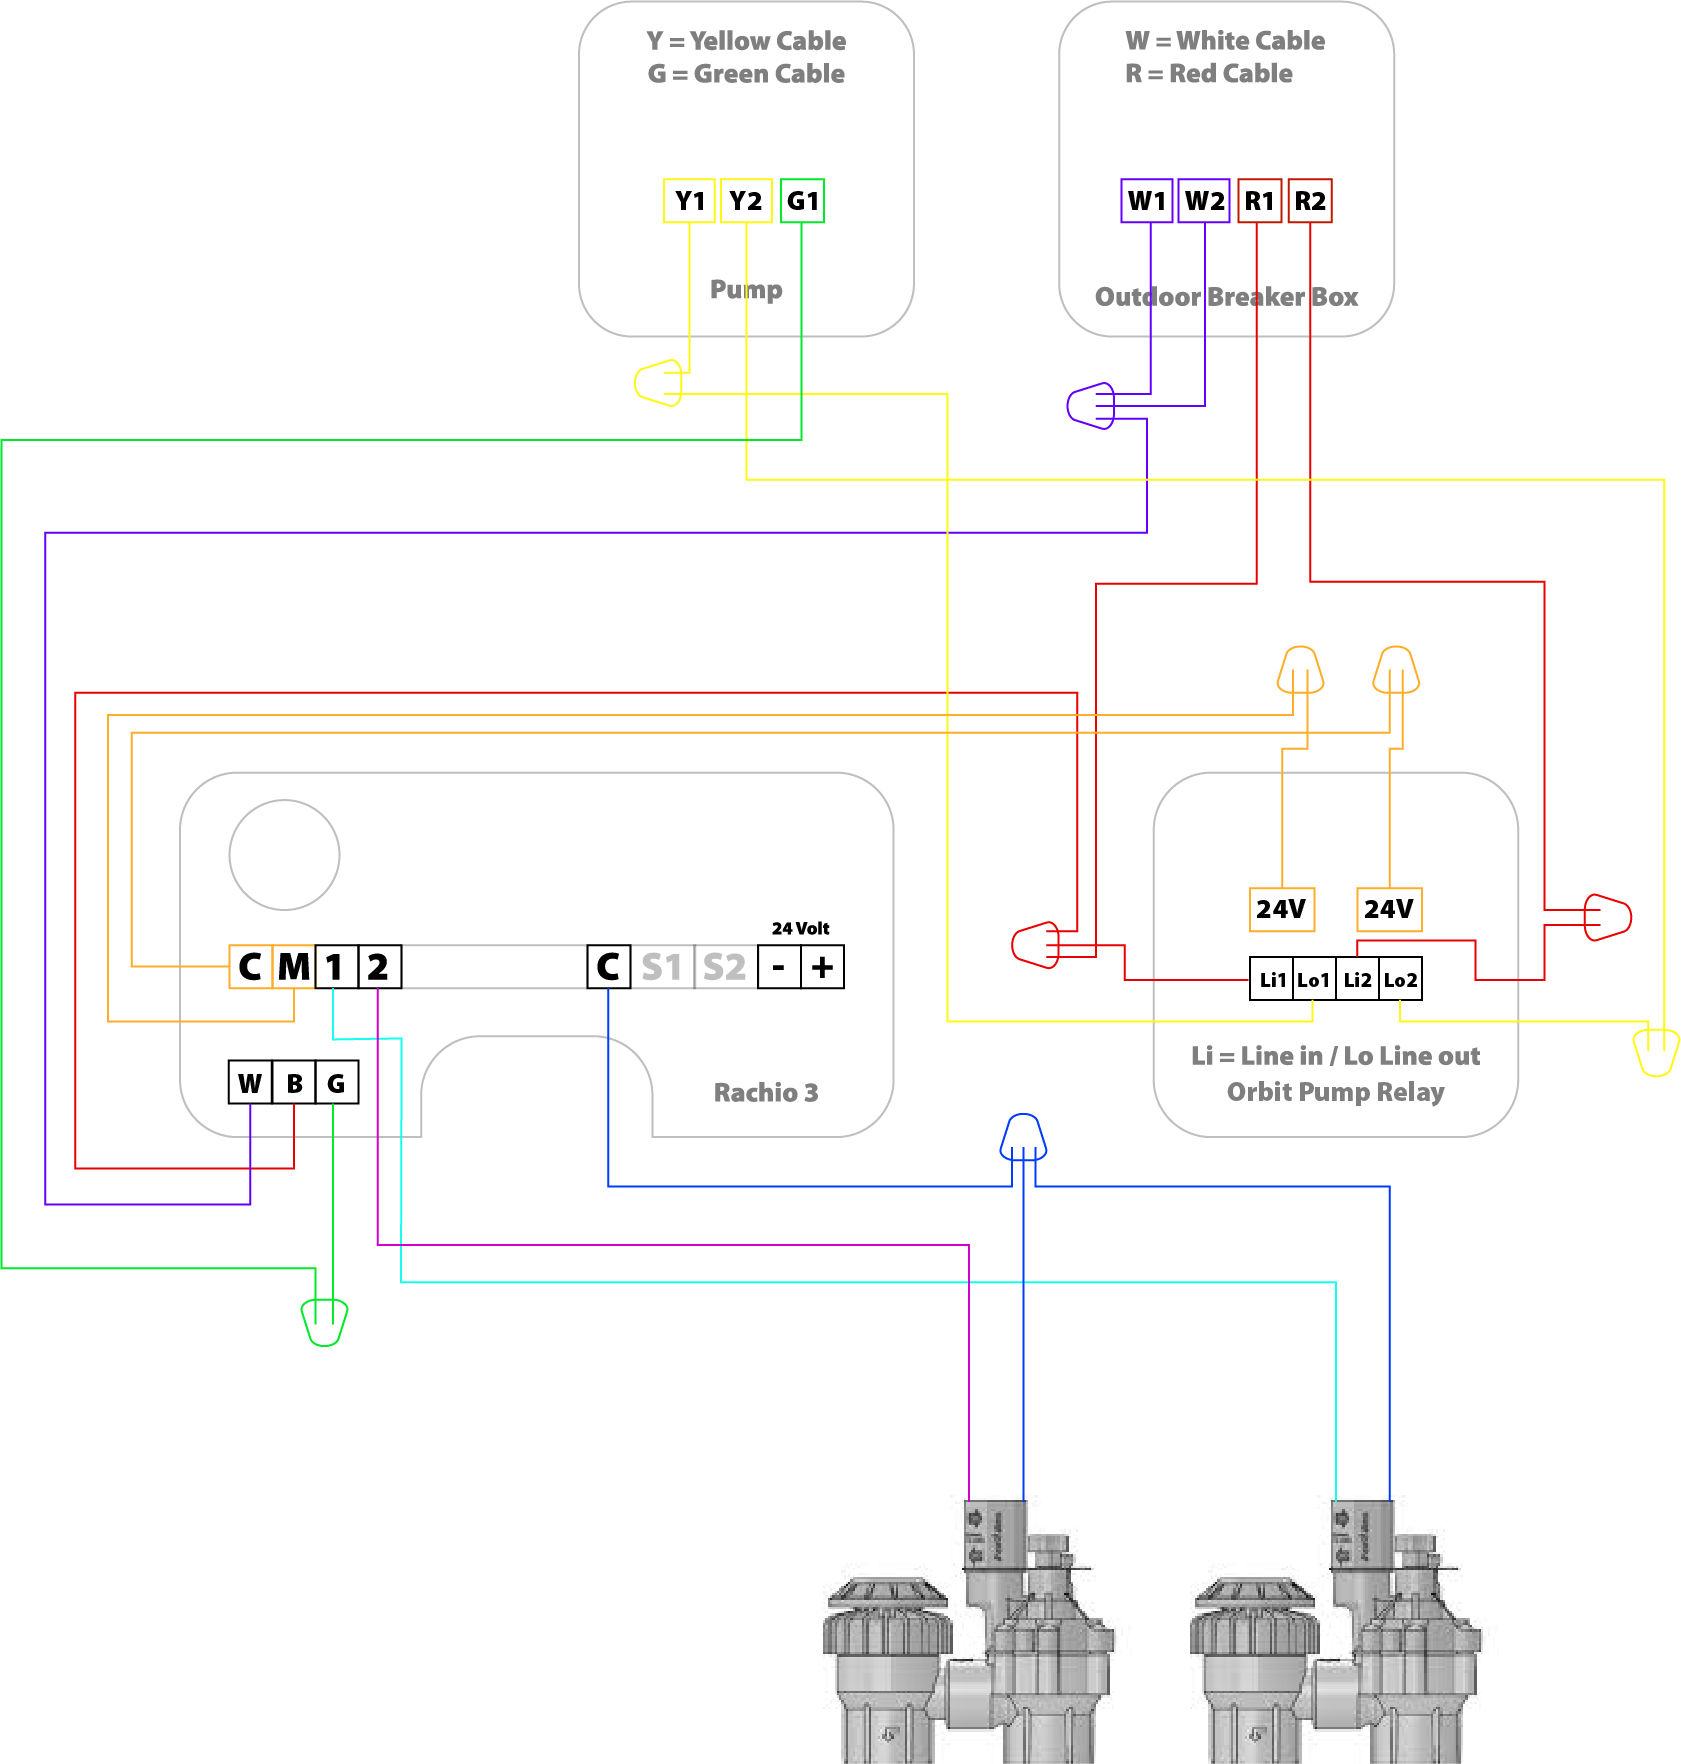
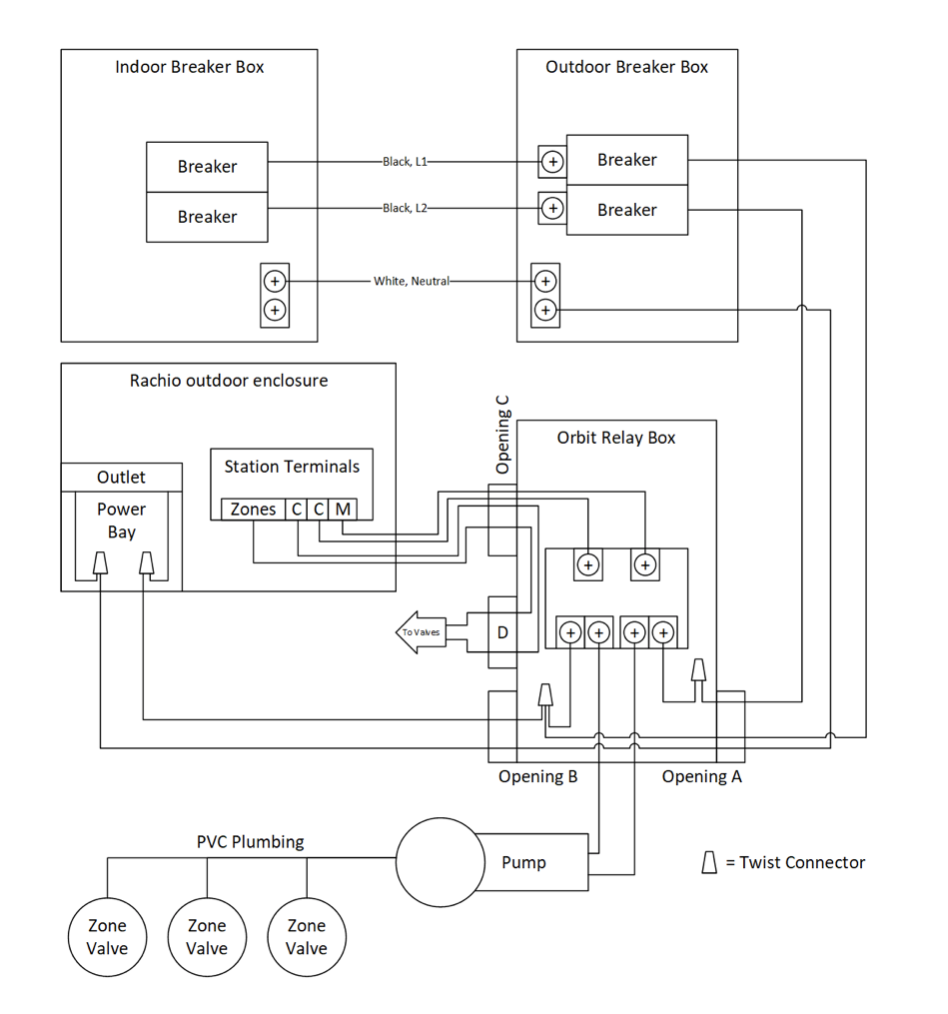
Alright here it is. I attached my mechanical box, to show how its connected. As well as the diagram I got off this forum somewhere that I based some of my decisions, then compared to my actual wiring right now.
If you look at the mechanical box, the wires coming out of the right side is from the breaker box and the bottom goes to pump.
Let me know what you think
\ wiring-dia1681×1764 372 KB](https://community.rachio.com/uploads/db1097/original/2X/f/f6514765369a32fb13b00de471770e1f806c0116.jpeg "wiring-dia")
\ IMG_20452268×4032 2.07 MB](https://community.rachio.com/uploads/db1097/original/2X/d/dcad5edfd507e119cdd8d1886555b9b6e3b1fe42.jpeg "IMG_2045")
\ IMG_20442268×4032 2.17 MB](https://community.rachio.com/uploads/db1097/original/2X/5/55616220075f456dcd7c72343ed53a11ad7a6de8.jpeg "IMG_2044")
\ Screen Shot 2020-07-09 at 12.13.38 PM948×1014 116 KB](https://community.rachio.com/uploads/db1097/original/2X/f/fb95da159b155e18ce1e790a4bb38209864f2d7f.png "Screen Shot 2020-07-09 at 12.13.38 PM")
post by Gene on Jul 10, 2020
You found one of my old drawings
Do not ground your pump to the rachio controller, in your old timer it was done for simplicity, but the purpose of the green wire on the second photo is to connect to the white wire attached to the same nut. Because your breaker box is the first one downline from the meter, your Neutral (white) lines and ground (green) lines are interconnected there, thus it is possible to use a white wire (like they’ve done) to ground the pump. Fix: G1 terminal of the pump should be connected to W1 terminal of the breaker.
W1 and W2 terminals do not need to be tied together (no need for a wire nut), simply run the (white) line from W2 terminal to W terminal on your Rachio controller. Green (G) terminal can be left disconnected on the rachio controller (just cap it or connect it to the W line), since the power supply does not use it.
Otherwise you’ve got it, good job
post by iamdago on Jul 10, 2020
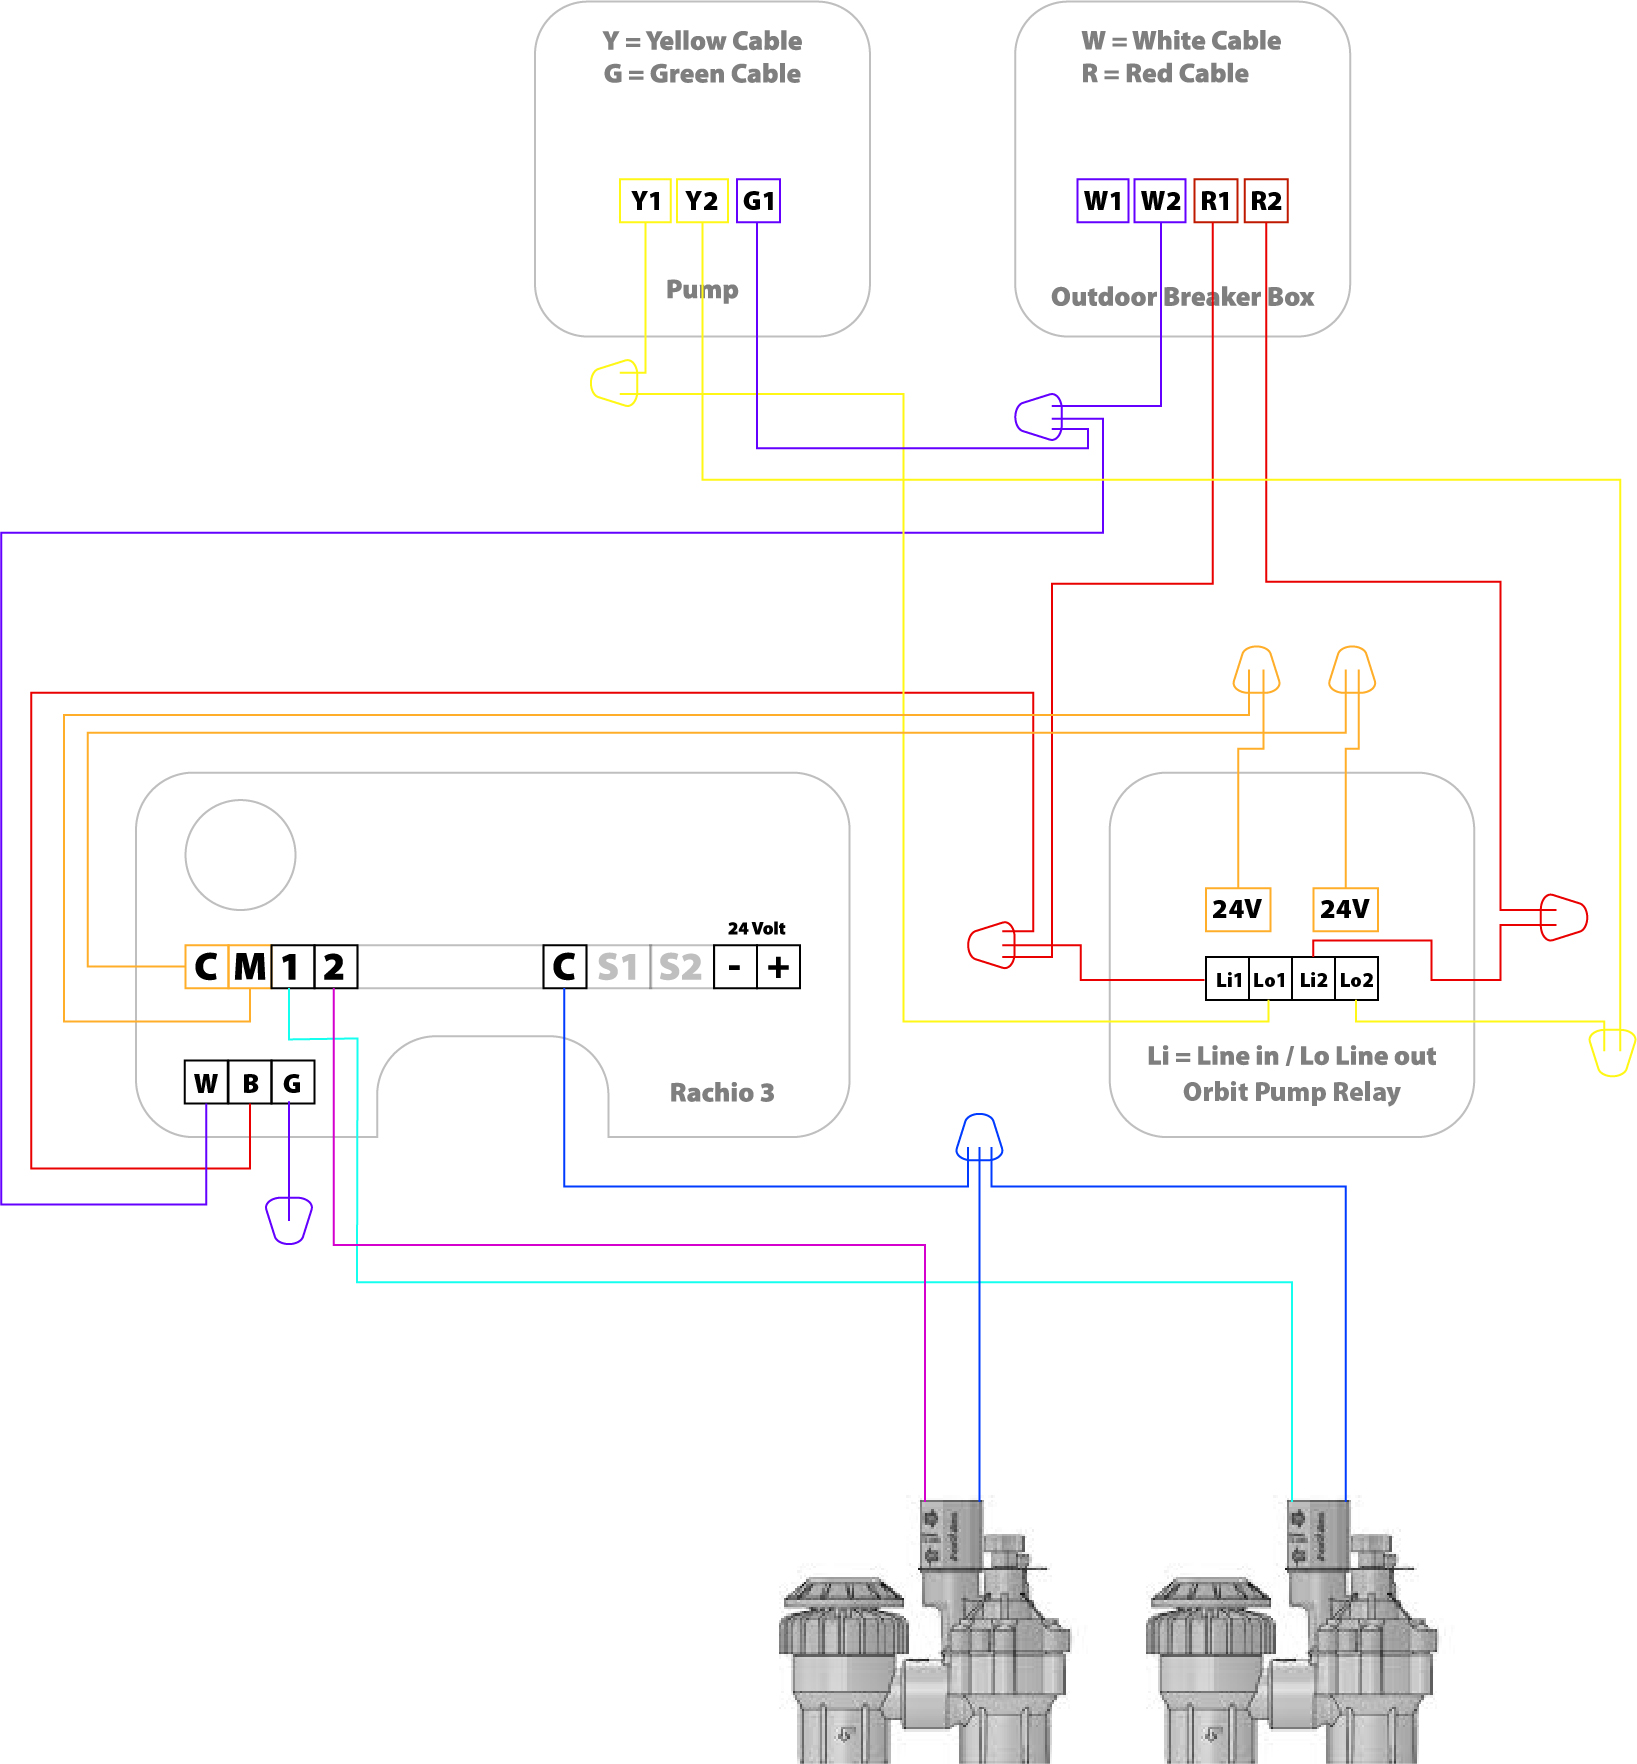
So the cables I bought (18 AWG) 4 Conductor today, those are a lot thinner then the cables inside the orbit relay. Will that be fine?
I might need more cable. I can run wire from Rachio to Valve and use 3 out of 4 wires. Then one wire from rachio to the pump relay… Actually I might have enough, forgot that my pump will already be where the cables are ran, was looking at my diagram of how they’re all separated for clarity.
I bought conduit that is 6ft. The website somewhere said have the rachio 15 feet away from pump? How far do I need to have it? Was thinking of putting how I photoshopped early on in this thread.
Will tape the wires before I take them off mechanical so I can label them. As in put tape around the cable and stick it to itself with enough room to write. Better yet I will use my label maker lol.
\ wiring-dia1637×1764 359 KB](https://community.rachio.com/uploads/db1097/original/2X/1/131a68164993732b8b4ebda20816f948e1561225.jpeg "wiring-dia")
post by Gene on Jul 10, 2020
Since you are running the cable through the pump relay housing, you could use the wire nut to tie the relay common and the valve commons of of one line. (this will optimize the use of a four conduit cable you’ve bought)
So the cable (C, M, 1 & 2) goes from Rachio enclosure to the relay enclosure where the wire is cut and sipped back. (C and M) wires are used to run the relay, where as (C, 1 & 2) are moving onto the valves.You will likely end up using three wire nuts for this, or you can buy a terminal block (like this), which can be separated into the number you need (3?)
Do not worry about the wire size on the 24V terminals within the relay box, they’ve used the same gauge of wire as the line wires as a cost savings, 18 AWG is plenty to power that relay and then some.
The relay is low power, it should not cause any issues with the Rachio, do not worry about minimum distance as long as you have a strong wifi signal where you are planning on installing it.
post by iamdago on Jul 10, 2020
Yeah I have good wifi and good signal strength beyond the house.
The actual relay pump housing, not sure where it comes out, its down there and I haven’t really looked at it, but was just planning to use the conduit I bought to run it down along the pump housing. Use the cable down there and just use 3/4 since I have to run the cable down there anyways for the zones.
For the one cable i’m not using in the wiring, I was just thinking of using electric tape or just putting a nut on both sides. I bought waterproof nuts in a big bag, so even though they provide nuts and the cables will be enclosed I’m going to use them on all the wires.
post by Gene on Jul 10, 2020
By relay enclosure / housing, I meant the plastic Orbit enclosure of the pump start relay that you are installing next to the rachio enclosure. There is no reason to open / make changes to the pump itself.
No need to terminate / hide unused cable next to your valves, simply leave it not stripped and wrap it around the cable to move it out of the way.
post by iamdago on Jul 10, 2020
Theres that too.
But yeah I’m removing the mechanical timer guts and just screwing the relay in there like you suggested. But first i’ll try to see if I can remove the mechanical box completely and fit the orbit box in its place with the conduit already there (but I doubt it without a lot of work)
post by Gene on Jul 10, 2020
yea, save yourself the trouble, simply drill a small hole near the bottom of the old timer enclosure in order to allow the irrigation wire from the controller to enter. In this case I suggest you run separate cables to the relay and the valves. Having the valve wire follow the conduit to the pump is a good idea, there should not be enough interference to cause any issues.
post by iamdago on Jul 10, 2020
Yeah gonna run conduit from rachio to the top of the box just to have space from the other two holes. Will route all the cables necessary from rachio to relay and rachio to vales through that, then have a separate exit to go to the valves from mechanical.
Actually might just get some more conduit for the small hole on racio where power goes for the relay cables. Then use big hole for the valves
post by Gene on Jul 10, 2020
Many ways to skin this cat, looking forward to how it will turn out.
post by Gene on Jul 10, 2020
iamdago](https://community.rachio.com/t/intermatic-mechanical-timer-replace/25406 "Load parent post")
In the interest of keeping the thread unbroken I’m replying to your comment here
You can cut the pipe midway to the ground and install a twist union, so that in the future the repairs are easier:
You will likely need to make two cuts per valve, so that at the end you can completely remove the valve and fix the leak.
Unscrew the cut peace from the valve and reinstall it using the sealant, it is easier to apply generously and not worry about breaking the union:
https://www.lowes.com/pd/Oatey-Great-White-Sealant/4750813
post by iamdago on Jul 10, 2020
I have a purple primer and and cement package one. I will google that so I can see how to do it better. As for the part with the cut off, cut and replace completely? But this time use sealant for the screw part?
\ image4032×2268 3.32 MB](https://community.rachio.com/uploads/db1097/original/2X/0/0ccf867057e72069dd79710e71b5ffa4bab9b52c.jpeg "image")
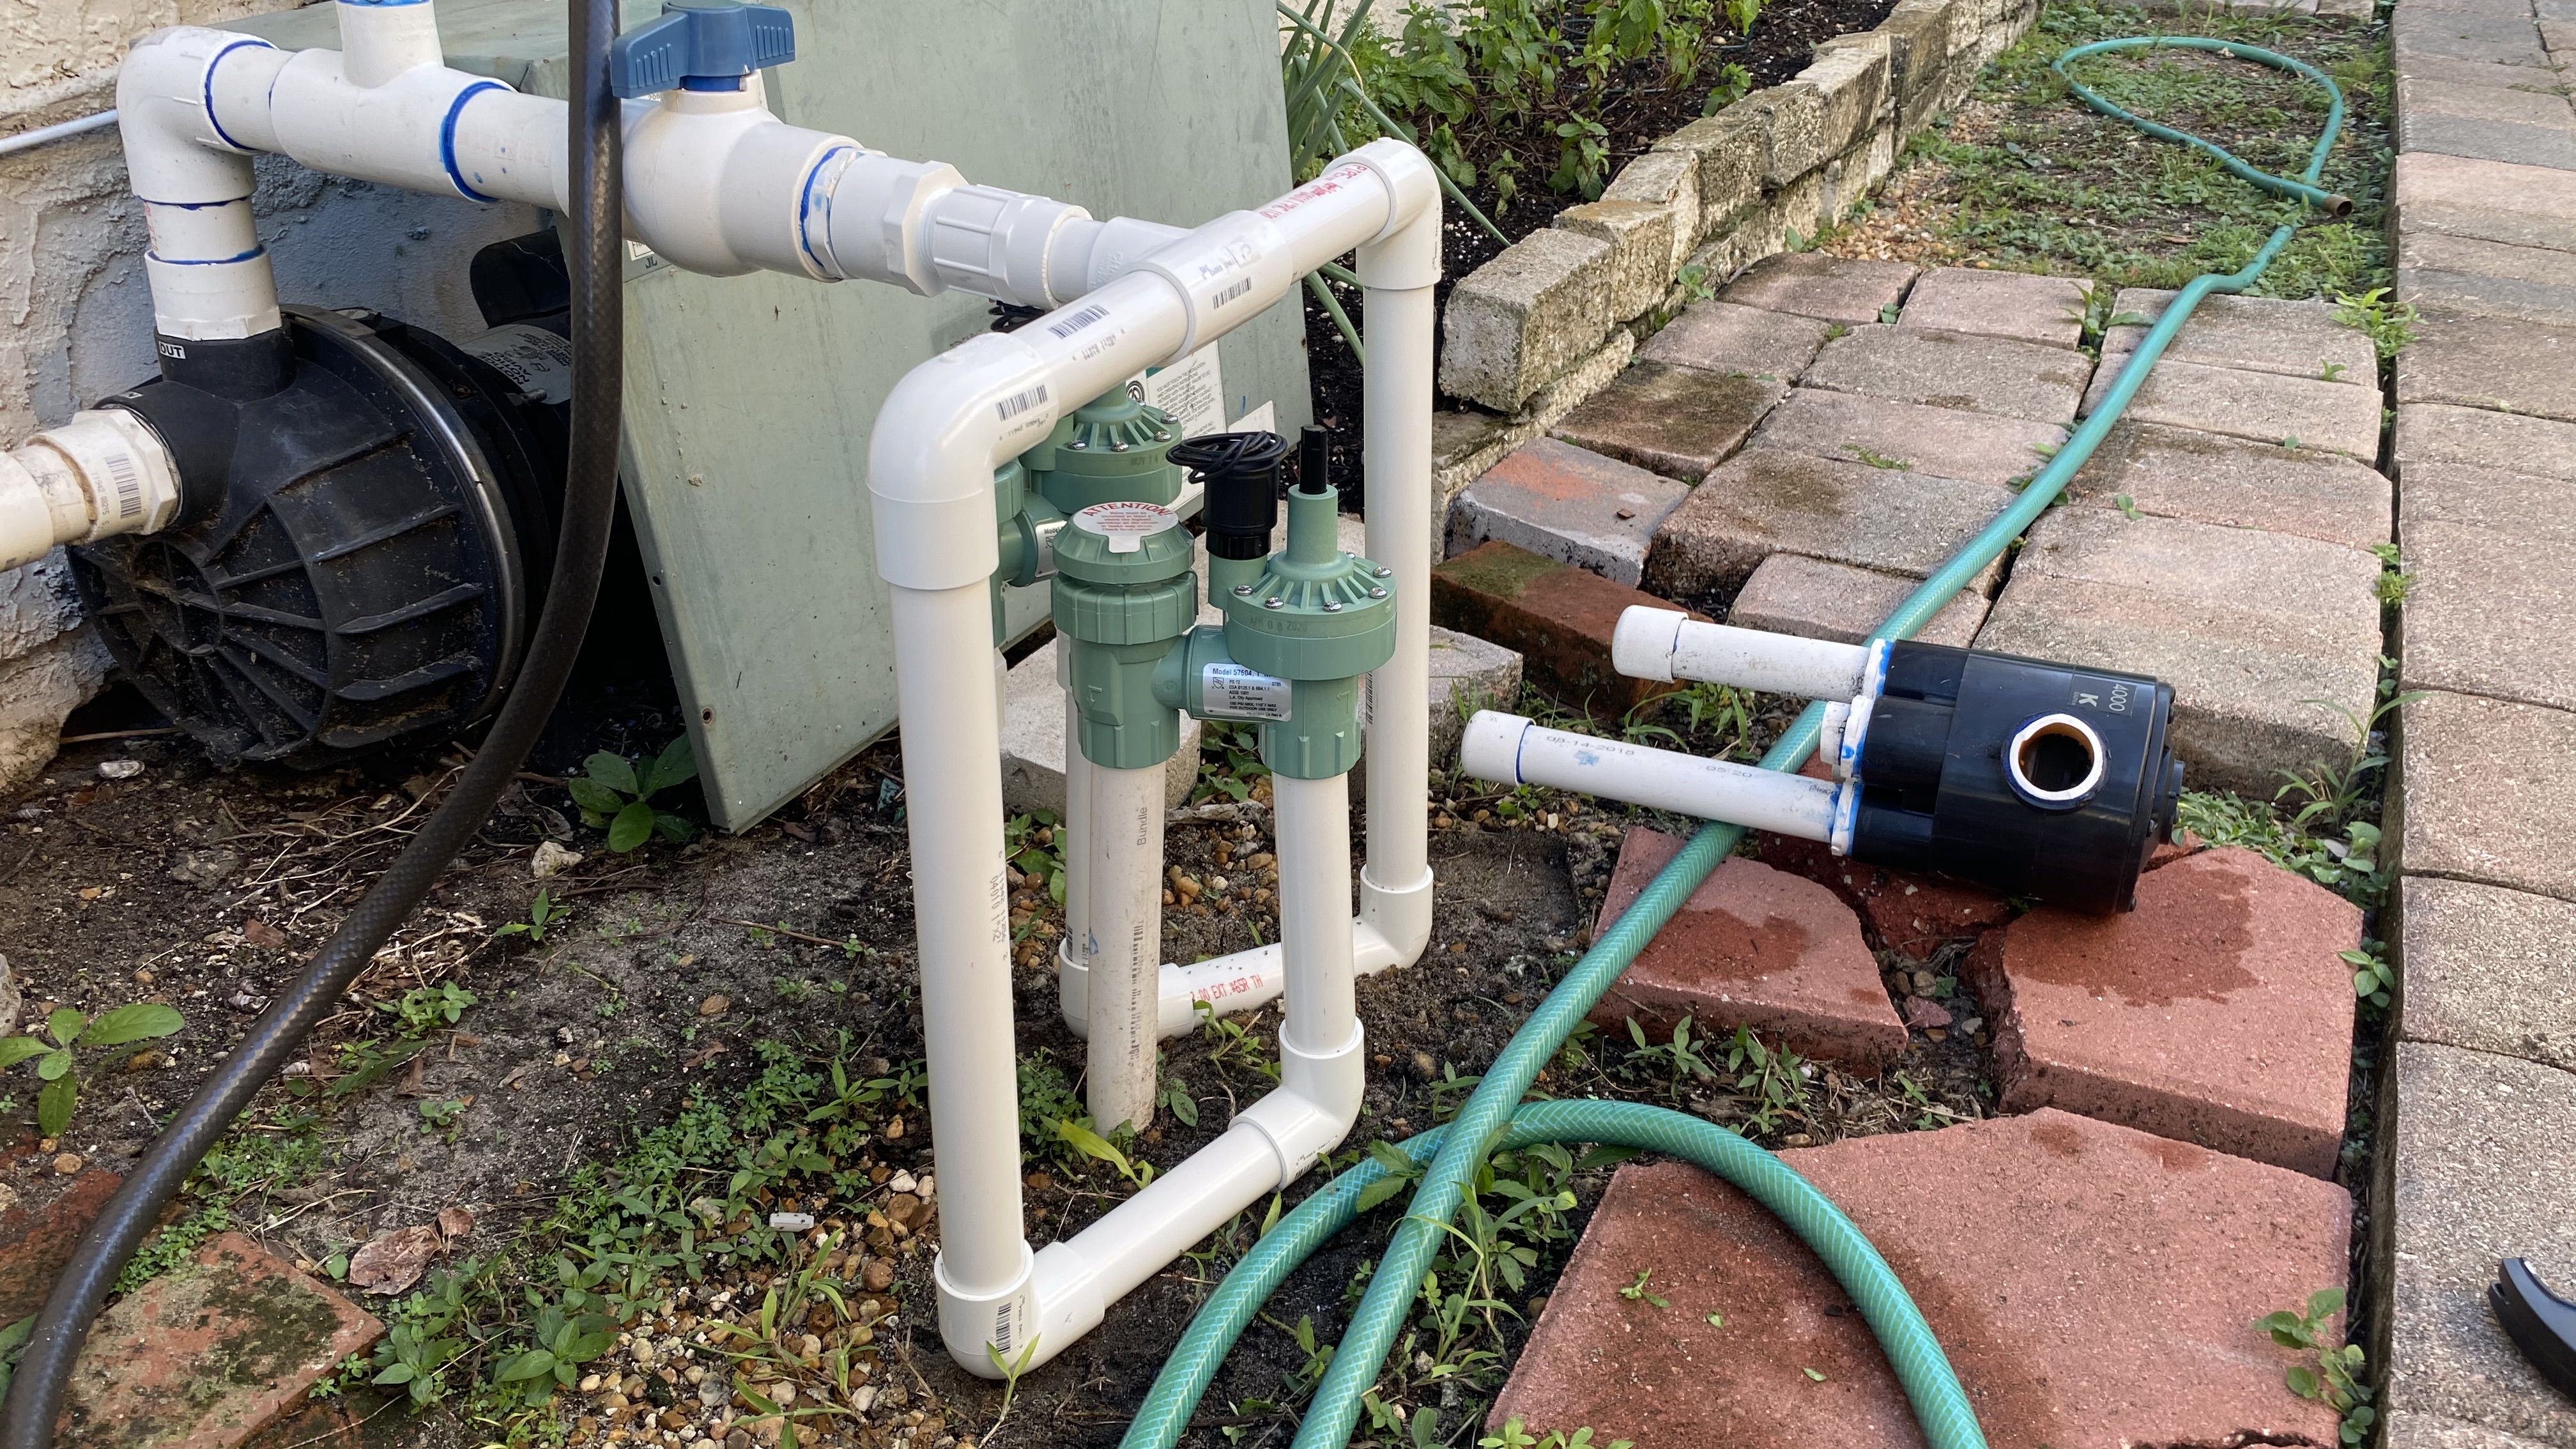
post by Gene on Jul 10, 2020
1
You can fix the cut with new Union
Sealant is not a replacement for cement, use it in place of tape
post by iamdago on Jul 10, 2020
Not for the valves but where the cut off knob ball thing is. Those are are screwed and barely any room. Probably gonna cut and replace the pipes leading into that and find a screw glue.
post by Gene on Jul 10, 2020
\ image2424×1364 1.23 MB](https://community.rachio.com/uploads/db1097/original/2X/4/469110494ec08d59758efca9384ddcd7ec282811.jpeg "image")
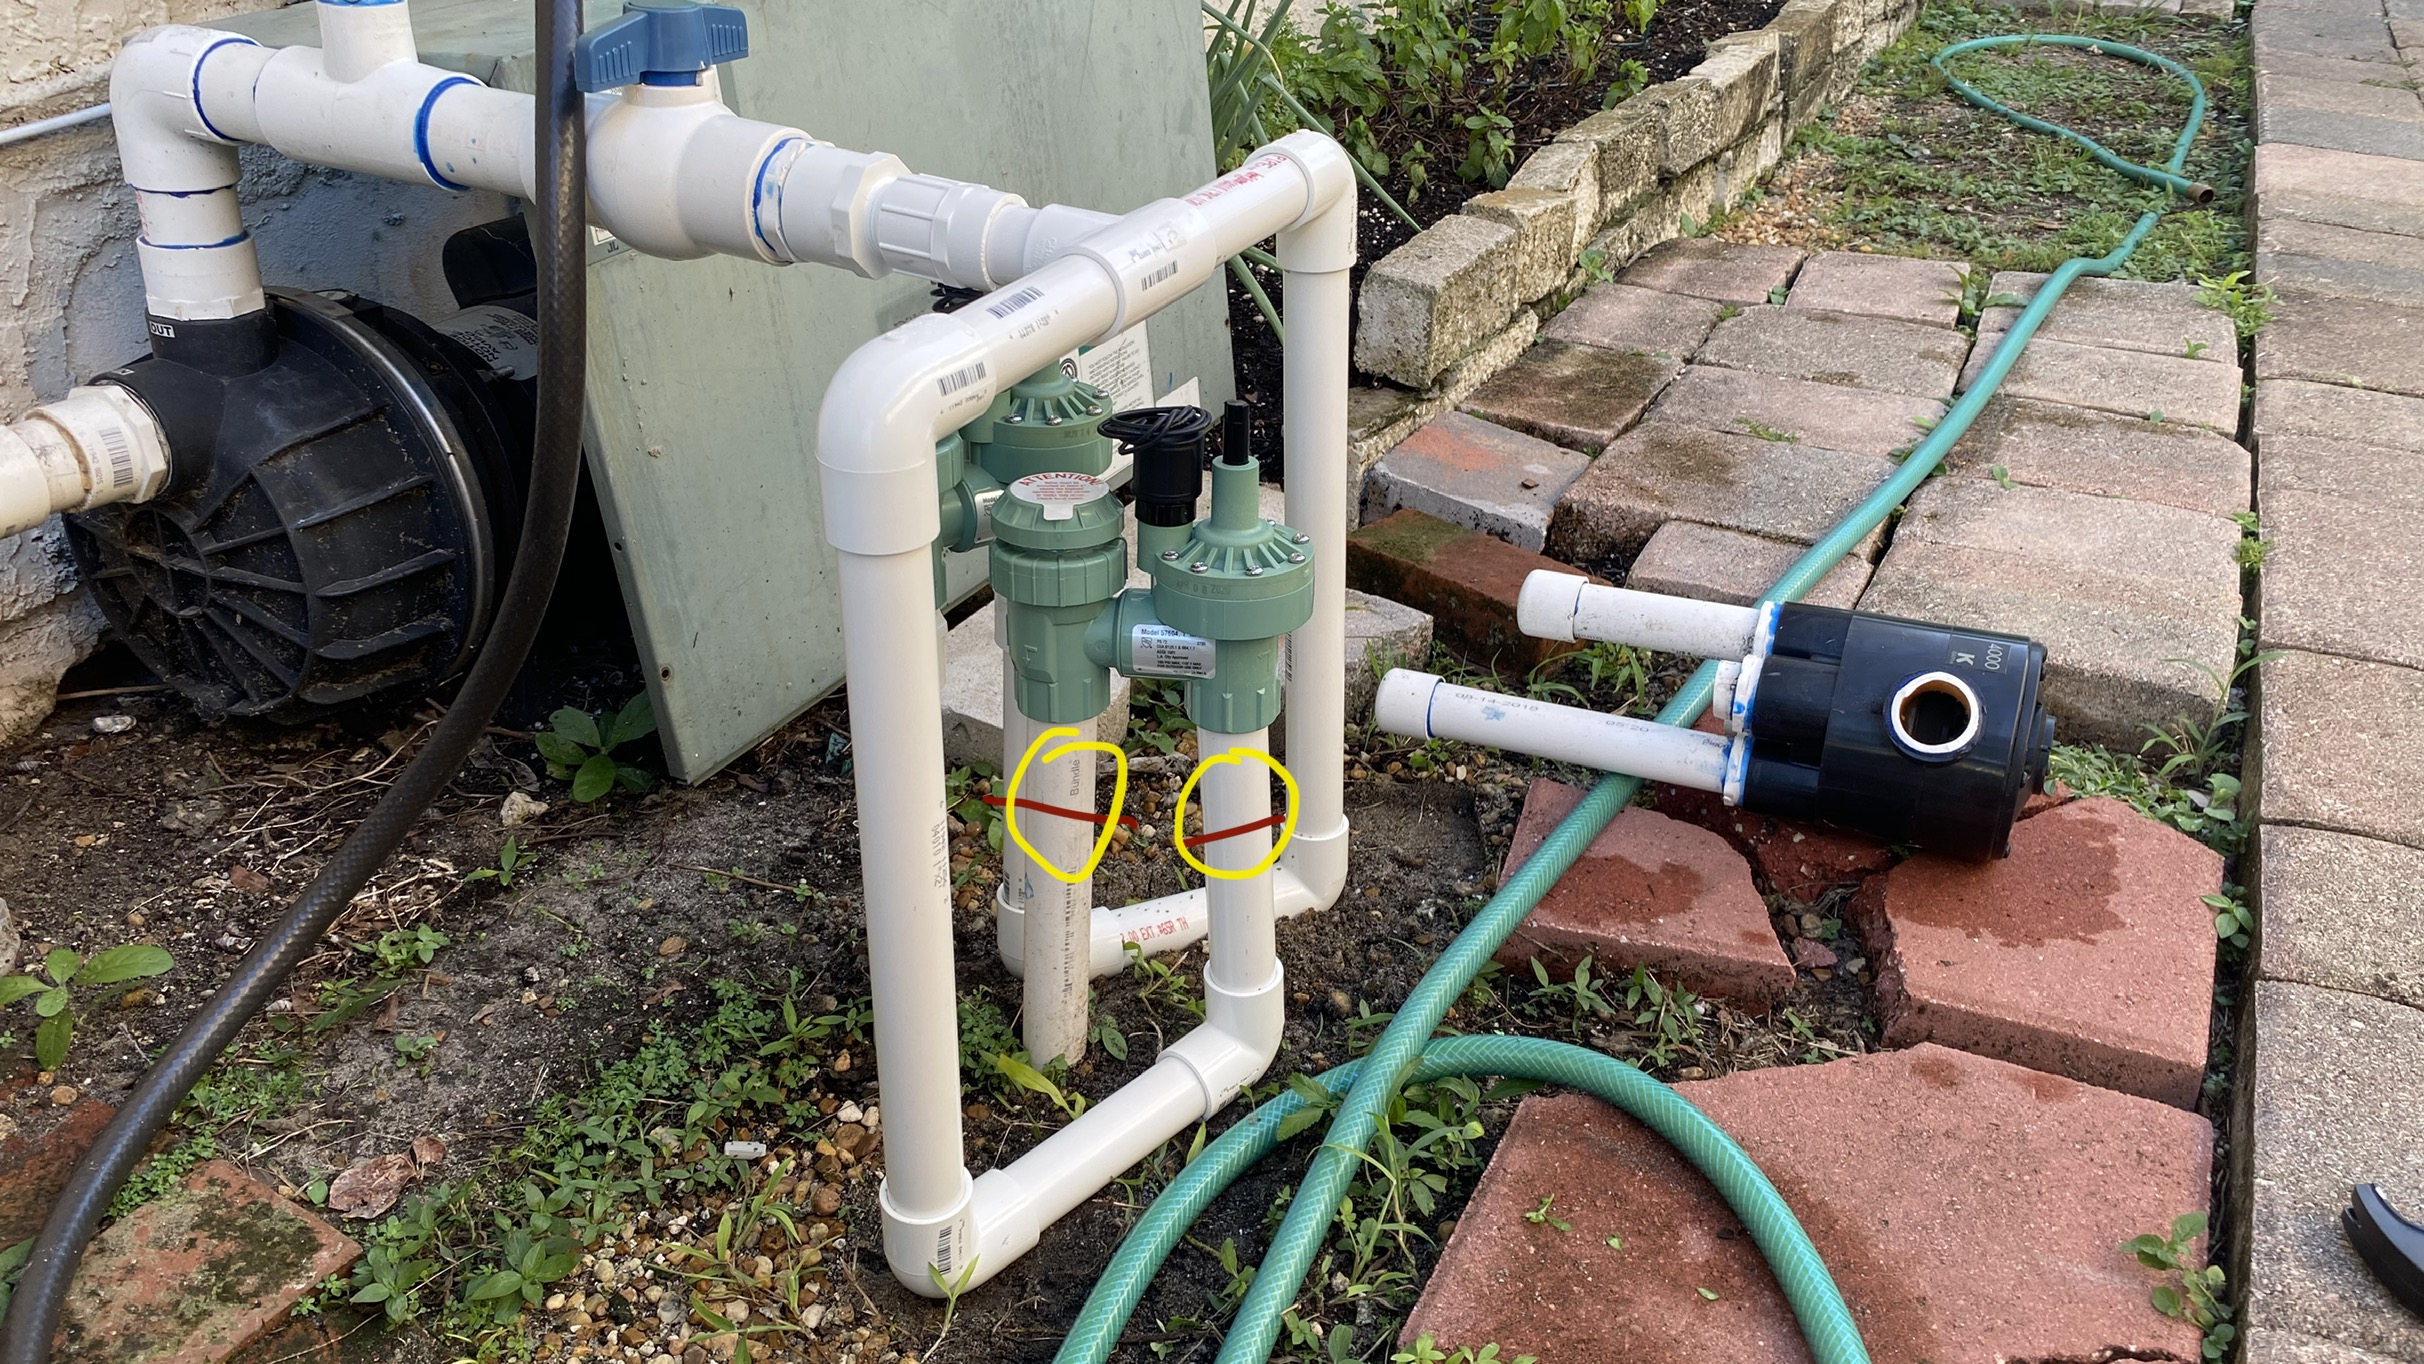
Cut here
post by iamdago on Jul 10, 2020
Yeah that side I get. I’m talking about this part. it goes from ball to a screw adapter reducer from 1 1/2 to 1 1/4
\ image386×836 263 KB](https://community.rachio.com/uploads/db1097/original/2X/0/0886ed55df1a7df8ae92f49ac950a47465d95cc0.jpeg "image")
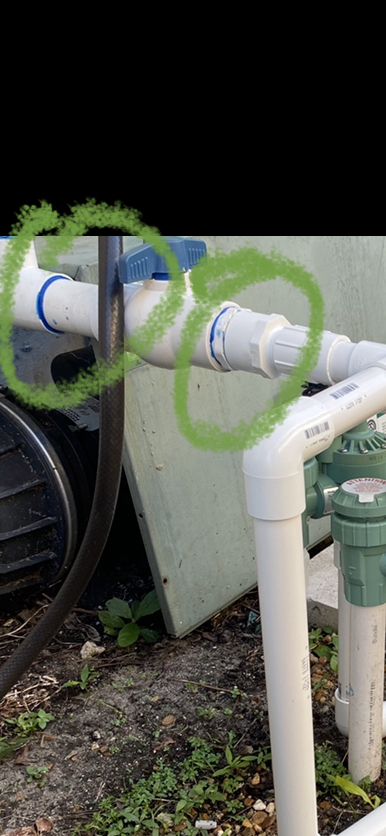
\ image1242×2688 2.42 MB](https://community.rachio.com/uploads/db1097/original/2X/f/fb62bb134d67b98a994eeb6876ef27a9a4c08337.jpeg "image")
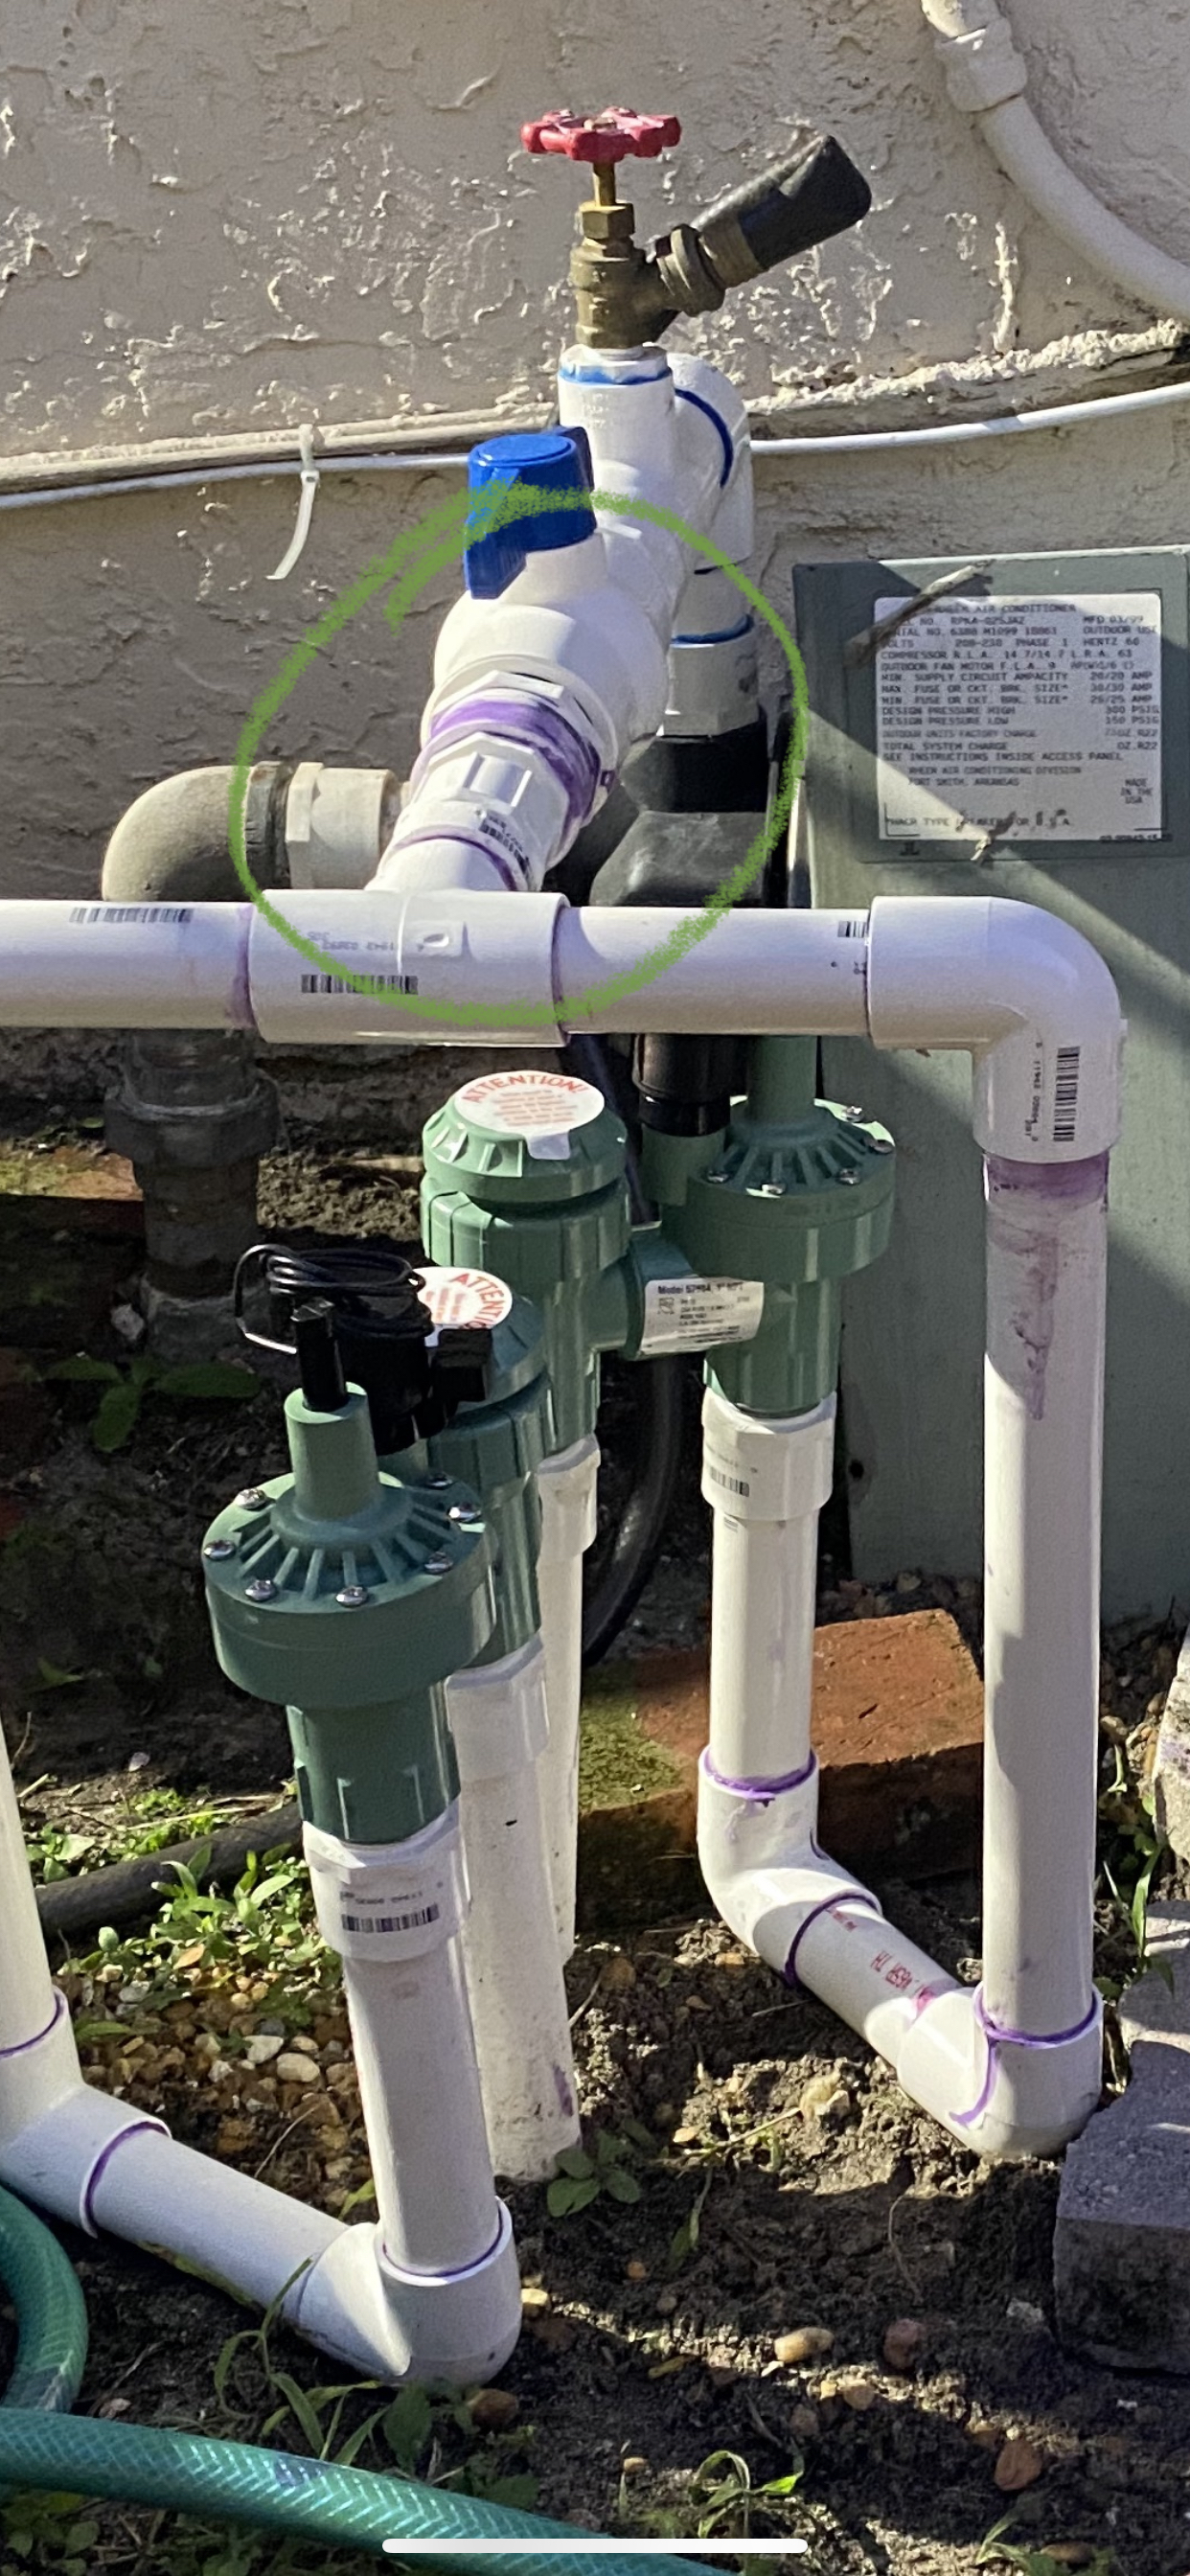
post by Gene on Jul 10, 2020
Sorry, misunderstood where it was leaking. Is that the only place?
post by iamdago on Jul 10, 2020
Any part that I used a screw adapter with teflon type tape. So valves and where the ball is. Going to just remove and see if there is a straight pipe fix. Unless you recommend something
post by Gene on Jul 10, 2020
Cutting midway to the spigot from the valve would allow you to disconnect the whole assembly, in case you are making the other cuts as well. Valve can then be unscrewed without additional cut between assembly and the valve.
post by Gene on Jul 10, 2020
How big of a leak do you have? Is it dripping or flowing?
post by iamdago on Jul 10, 2020
Dripping, all 4. The siphon pipes easy to do, it said 6” from sprinkler or floor and i made sure to have more incase i needed cut. The ball is gonna be the tough part lol.
Also the siphons were closed, not sure how to open them manually, there’s the flow knob which i assumed was all the way open and there is the part that unscrews with the cables, do you know which allows water to flow?
So it could drip due to the pressure?
post by Gene on Jul 10, 2020
Yes, normally the system would not be under the full pressure, so the leak will be much less (if at all). Also, depending on how clean your water is that you are pumping out, the leaks will get clogged up.
Valve(s) can be opened by turning the part with the wires (solenoid). CCW to turn ON, CW to turn back off.
post by iamdago on Jul 10, 2020
So should I test again rn with the solenoid open and how open should I turn them? To see if it leaks?
post by Gene on Jul 10, 2020
Simply turn until the water starts flowing (sprinklers pop up). The water itself does not flow through the solenoid, so you only need to turn enough for the actual mechanism to turn on.
post by iamdago on Jul 10, 2020
So i’ll test rn.
post by iamdago on Jul 10, 2020
Gene](https://community.rachio.com/t/intermatic-mechanical-timer-replace/25406 "Load parent post")
So yeah turned on til you felt the water go through, they still leak. The ball spot same amount. The valve siphon less but still leaks.
Best bet is just to redo, do wiring and wait 24 hours to do it again after it dries?
post by Gene on Jul 10, 2020
If it drips, I’d give it a chance to seal itself, you are only loosing a few cups of water per hour your sprinklers are running so in terms of financial losses it’s negligible, especially since you are pumping from the well / lake.
post by iamdago on Jul 10, 2020
Yeah, but if it leak after i do wiring tomorrow i’m changing them sunday. Because I rather it done right you know?
post by iamdago on Jul 11, 2020
Gene](https://community.rachio.com/t/intermatic-mechanical-timer-replace/25406 "Load parent post")
Started hurricaning outside so only got to put box up.
\ image4032×2268 2.8 MB](https://community.rachio.com/uploads/db1097/original/2X/4/4db0ff692433cacaab5b639fc458e64993e31fb7.jpeg "image")
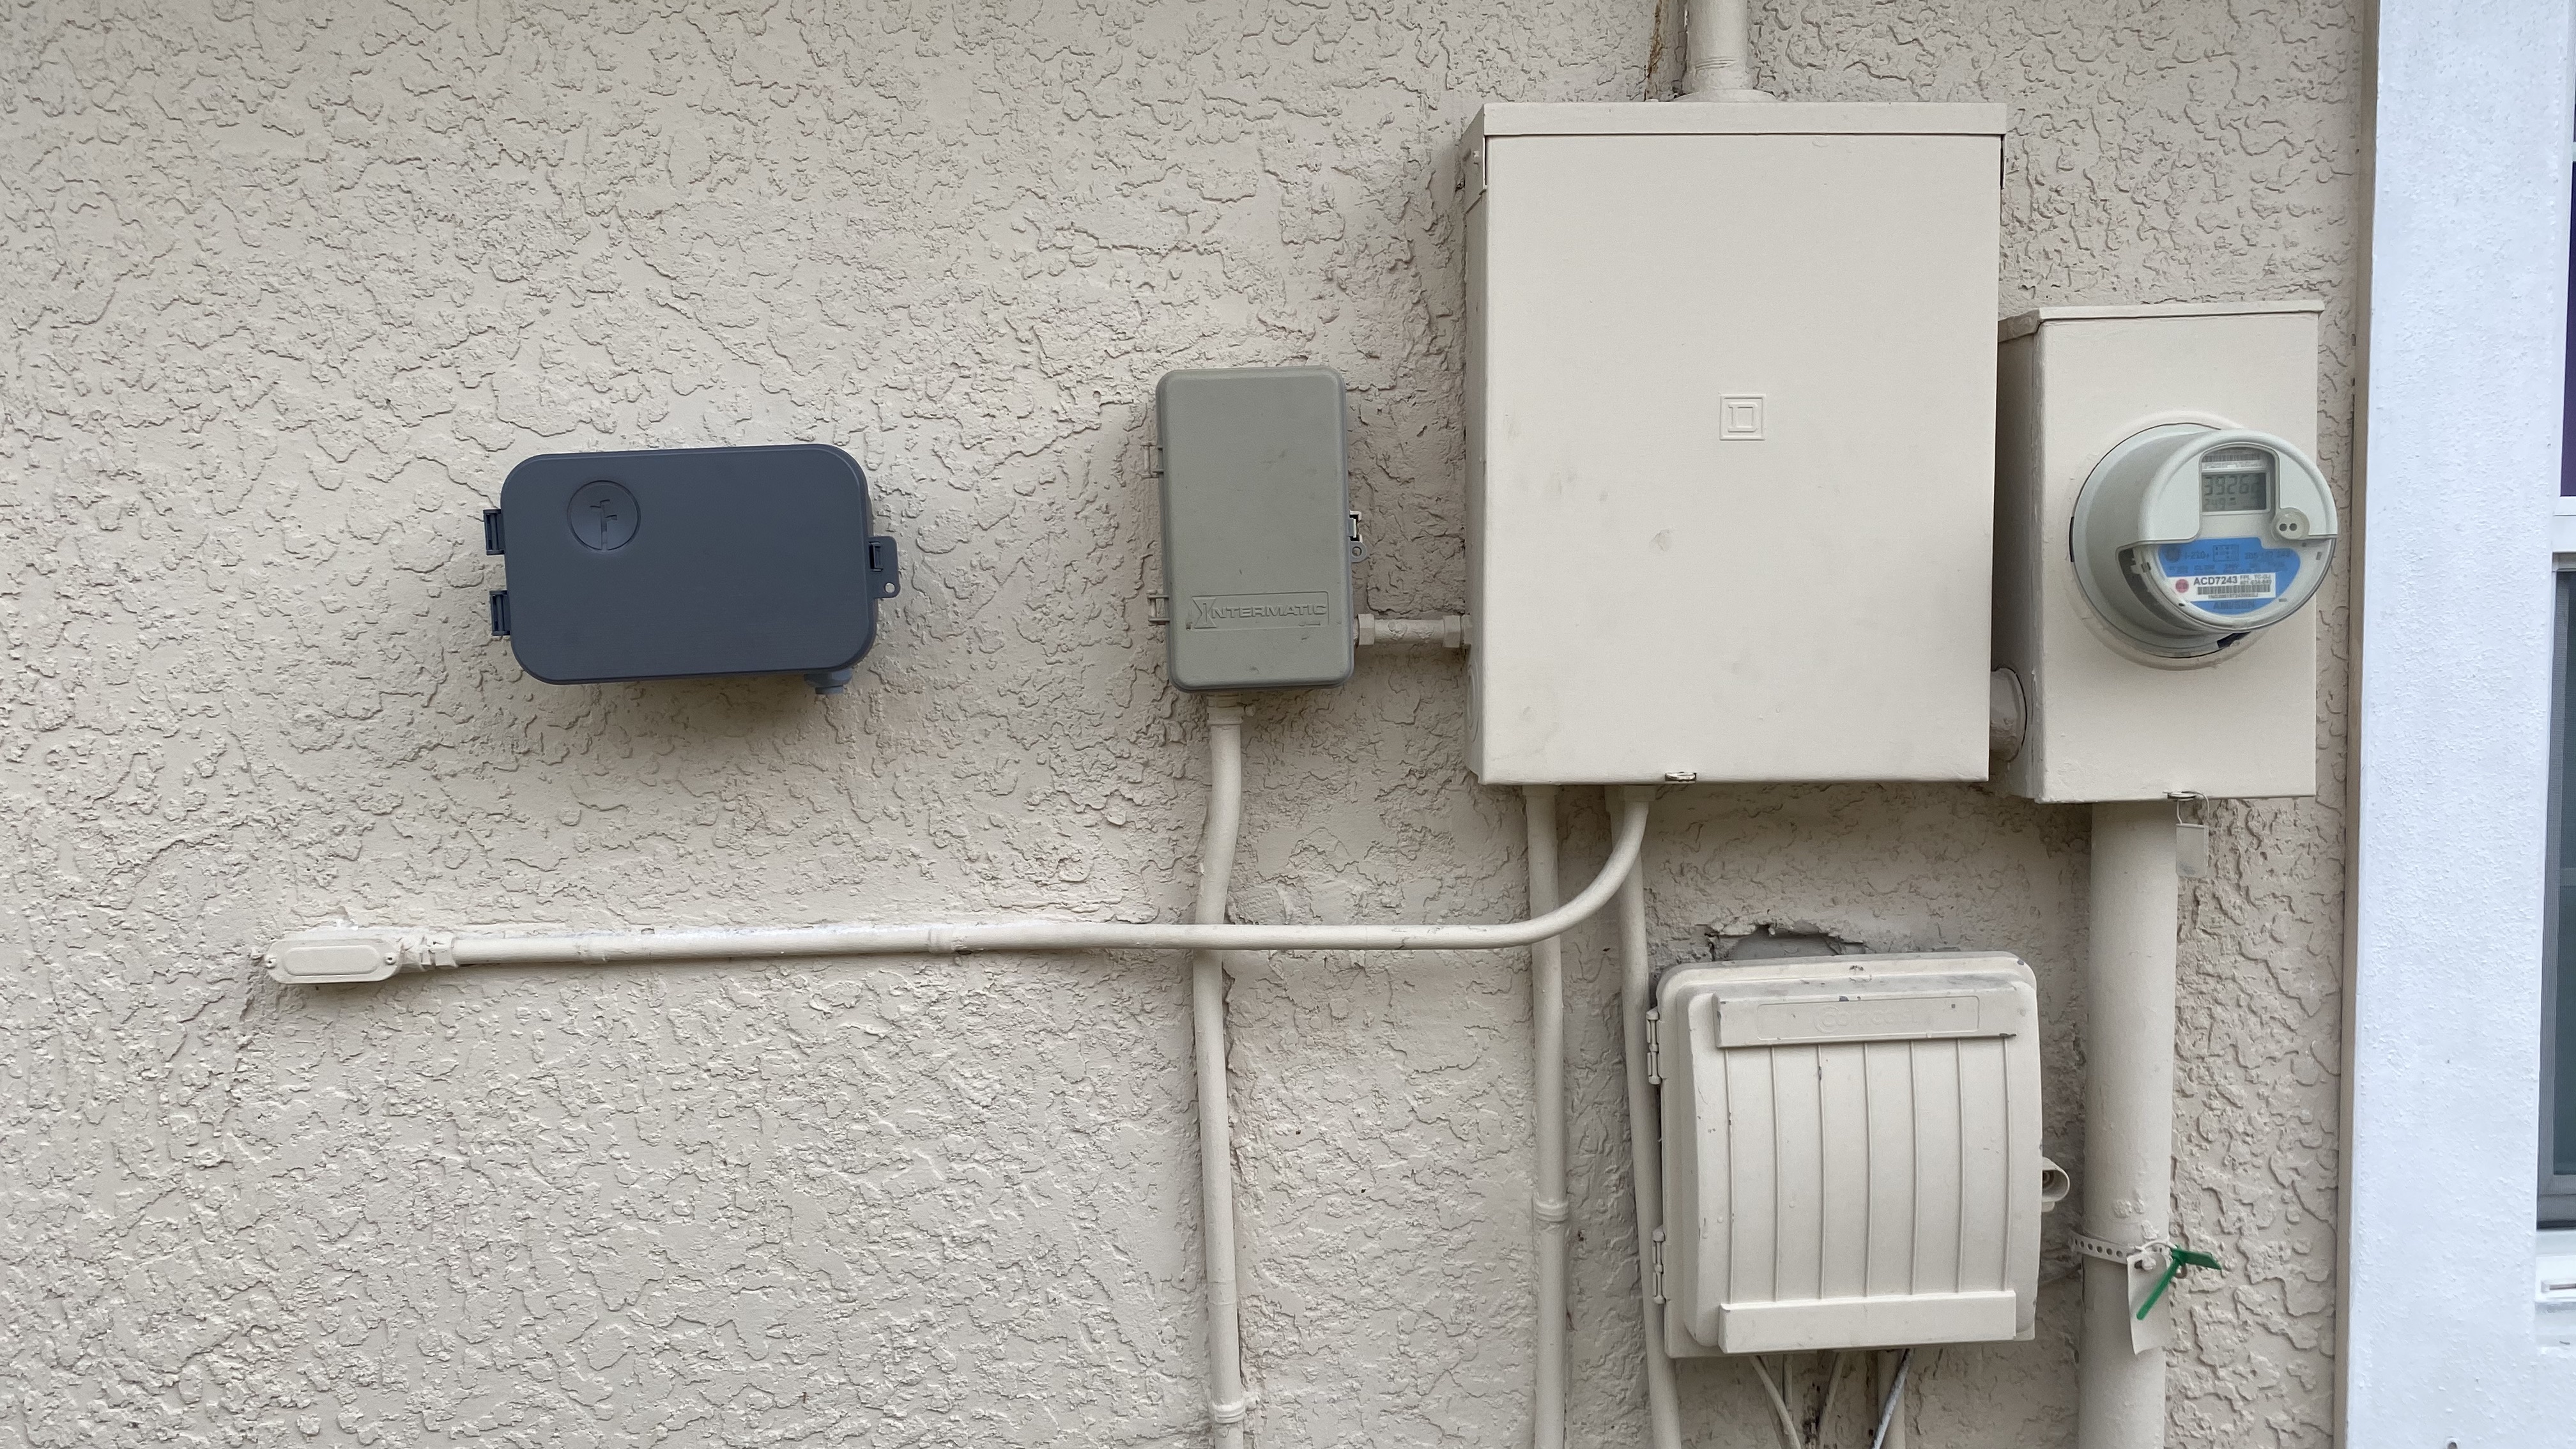
post by iamdago on Jul 13, 2020
Gene](https://community.rachio.com/t/intermatic-mechanical-timer-replace/25406 "Load parent post")
In my wiring diagram I didn’t attach the green wire to anything (the green wire that the plug plugs into) and it’s not turning on. The black and white cable get power, you sure green goes no where i emailed you call me or text or reply if you can
post by iamdago on Jul 13, 2020
For anyone who follows this, yes you wire the green ac chord in rachio to green from your old timer… Took awhile figured it out.
However when i turn the breaker back on the pump starts
post by Gene on Jul 13, 2020
iamdago](https://community.rachio.com/t/intermatic-mechanical-timer-replace/25406 "Load parent post")
Green on the rachio plug goes to GND terminal of the internal power outlet, since rachio power supply does not feature a third GND terminal, that plug is unused, thus green wire (internal to Rachio enclosure) is not nessesary.
Take pictures of your wiring. We’ll see if we can find an issue (pump should not turn on). Have you tried plugging anything else into the power outlet (such as light) and see if outlet is live?
Does your controller power up when plugged into a different outlet (other than the one within the enclosure)?
post by iamdago on Jul 13, 2020
Hey so two things it turned on cause I had it in 24+ not in the right place. As for the green ground cable for ac adapter, I connected it to the green cable coming from the right. Without that it wouldn’t turn on. But got everything working, now what’s left is the pipes leaking. If anyone needs help feel free to ask, i’ll get notification and i’ll know and help.
post by Gene on Jul 13, 2020
If it works… But I’m still lost as to why the green wire was needed within the Rachio enclosure. Looking forward to after pictures
post by iamdago on Jul 13, 2020
The wiring is emberrasing. Whoever placed it in the first time for mechanical timer did not make the wires long enough. They were exact to size so it just looks like cluttered twist tie things that are waterproof.
Well it needed ground to power… But then again I had 24+ volts in the wrong section… I had them in 24V part instead of CM…
Maybe that’s why? But now they’re in right spot and the 24V is in the right section. But honestly I think it needed to be grounded
\ image2268×4032 2.41 MB](https://community.rachio.com/uploads/db1097/original/2X/e/e835bd585405d012a546326bbdaf81e9ecfcde16.jpeg "image")
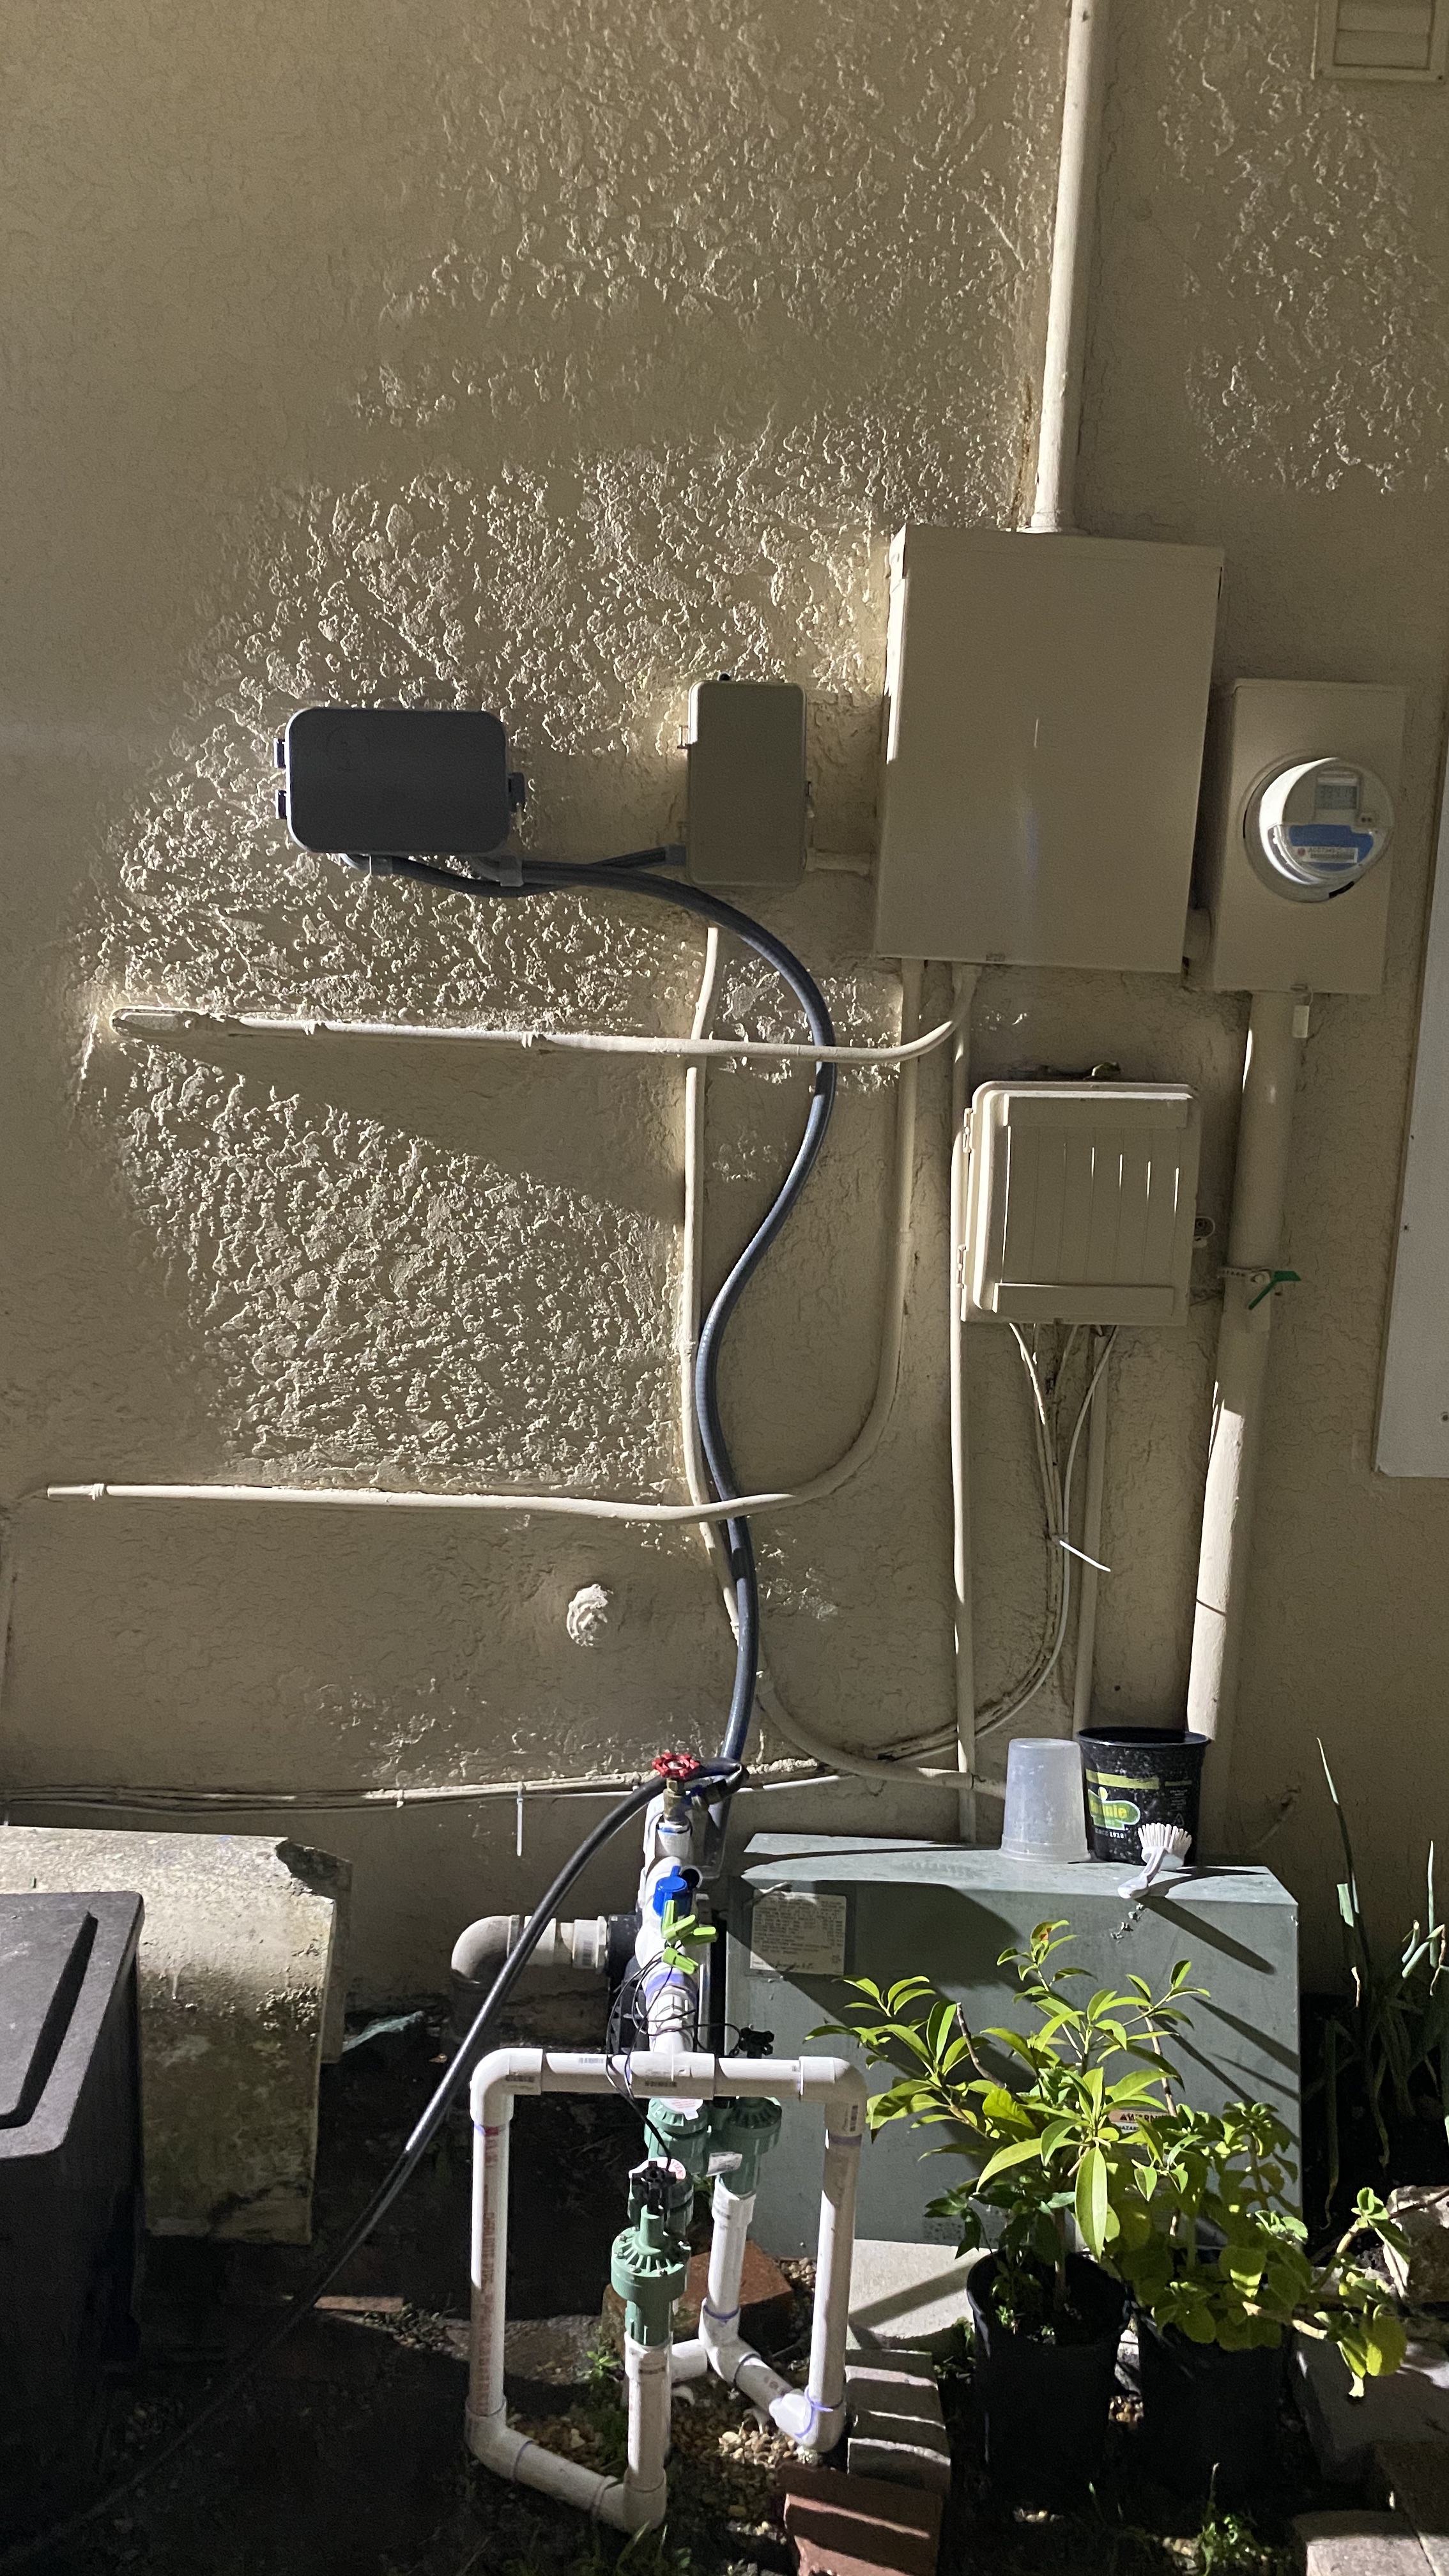
post by Gene on Jul 13, 2020
Rachio power supply has only two terminals
\ Rachio-MKA-482401000-Adapter-C800×800 57.5 KB](https://community.rachio.com/uploads/db1097/original/2X/5/56ee54a881a257c660d0215137e70eb7f505be19.jpeg "Rachio-MKA-482401000-Adapter-C")
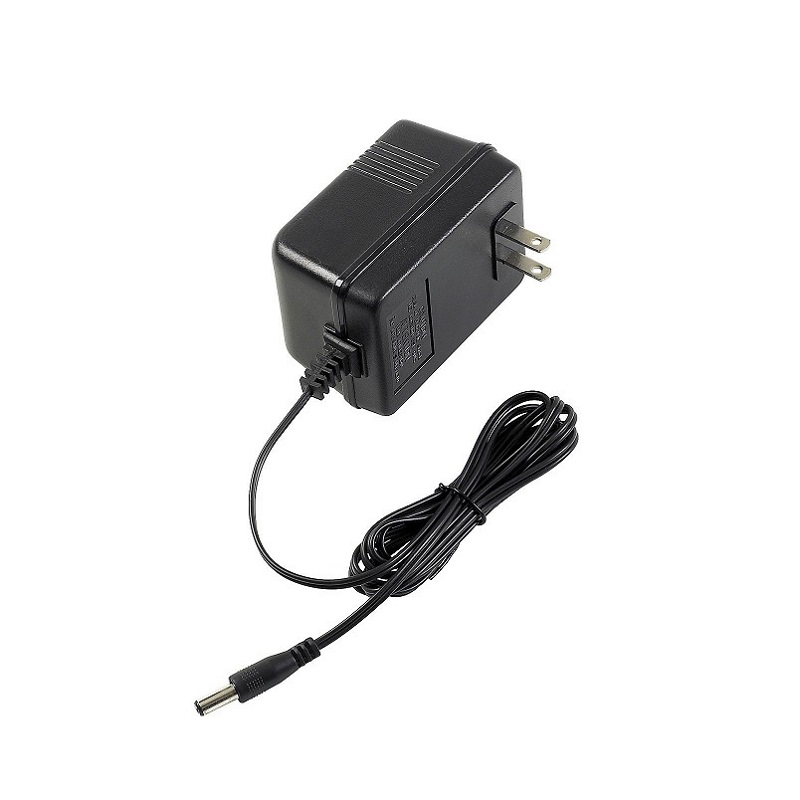
So plugging it into the grounded outlet should not really provide any benefit:
\ clint-patterson-exfrR9KkzlE-unsplash1800×1202 117 KB](https://community.rachio.com/uploads/db1097/original/2X/d/dba46841ecacca91b284c61e4d77f3c67bfdb983.jpeg "clint-patterson-exfrR9KkzlE-unsplash")
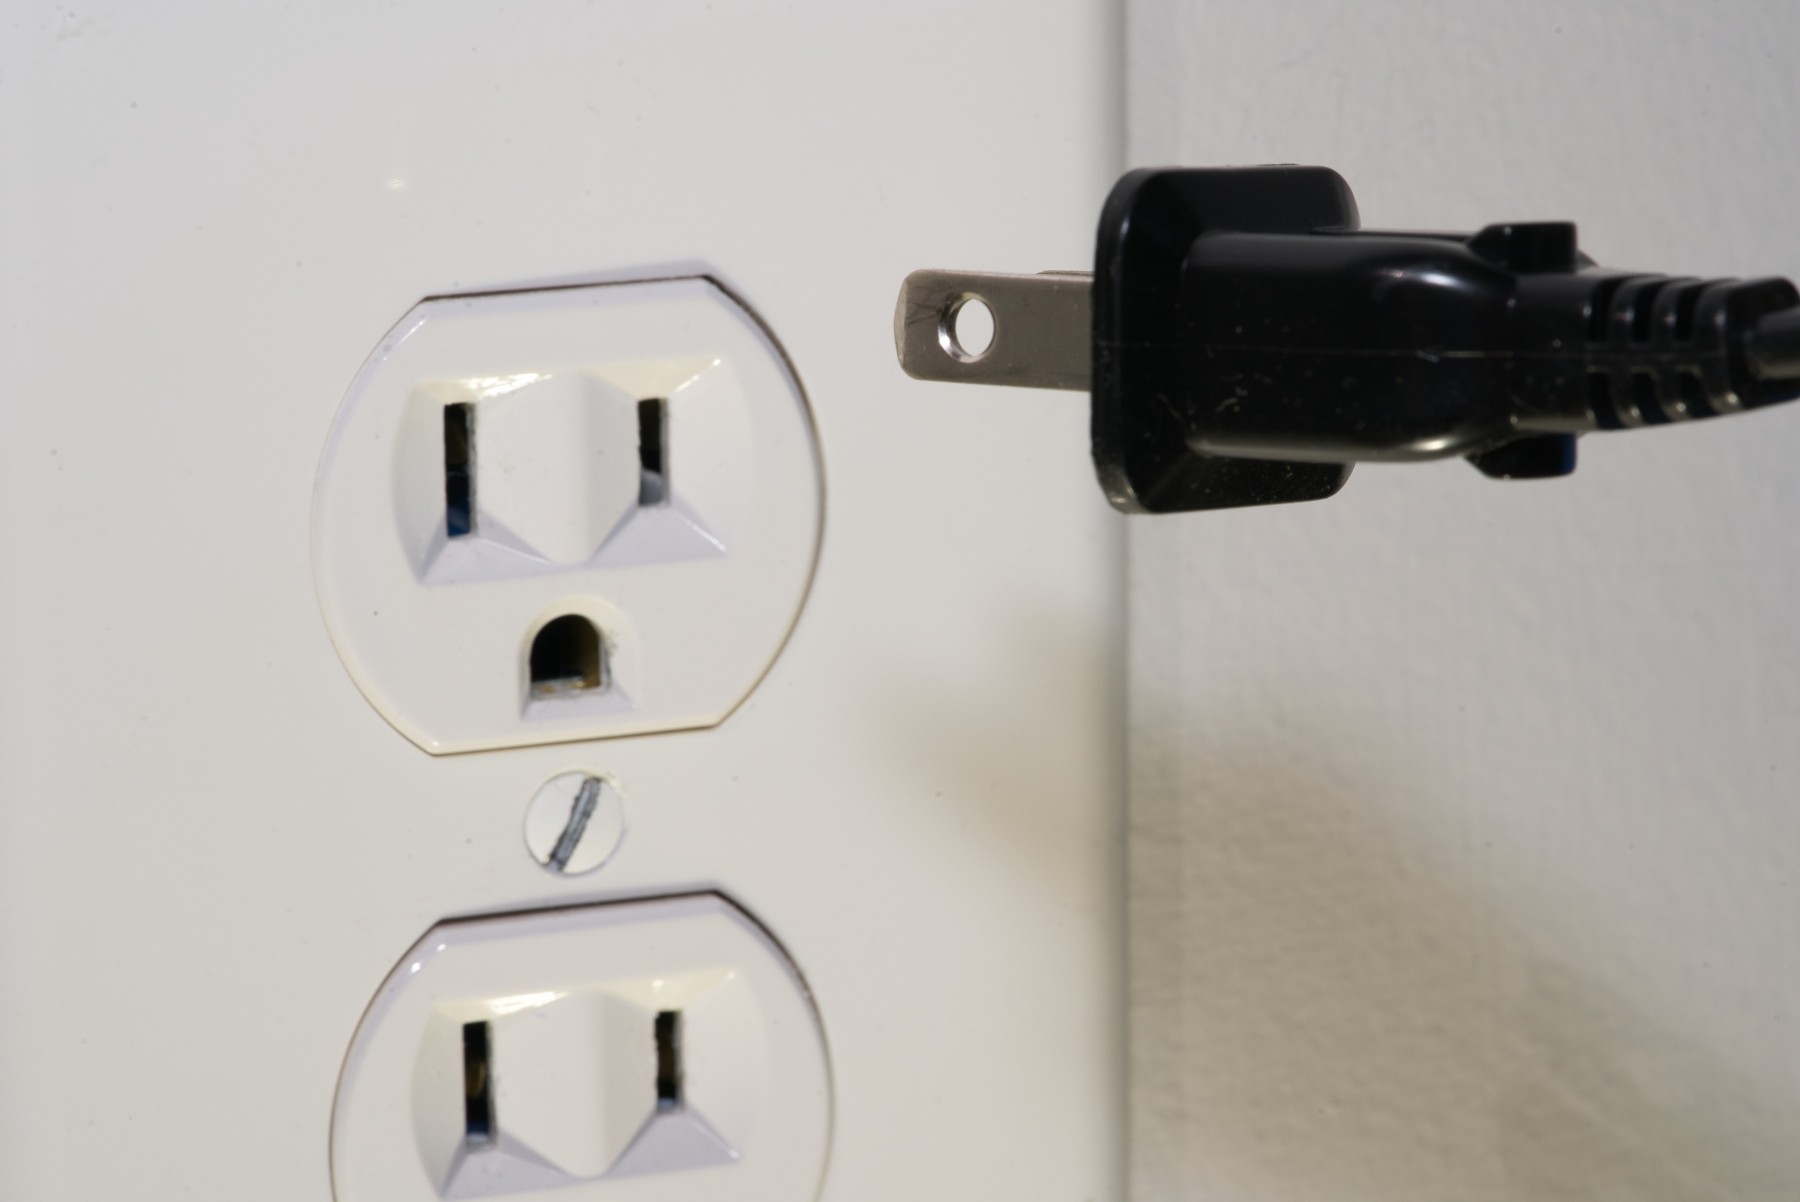
The third ground port of the outlet is technically unused (nothing is connecting to it).
As far as your setup, looks great! If everything works (and not on fire), you must have done something right
post by iamdago on Jul 14, 2020
Lol it didn’t work before I did that and now it does. But yeah gonna do zoning tomorrow and take a pic
post by iamdago on Jul 14, 2020
Gene](https://community.rachio.com/t/intermatic-mechanical-timer-replace/25406 "Load parent post")
Your idea about placing a third zone for the hose, wouldn’t that mean if I left it open that when I ran zone 1 or 2, water would be going into the hose?
post by Gene on Jul 14, 2020
Yes. It would require you to turn off the hose in order to prevent water flowing out of it when other zones are active, this is no different to how you were doing it do this date.
If you wish to automate a hose, you could add an additional valve inline with the hose. Alas I cannot find a complete assembly off the shelf, but you could assemble one yourself out of something like this:
A valve (link), spigot adapter (link), and a hose adapter (link)
Theoretically you already have the 4th line needed to drive this going to the area.
post by iamdago on Jul 14, 2020
Now you’re talking. Is it possible to run two zones at the same time? Haven’t looked at app that in depth until I figure out piping. I’m thinking I do your suggestion, remove the ball drop and just put a whole new pipe the length I need.
post by Gene on Jul 14, 2020
You cannot easily run multiple zones at the same time, but you could add a cheap relay to the mix in order to run multiple zones. The downside is that the controller will not correctly account for water use within your zones.
If you are going to add a PVC pipe, than you will likely not need adapters I’ve linked to. Those were for use with your existing spigot / hose setup.
post by iamdago on Jul 15, 2020
I’ll show you when i finished today with the pipes of what I bought.
post by iamdago on Jul 17, 2020
Gene](https://community.rachio.com/t/intermatic-mechanical-timer-replace/25406 "Load parent post")
\ image2268×4032 2.96 MB](https://community.rachio.com/uploads/db1097/original/2X/f/f39d8cbd7a47f8a629140946d4e3034ba479b3e4.jpeg "image")

post by Gene on Jul 18, 2020
Looks great, out of curiosity, what kind of end connector have you used on the new valve at the left of the picture?
post by iamdago on Jul 18, 2020
It’s 1” to hose. I need to get a hose nipple adapter to use the type of hose i’m using.
https://www.homedepot.com/p/3-4-in-Thread-x-Hose-Nipple-D49/100111603
The way it is now is for a regular hose. But i’m using one of these hose boxes, so it screws on to the nipple. If that makes sense. Tested after 30 mins. Hopefully no leaks tomorrow after 24/hr if it doesn’t rain.
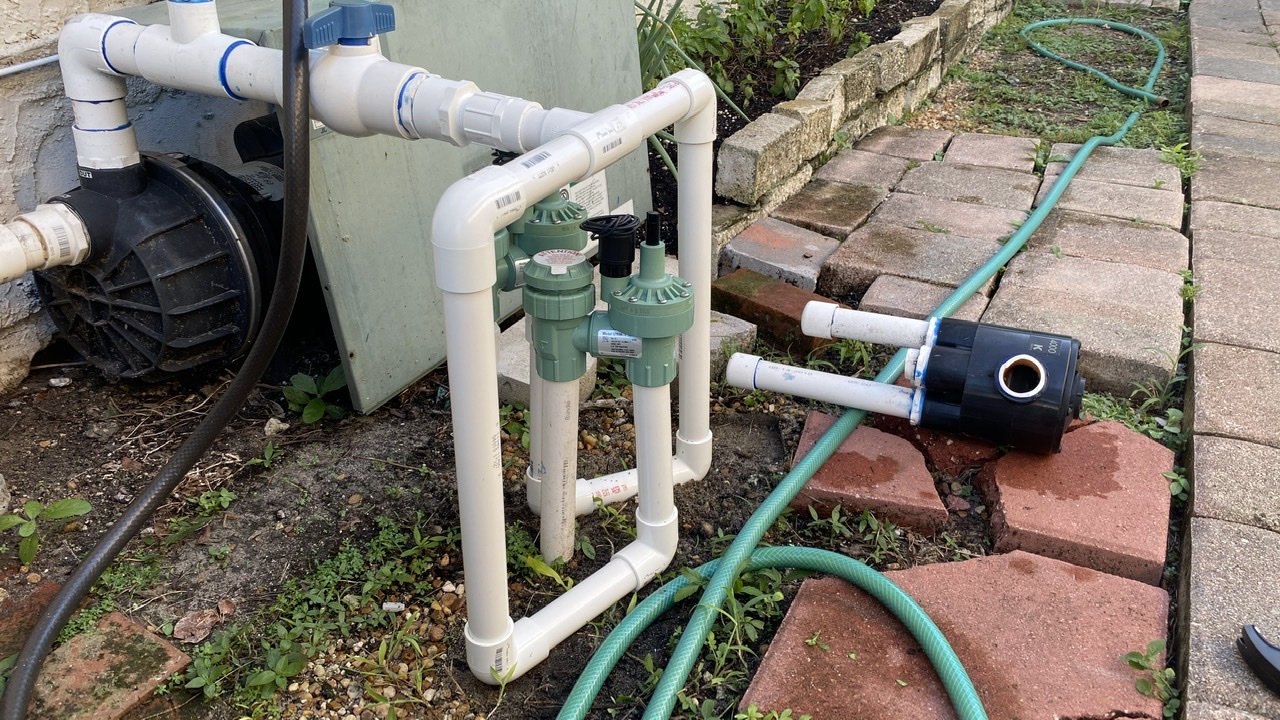
post by Gene on Jul 18, 2020
So you are extending 3/4 tread away from the valve by how ever long the pipe section is? Seems that left section consists of:
valve’s 3/4 female > 3/4 male to PVC > PVC > PVC to 3/4 female
I’d bypass the extension and install the hose adapter directly to the valve, primary reason is to reduce the rotational torque which the hose may apply to the assembly.
post by iamdago on Jul 18, 2020
Right now it’s 1”x1”x3/4 tee, then 3/4 pvc to 1 inch adapter, into the valve, one inch adapter to 3/4 pvc to 3/4 pvc to hose adapter.
Can you explain your idea, more dumbed down? lol.
post by Gene on Jul 18, 2020
Can 3/4 pvc to hose adapter be installed directly to the valve without the extra PVC?
post by iamdago on Jul 18, 2020
The adapter screws in and allows for 3/4 to be screwed in. So without the pvc not for that specific adapter. Now if there is one that’s just a nipple that goes 1” screw to nipple screw, that would work.
What’s the concern about how it is now? You’re saying after you screw the hose there might be too much pressure?
post by iamdago on Jul 18, 2020
Gene](https://community.rachio.com/t/intermatic-mechanical-timer-replace/25406 "Load parent post")
The valve has a screw, so it would have to be hose adapter to 1” screw. Which i can see if they have one
post by iamdago on Jul 18, 2020
Gene](https://community.rachio.com/t/intermatic-mechanical-timer-replace/25406 "Load parent post")
There’s a 3/4 swivel adapter
I’d have to switch out the valve for a 3/4 valve not 1” valve, get this adapter for it to go from T to screw adapter to valve to hose adapter.
post by Gene on Jul 18, 2020
Don’t worry about it, what you have will work fine. I just got confused as to the purpose of the adapter.
You can probably replace it with one of these, alas I can’t find one at lowes / hd.
https://www.amazon.com/s?k=1"+NPT+x+3%2F4"+GHT
The reason it caught my attention is that valve is not well supported, and the longer pipe creates a lever, similar to how a wrench can turn a screw, any weight on the end will apply the force to the T which your new valve connects to.
I’m probably overthinking it. The force at the end of the day is not going to be that great.
post by iamdago on Jul 18, 2020
This one right? WKUP F001 NPT to GHT Adapter - 1 NPT Male x 3/4 GHT Male, Rubber O-Rings Included on Both Ends (Pack of 2) https://www.amazon.com/dp/B078KV2S93/ref=cm_sw_r_cp_api_i_CZOeFb54PKB0S
I have a bunch of left over pvc, I can make a support towards the end if that would be better. How hard is it to twist off the screw when you use screw cement?
post by Gene on Jul 18, 2020
This one is a bit cheaper, if you garden hose already has an o ring on it:
https://www.amazon.com/Garden-Adapter-Barrel-Water-Aquarium/dp/B077F6JLQW/
The other one (you’ve linked to) gives you 2, in case you wish to keep one as a backup, in that aspect it’s better (and comes with a replacement orings)
Didn’t know about screw cement. Leave it as is. I’m 90% sure that it will never be an issue.
post by Gene on Jul 18, 2020
A better solution for you will be to add support, using something like this:
https://www.homedepot.com/p/FIMCO-1-in-ABS-Snap-on-Saddle-Tee-9027/204333441
or
https://www.homedepot.com/p/FIMCO-1-1-2-in-ABS-Snap-on-Saddle-Tee-9029/204333418
In case the 1 inch version does not fit on 1 inch section of the pipe to the left, the bigger part should be able to go right over adapters. Simply run the pipe from that saddle into the ground and you’ll have a good support
post by iamdago on Jul 18, 2020
Nice nice, yeah that’ll work, i’ll get it tomorrow, i’ll buy extra pipe too, cause i have cut pieces, long pole would work.
post by iamdago on Jul 21, 2020
1
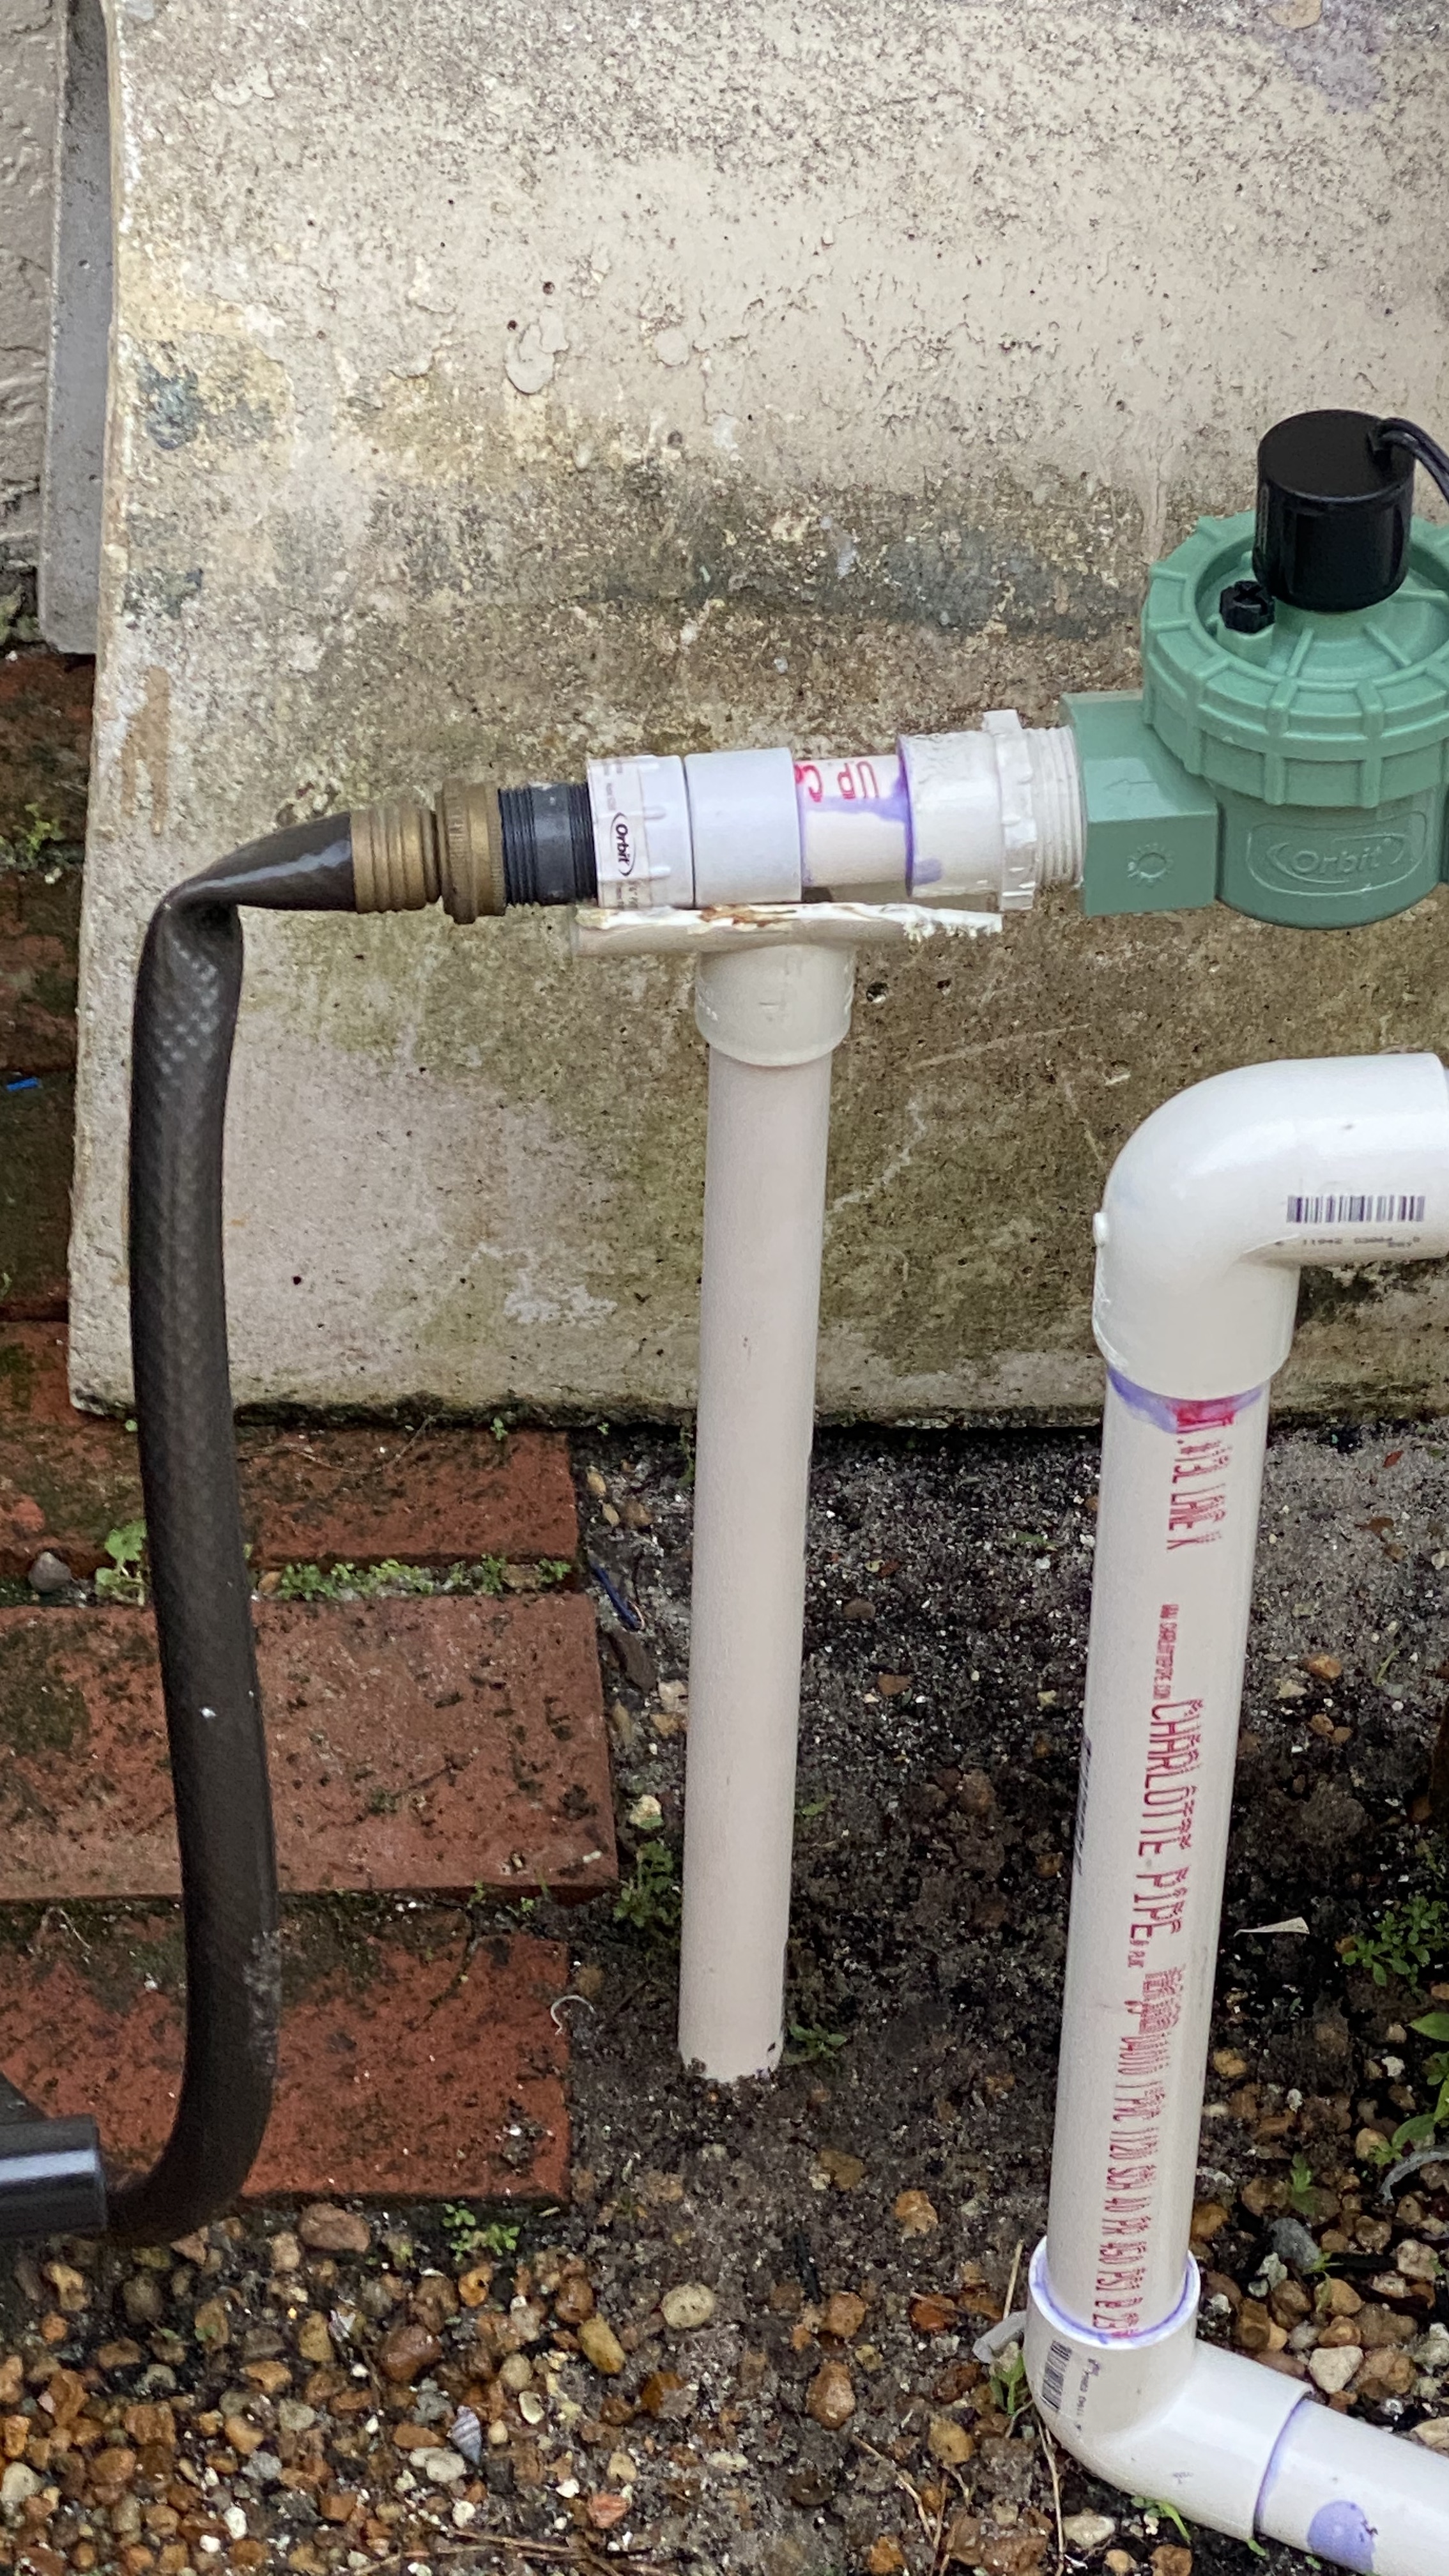
Gene](https://community.rachio.com/t/intermatic-mechanical-timer-replace/25406 "Load parent post")
Couldn’t find and no one could help at lowe’s or homedepot so I just made one.
Also rachio keeps disconnecting from internet and then i have to troubleshoot ( Nvm, made a ticket, after using that app and giving them code, they said it shouldn’t but if it does, do a static ip.)
\ image2268×4032 2.3 MB](https://community.rachio.com/uploads/db1097/original/2X/4/433df7614de234cc37ff768799d98317bced7952.jpeg "image")
post by Gene on Jul 22, 2020
How far away is your Rachio from the wifi router? Also what kind of a setup / wifi equipment do you have?
post by iamdago on Jul 22, 2020
When i opened a ticket they said I have moderate signal strength and good 2.4 wifi. I have good wifi, reaches outside I can use my phone beyond the router.
There is only two walls away and not that far.
Reply
New & Unread Topics
Topic list, column headers with buttons are sortable.
Want to read more? Browse other topics in Sprinklers & Irrigation or view latest topics.
Invalid date
Invalid date
Loading complete